
[ Titleblock ] [ Tutorial ] [ Get a Property ][ Get a Floor Plan ][ Draw a Floor Plan ][ Elevations ] [ Plot Plan ] [ Kitchen ] [ Model ] [ Section ] [ Paper-Space ]
AutoCAD is a little drunk when it comes to printing.
It’s like it was designed by a bunch of Engineers. But, if you’re willing to take a swig of what they are having, it will make a bit more sense.
In Hand Drawing: you draw a border, and you make your drawing fit within the border.
In AutoCAD: you create your drawing, then you make your border fit the drawing.
There are TWO REALMS OF EXISTENCE in AutoCAD:
MODEL SPACE – the infinite world where you create your drawing
PAPER SPACE – the sheet-of-paper portal into that world that you print. It has your titleblock and ALL your annotation
SHORT VIDEO ON WHAT TO DO. DETAILED STEPS FOLLOW.
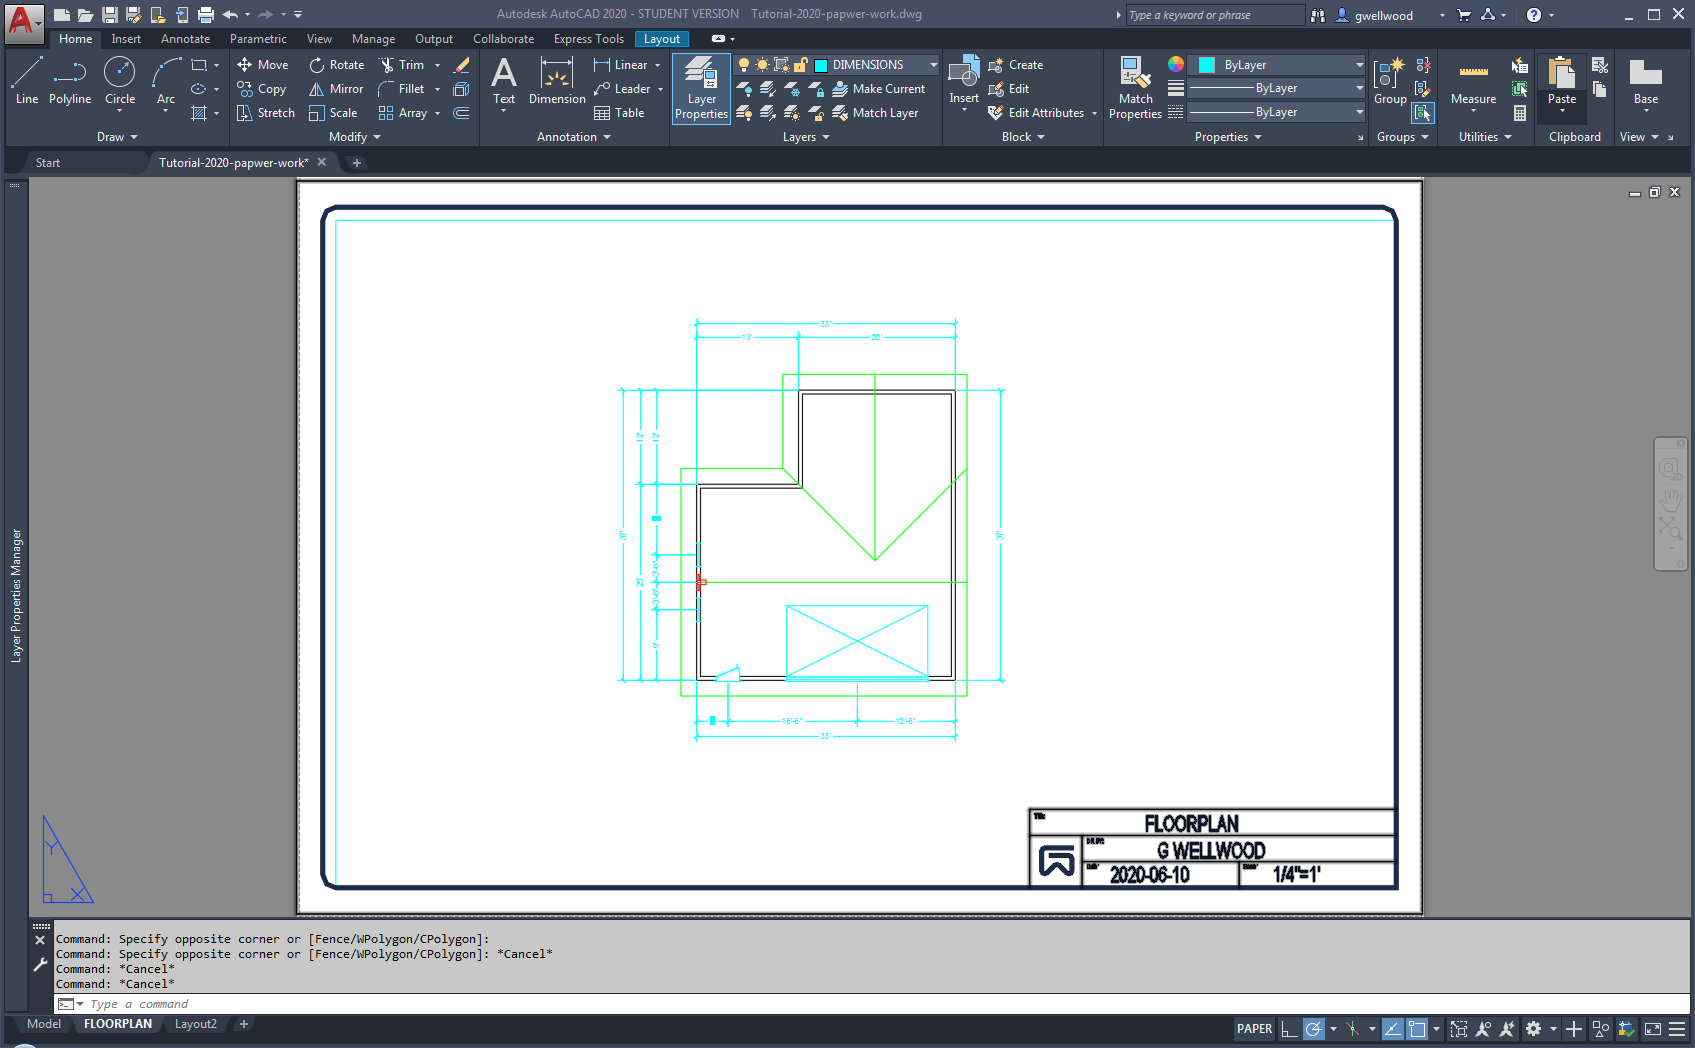
Let’s start with a drawing. Here’s a stripped down Workshop from one of my tutorials:

Down at the BOTTOM LEFT of your screen, you will see three tabs. So far, we’ve only been working in MODEL SPACE:
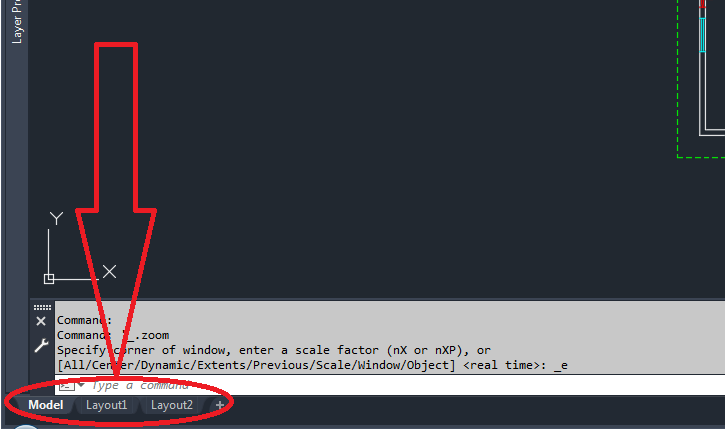
Now click on LAYOUT1. If there is no LAYOUT2 in your screen, that’s fine – it’s easy enough to add one.
You will eventually have different LAYOUTS for each “Drawing” – Floor Plan, Elevations, Plot Plan, Kitchen View, Structural, etc.
Just click the [+] to add a “NEW LAYOUT….”
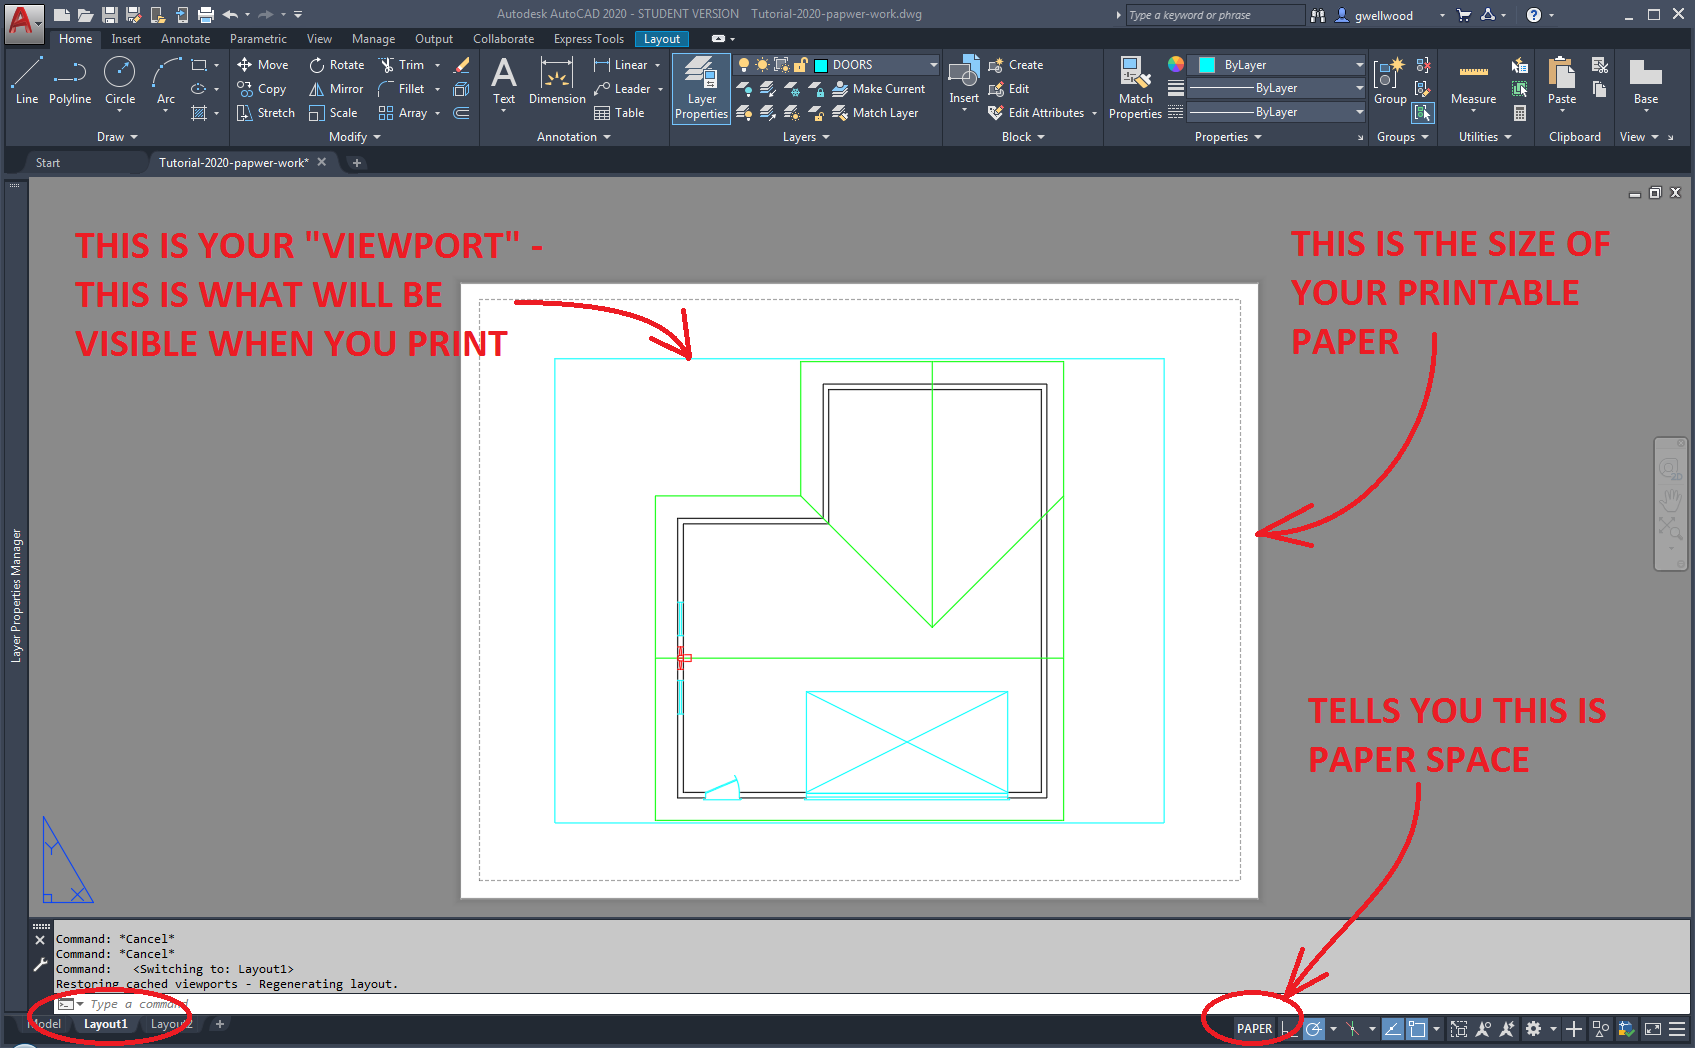
In LAYOUT1, you’re going to see your screen on a piece of paper.
Since we’re doing a FLOOR PLAN, I’d like to print it “Biggie-Size” on ARCH-D paper. ARCH-D is 2′ x 3′, and huge. I also want this to be PERFECTLY SCALED, but we’ll get to that.
Sometimes you need different paper sizes – not all drawings are ArchD
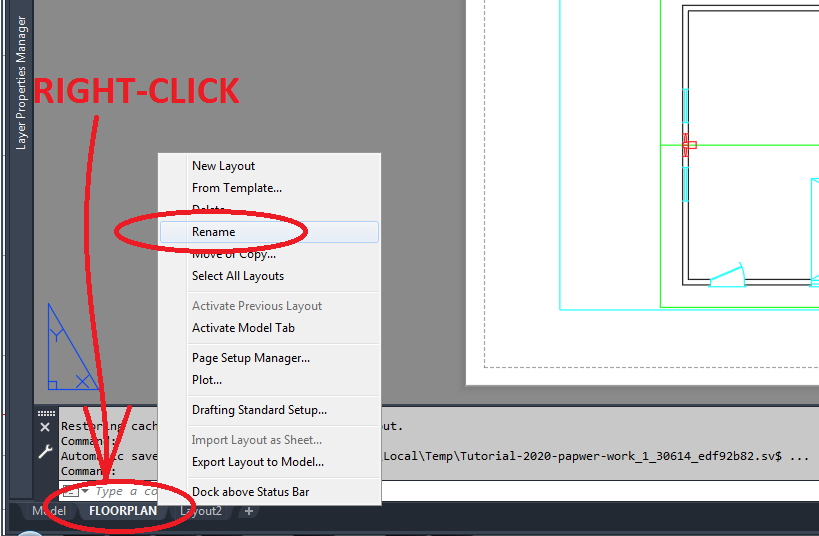
First, RIGHT-CLICK on the LAYOUT1 tab, and click “RENAME” and let’s call it FLOORPLAN:
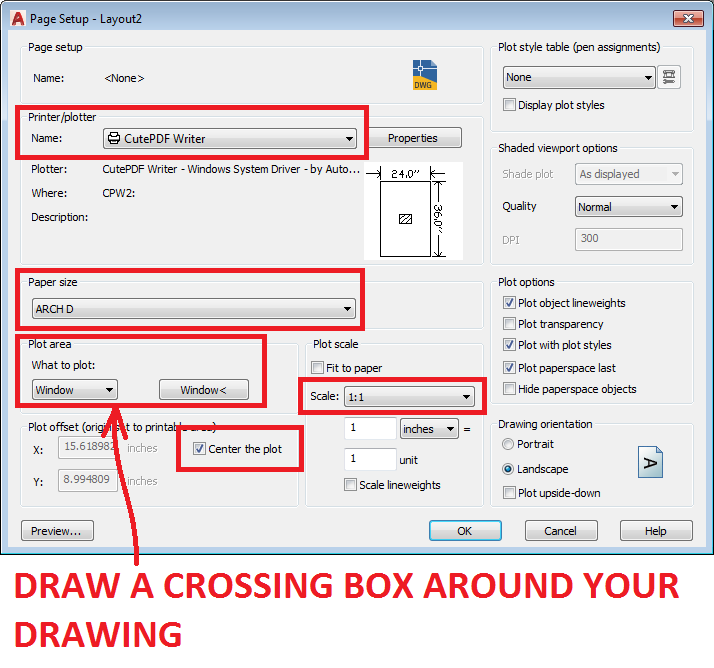
Now, RIGHT-CLICK again, and chose PAGE SETUP MANAGER, then pick MODIFY:
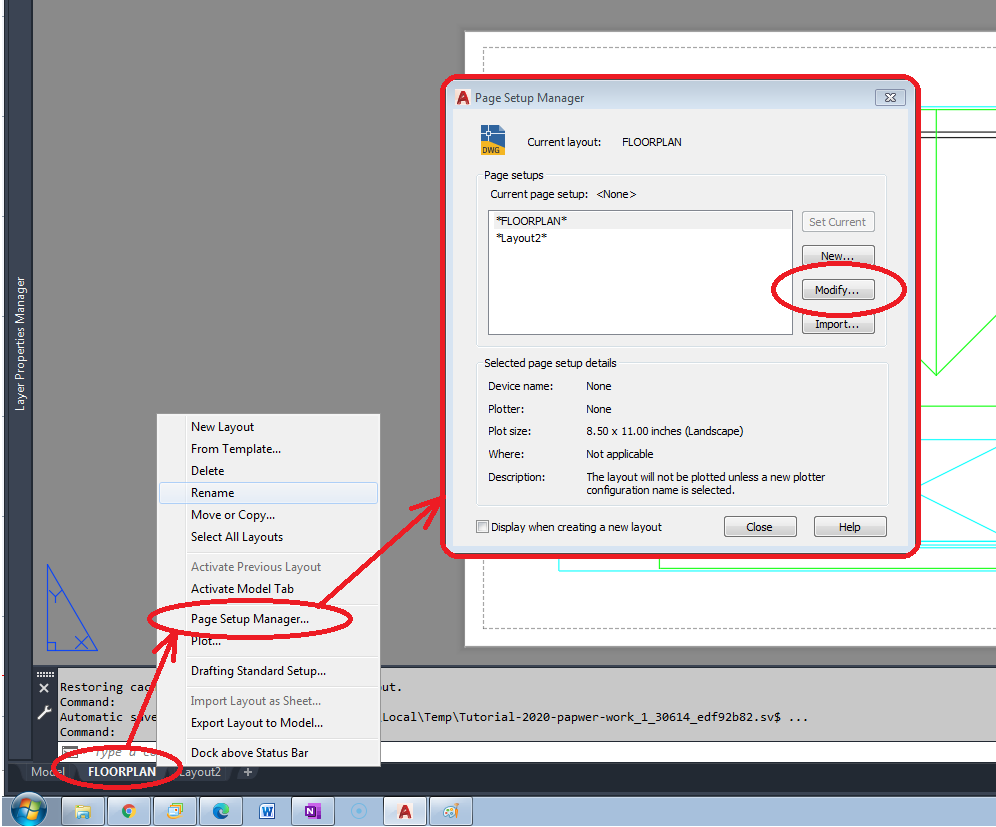
PAPER PAGE SIZES are based on the PRINTER you have
And I’ve found AutoCAD kicks my butt when I try to print directly to my printer, so I usually make AutoCAD make PDF files for me, then print the PDFs. We’re going to pick a PRINTER first!!
ANNOYING TIP #1: “PRINTING” is called “PLOTTING.” We PLOT here in Draftingland.

(I wrote this tutorial from home, and at home I use CutePDF Writer to produce PDF documents (Portable Document File – they’ve been around longer than you’ve been alive). You might have a different PDF option on your computer.)
FIRST:
Change the PRINTER (use Microsoft Print To PDF)
CHANGE the PAGE SIZE
Click “OK“
Go back into MODIFY again and THEN change the PLOT AREA click a box around the ENTIRE PAGE
INSERT your Titleblock (be sure to select Uniform Scale), clicking on the bottom left corner of the page as the INSERTION POINT.
If you have to, SCALE your Titleblock, using the bottom left corner as the BASE POINT, and scale it up or down until the right side of the border meets the right side of the page.

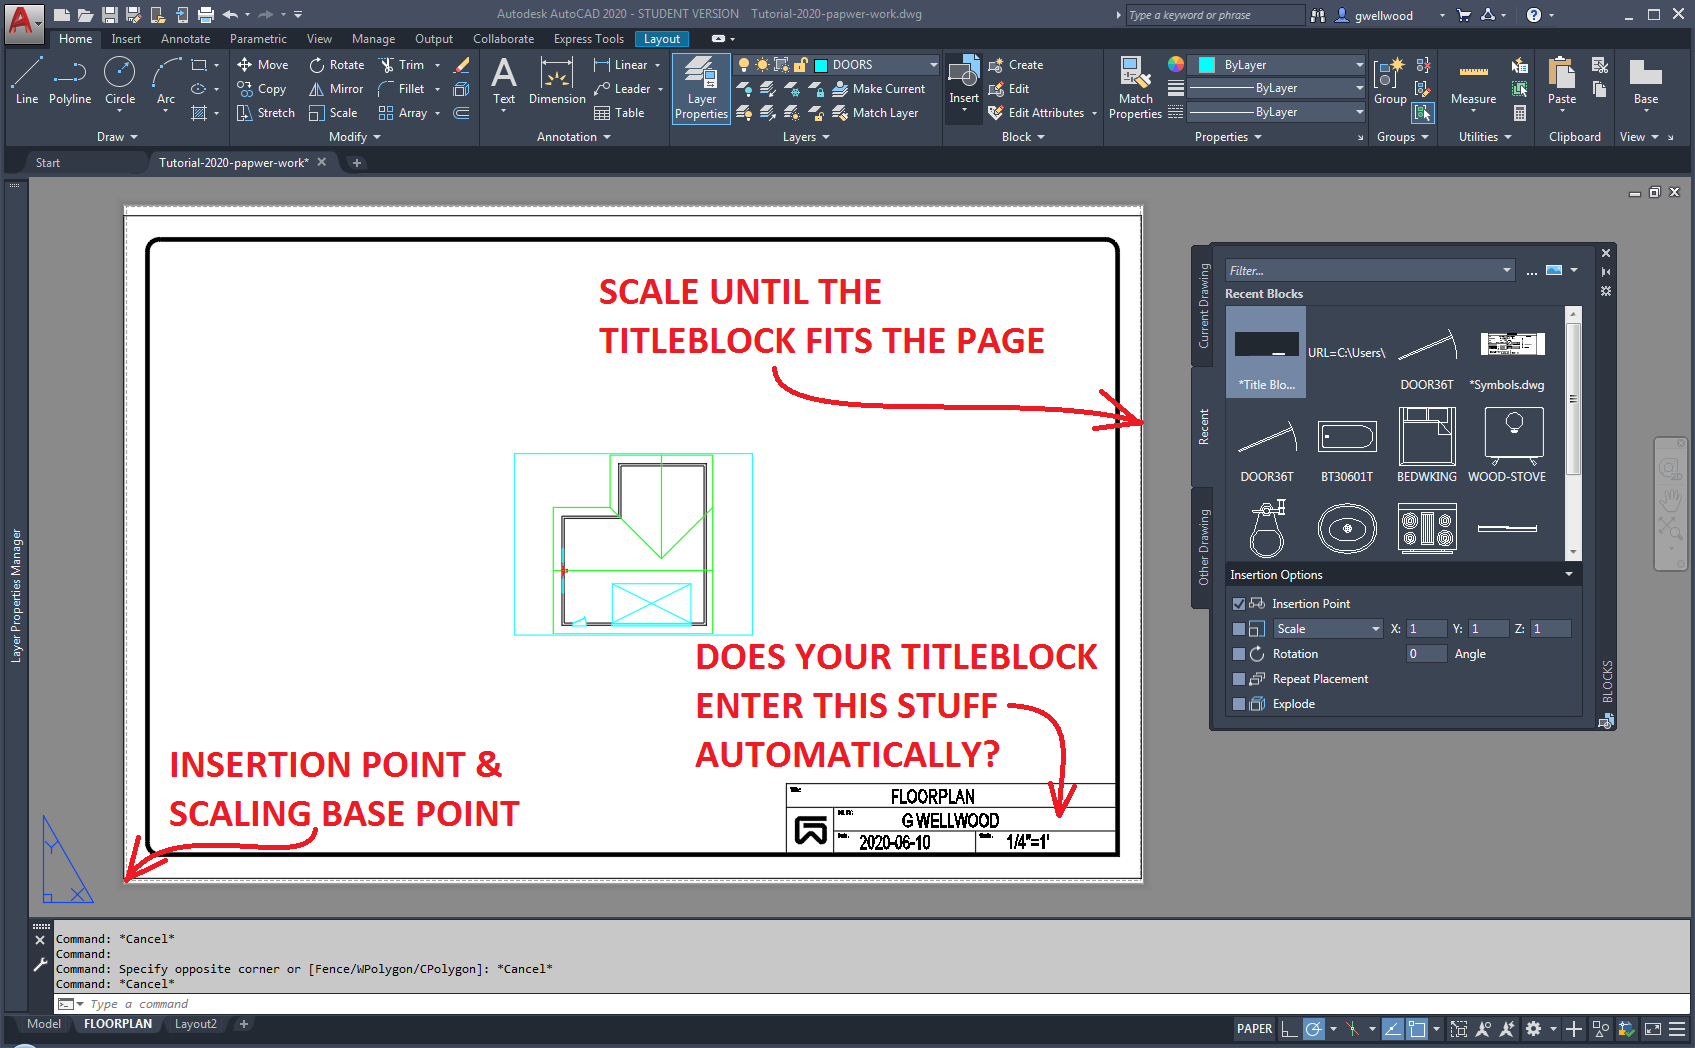
As your Titleblock asks for inputs, the Drawing Scale will be 1/4″ = 1′ for most Architectural drawings.
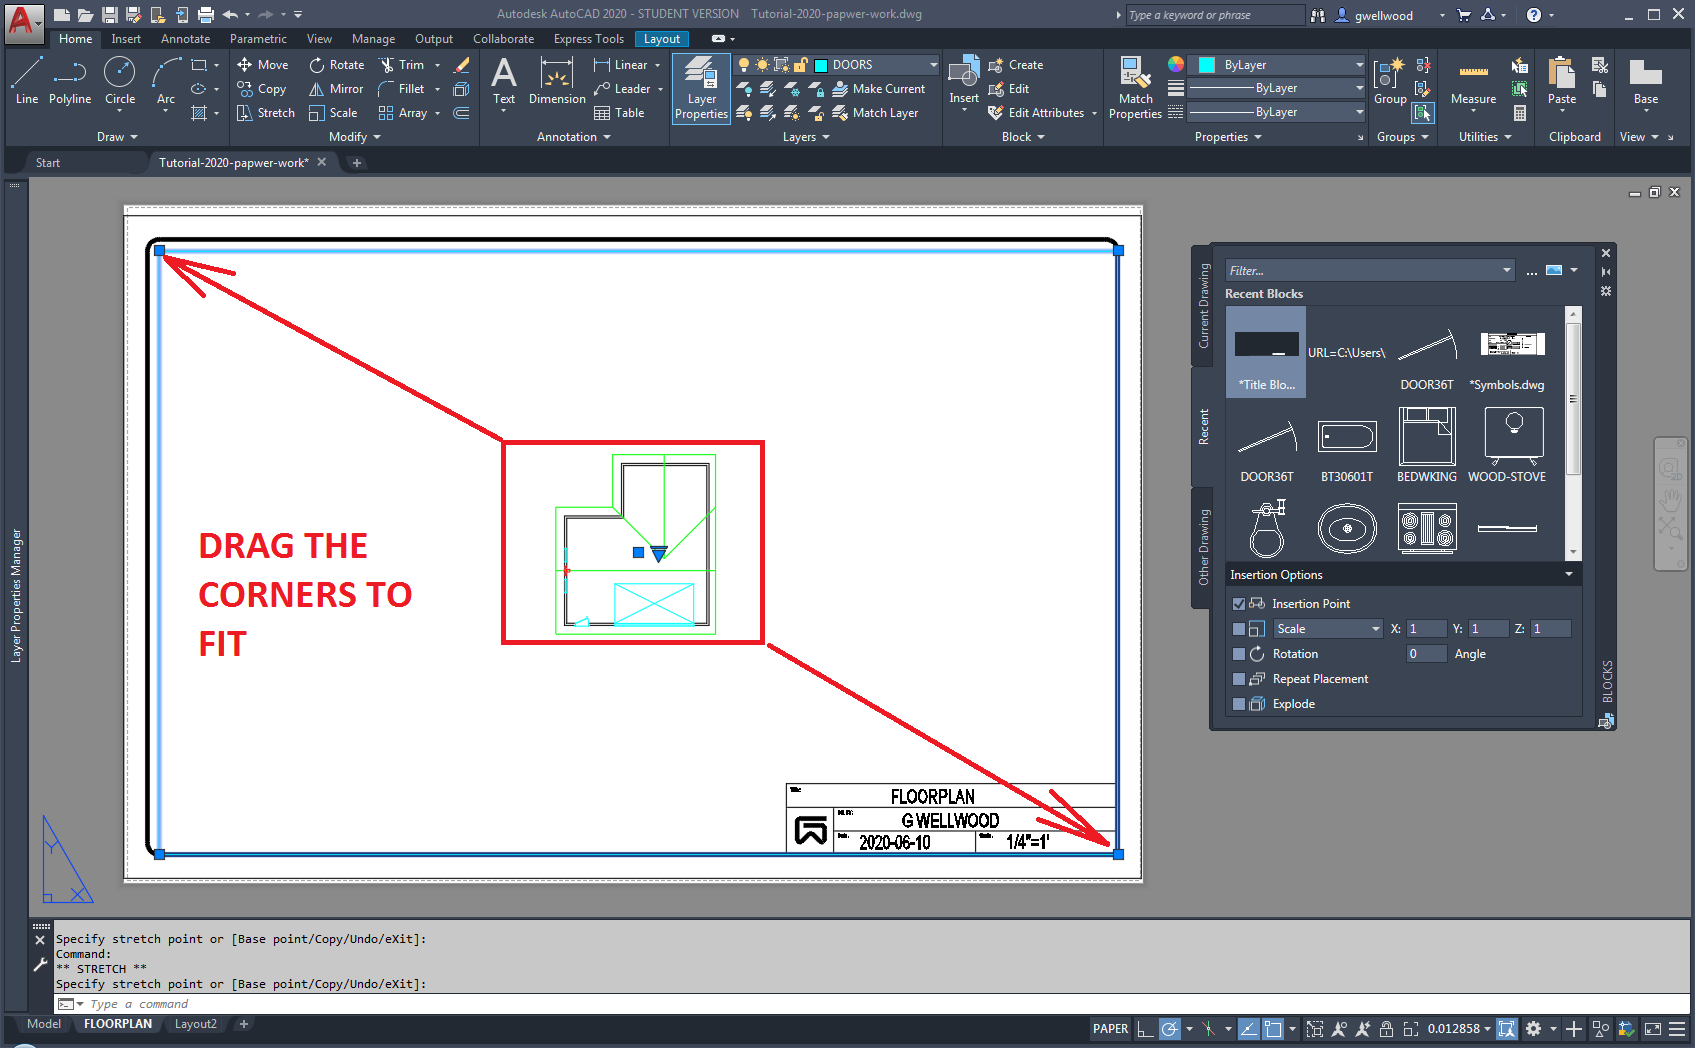
Now click the VIEWPORT BORDER (that box in the lower corner of your page, that used to be 11×8.5″) and DRAG it to fit to the extents of your PAPER SPACE so the view port border is not visible. the VIEWPORT BORDER is the window through the paper page into the infinite black screen world of your drawings – you want it to fill the page.
Now switch to MODEL SPACE by clicking on PAPER at the bottom (off-center) of your screen. If you play around with your screen, you will see that you can work with your drawing just like you can in the MODEL TAB as before, except now you can see the paper.
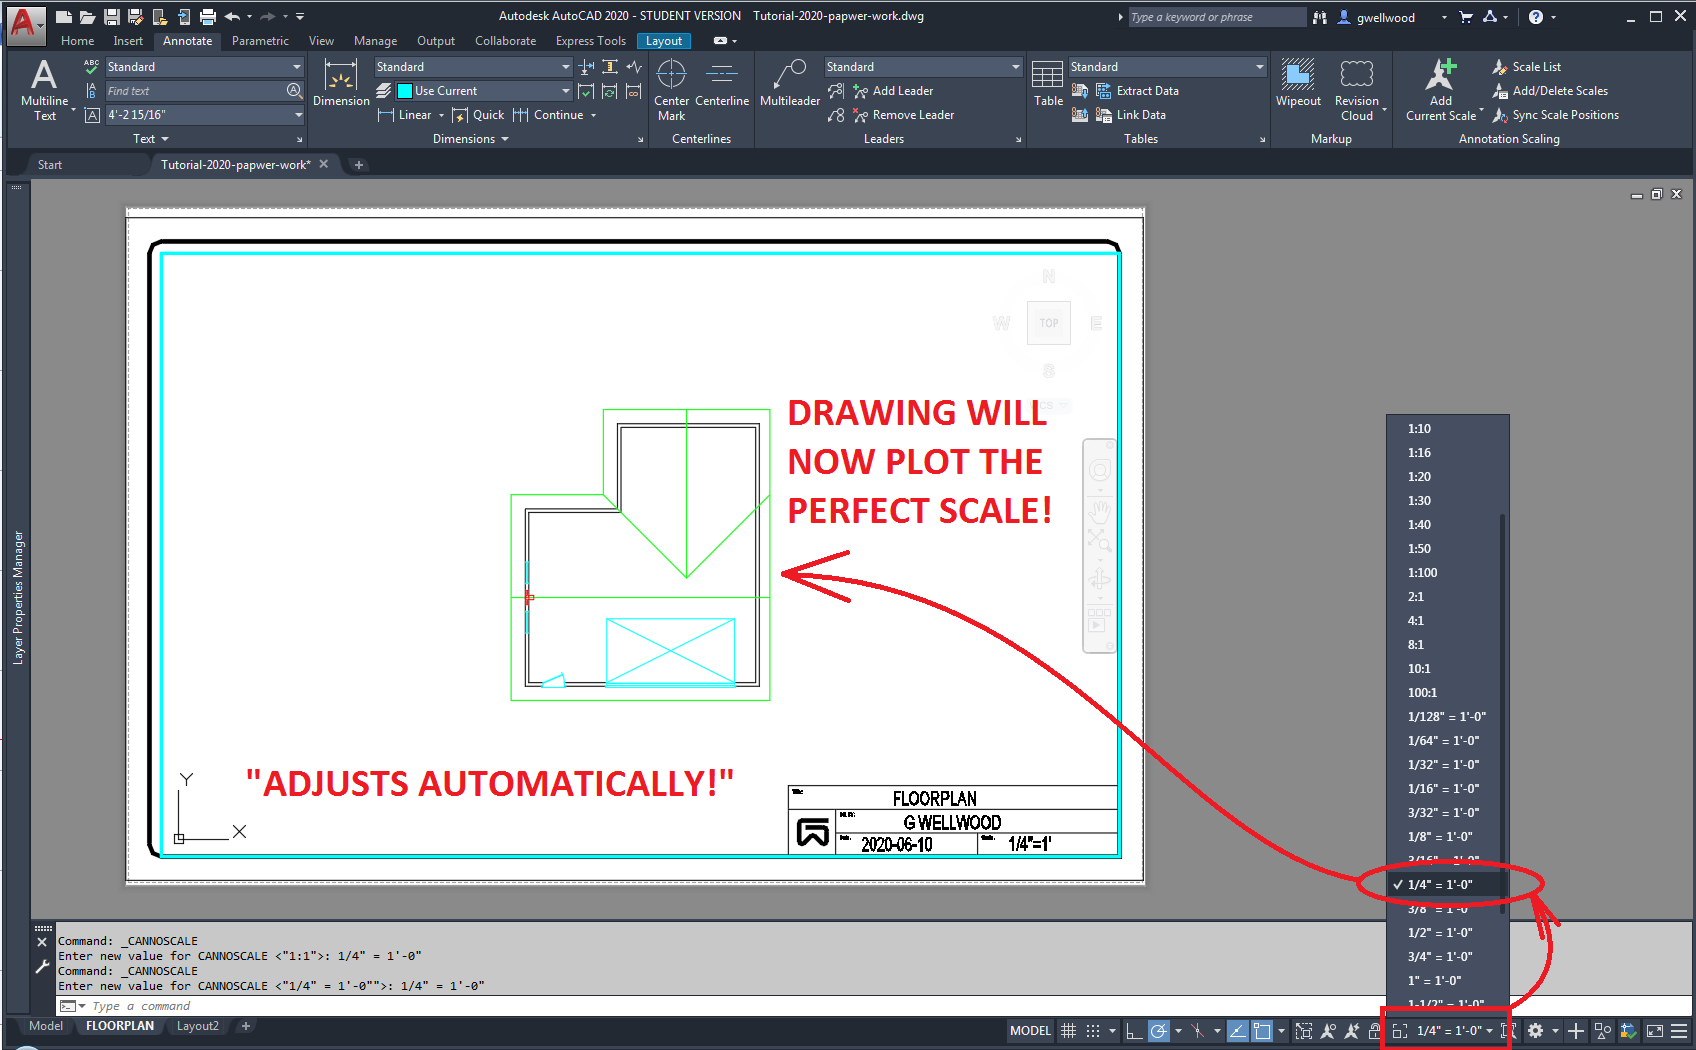
WE NEED A SCALE.
Since I cannot plot my structure FULL SIZE, we need to scale it down to fit the PAPER.
But you can’t just shrink it all willy-nilly!
In Drafting, it MUST be SCALED a PERFECT amount. AutoCAD can help us with that!
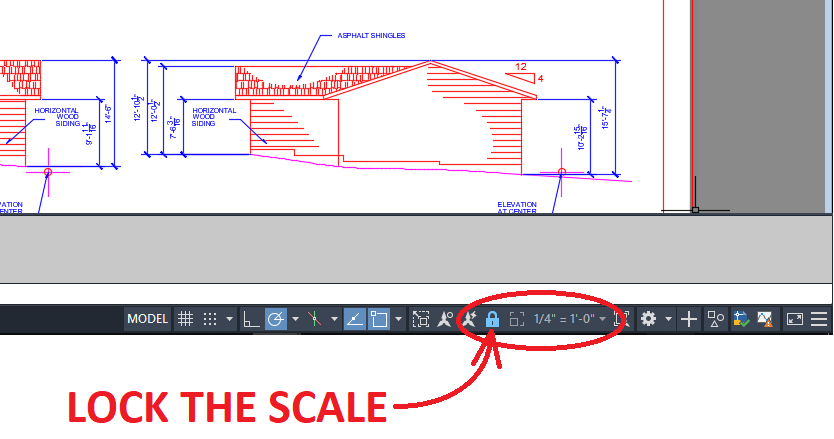
To do this, click the SCALE part at the bottom of your screen (see image below), select (in this case) 1/4″ = 1″. This scale means that anything that measures 1/4″ on this page is actually 1′ in real life.
You ever watch movies where Pirates are using dividers to figure out distances on a map? If they did not have an accurate SCALE, they would have no idea on distances. They would probably fall off the edge of the earth. Beyond here there be Dragons.
If this SCALE option is not showing for you, switch to MODEL SPACE like I just asked you to. It is not available in PAPER SPACE. Literacy; It gets you every time.
NOTICE I previously recorded the scale in my titleblock when I inserted it (it’s like I knew what I was doing!). You can always go back and change it, if you chose the wrong scale – just double-click your titleblock!
Now, IN PAPERSPACE, do all your annotation. All your LAYERS and everything work here.
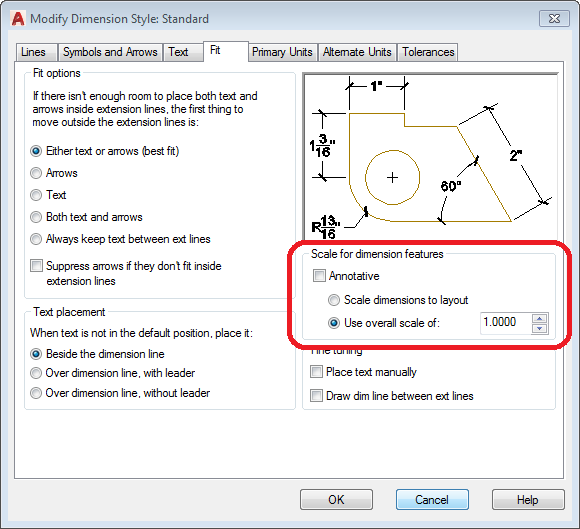
In this example, I have “USE OVERALL SCALE OF” set to 1 in DIMSTYLE -> MODIFY -> FIT
PLOTTING
Go to the BIG A, pick PRINT, then PLOT, check your settings, AND FREAKING PREVIEW IT!

If it’s all good – send it!