
[Automatics] [Differentials] [Engine Performance] [Boost & Nitrous] [Lifting & Lowering] [Balancing & Blueprinting]
QUESTIONS – Lifting and Lowering |
||
WHY? |
||
|
This is always the biggest question. And most people lie about why they did it. In all honesty, people lift and lower their vehicles strictly because it looks good. I’d bet that for 90% of the people out there function was NOT on the forefront of their minds. The other 10% actually did it for a purpose. The “real” performance enthusiast would lower their vehicle for better handling (due to a lower center of gravity, for instance), while the “real” off-road enthusiast would raise their truck for increased wheel travel and ground clearance. As with everything in modification, there is always a compromise you must make – and most folks ignorantly refuse to admit that there is a compromise.
TERMINOLOGYYou are going to have to know what I’m talking about. Here are a few terms that you need to know: Bump – How far the suspension travels UP. eg: hitting a speed bump Droop – How far the suspension travels DOWN. eg: driving off a cliff Roll – The lean of a vehicle body during a turn Roll Center – The imaginary point around which the body of the vehicle rolls. It is purely geometric and determined by the angles of the control arms, and the size and location of the tires, ground and the center of the body. Low is generally good. Jacking – The unloading of weight from a tire during a turn. Made worse by high roll centers. Spring rate – How stiff or strong a spring is – measured in pounds per inch (lb/in) or Kilograms per millimeter (Kg/mm). A 225lb/in spring will need 225lbs of weight on it to compress 1″. |
||
FUNCTIONAL ADVANTAGE |
||
LIFTINGIncreased ground clearance to clear obstacles Increased wheel travel (depending on how it’s done) to improve articulation over irregular terrain LOWERINGReduced center of gravity reduces “jacking” (weight transfer pulling weight off the inside wheel on a turn) Reduced frontal area – vehicle slips through airstream better (less aerodynamic drag under the chassis, as well as less air above ground being disturbed by the body)
|
||
FUNCTIONAL DISADVANTAGE |
||
LIFTING“Top-heavy” makes the vehicle less stable in emergency maneuvers Front-Rear brake balance upset due to greater weight transfer under braking Excessive bump steer (where bumps cause the vehicle to steer to one side regardless of what you do with the wheel) Drivetrain vibration and/or premature universal joint failure due to excessive universal joint angularity or incorrect (non-complimentary) angles due to pinion angle changes Excessive tire wear (depending on how it was lifted) LOWERINGSuspension bottoming can cause instability and loss of control Chassis hitting the ground can cause instability and loss of control Excessive tire wear (depending on how it was lowered) Excessive bump steer (where bumps cause the vehicle to steer to one side regardless of what you do with the wheel – depends on how it was lowered) Drivetrain vibration and/or premature universal joint failure due to excessive universal joint angularity or incorrect (non-complimentary) angles due to pinion angle changes Constant-Velocity joint failure due to insufficient bump travel in the axle itself Front-Rear handling balance upset (depending on the vehicle) Tire to fender clearance issue on bump and/or turns |
||
LIFTING SOLID AXLES |
||
|
Lifting is generally reserved for trucks, so I will focus on them here. I know there are a wack of Subaru fans who lift the older Subies – You can adapt what you learn here to how other vehicles are raised. Almost all 4WD trucks today use a solid axle with leaf springs on the rear. More and more trucks are using Independent Front Suspension (IFS), while the “real” four-wheelers convert their IFS trucks to a solid axle largely for strength reasons. Lift BlocksOn the rear, blocks can be used to raise the leaf springs higher off the axle. They usually come in 1″ to 4″ heights, in 1″ increments. They anchor themselves onto a center pin on the leaf springs, and a hole in the spring perch on the axle. Without this anchor, the whole assembly could slip out, and your truck will go wherever the heck the axle happens to be pointing at the time. Cheap Aluminum blocks have been known to split when off-roading. Steel blocks are much better. For this reason, you should NEVER fabricate your own lift blocks. Lift blocks also cause more spring wrap which can cause wheel-hop. When you accelerate, the tires want to move. The axle will react to this rotation, and will try to rotate in the opposite direction. This loads the leaf springs and begins to wrap them from a U shape to an S shape. If the load is enough to “snap,” the tire is “hopped” off the ground and the tire loses traction. I had one car that would do this so bad, it would leave 300 feet of one-foot-long skid marks when it peeled out. It eventually ripped the axle mounts off the car. Adding lift blocks makes this spring-wrap worse, as you have now given the axle a longer lever to bend the spring. Lift blocks are probably the worst/cheapest method of raising your truck. It also does not increase your suspension travel at all. For these same reasons (extreme braking cause the leafs to fold up), lift blocks are illegal on the front axle.
Axle Flip-KitsFlip Kits take an axle that normally sits above the leaf springs, and re-locates it below the leaf springs. This can gain a significant amount of lift. Since the axle usually hits a bumpstop, mounting it below the spring also gains suspension travel.
Longer ShacklesBack in the Muscle Car days, we used to put lengthened shackles on the backs of our muscle-cars and wanna-be-muscle-cars to get the back end way up in the air to fit oversized rear tires. This usually caused the back of the car to handle very sloppily as the shackle would flex all over the place. Today, I see many manufacturers have braced the two arms of the shackle together to make the part more rigid. Good idea. Unfortunately, lengthened shackles change the differential pinion angle slightly, which may cause some driveline vibration. Shackles only raise one end of the leaf spring, so in essence a 2″ longer shackle will raise the truck 1″ (depending on the location of the axle on the springs). You may need longer shock absorbers with these. Shackle-Flip kits are available too, for trucks that have the spring shackle go UP to meet the leaf spring. Lengthened shackles and shackle flip kits are permitted on the front axle to the best of my knowledge.
Re-Arched SpringsThis is a much better solution since the axle still stays close to the leaf spring and spring-wrap/wheel-hop is reduced. It also increases suspension travel, and with the addition of another leaf or two, load carrying capacity can be increased as well (at the expense of articulation). You will need longer shock absorbers with these. Re-Arched springs ARE permitted on front axles.
Longer Coil SpringsSome manufacturers use Coil Springs on the front of their 4X4’s – Jeep and Ford are two. The easiest way to raise these trucks is to get longer coil springs for them. Make sure you also use longer shocks too (not shock spacers), so you can increase your droop travel to match.
Coil Spring SpacersOf course, you may not be rich enough for new coil springs, so you could buy coil spring spacers. You could even use shock absorber spacers, since spacers do not increase travel at all. This is what the Subaru guys do with the little Subaru Chaser. Also the same sort of thing that makes a “leveling kit” for the four-wheelers.
|
||
STEERING!!Whatever method you choose to raise a solid axle truck, the single most important thing to keep in mind is the steering. Check out this mess:
First, let’s make a note: Yuck #1: Welded tubes to axle to raise truck Yuck #2: Braced welded tubes with marginal triangulation Yuck #3: Panhard rod (prevents axle from moving left-right – larger of the two diagonal tubes) is at an angle, which means that any bump will cause the axle to shift towards the curb about 20%. Yuck #3: Steering arm (connects steering box to spindles – smaller of the two diagonal tubes) is very small considering its length, has poorly designed (weak) gussets, and is at such an offensive angle, any bump would cause the steering arm to arc upwards, steering the truck into the ditch – EVEN IF YOU HELD THE STEERING WHEEL PERFECTLY STRAIGHT. The truck is being steered by bumps – called “bump steer.” Looks cool, but EPIC FAILYour question sheet will show you a very similar picture and ask you what is wrong – when you give me an answer that shows me you didn’t read this section, I’m going to make fun of you and point out this sentence. The biggest problem here is letting that steering rod end up angled. You want the panhard bar (axle locator) and the steering rod to be as horizontal as possible. This truck is so morbidly awful, a police officer would instantly pull it over and have it towed to the nearest inspection facility, where it would fail without question. The vehicle would be condemned and would never be allowed on the road again. The horror, the horror. How can you get that steering arm horizontal on a lifted truck? I’ve never seen it done effectively on trucks with a lot of lift. Some techniques involve relocating the steering arms on the spindles up high. These are available for some front axles, and are sold “For Off-Road Use Only” – not legal for the street. Other techniques involve using a dropped pitman arm, which bring the steering box end of the steering rod lower. A bent arm is a weak arm, and it will be likely to bend more easily. You cheap buggers cannot just heat and bend the original forged steel Pitman Arm – you WILL ruin its metallurgy and it WILL fail. For your safety, it is illegal to heat and/or weld steering components.
|
||
LIFTING INDEPENDENT FRONT SUSPENSION |
||
|
All torsion bar front ends are adjustable, but you cannot get a whole lot of lift (or drop, if you’re into that) with simple adjustment. Torsion Keys These change where the adjustment can be, providing a couple inches of lift. They sort of mess up your suspension geometry and you should get a wheel alignment after, but they also take away from your Droop Travel, what you do NOT want to do on a four-wheeler. Torsion keys are not my favourite method of lifting IFS, but they are affordable.
While many IFS trucks have a torsion bar front suspension that can be raised with a turn of a wrench, there really is only one correct way to raise an IFS truck – an engineered kit. These kits are simple – they bolt into the original suspension mounts on the frame, and relocate the holes lower. The factory suspension components then attach to the new bracketry just like they did before. Done. You do not gain any more suspension travel since you are still using the original suspension, just in a different location. Why not just crank the torsion bars up? Wheel alignment will go outside of specification – bad for tire wear and handling Bump steer may increase as you operate outside the factory-optimal range of motion Reduced droop travel may cause instability in emergency maneuvers if an inside wheel is pulled off the ground Excessive “jacking” and instability – the leaning body pulling weight off the inside wheel in a turn Now, I’m painting a pretty bad picture here, but you can get away with probably 1″ to 2″ of lift without suffering catastrophic death or anything. The more you change, the more compromises you make.
|
||
DRIVELINE VIBRATION
|
||
|
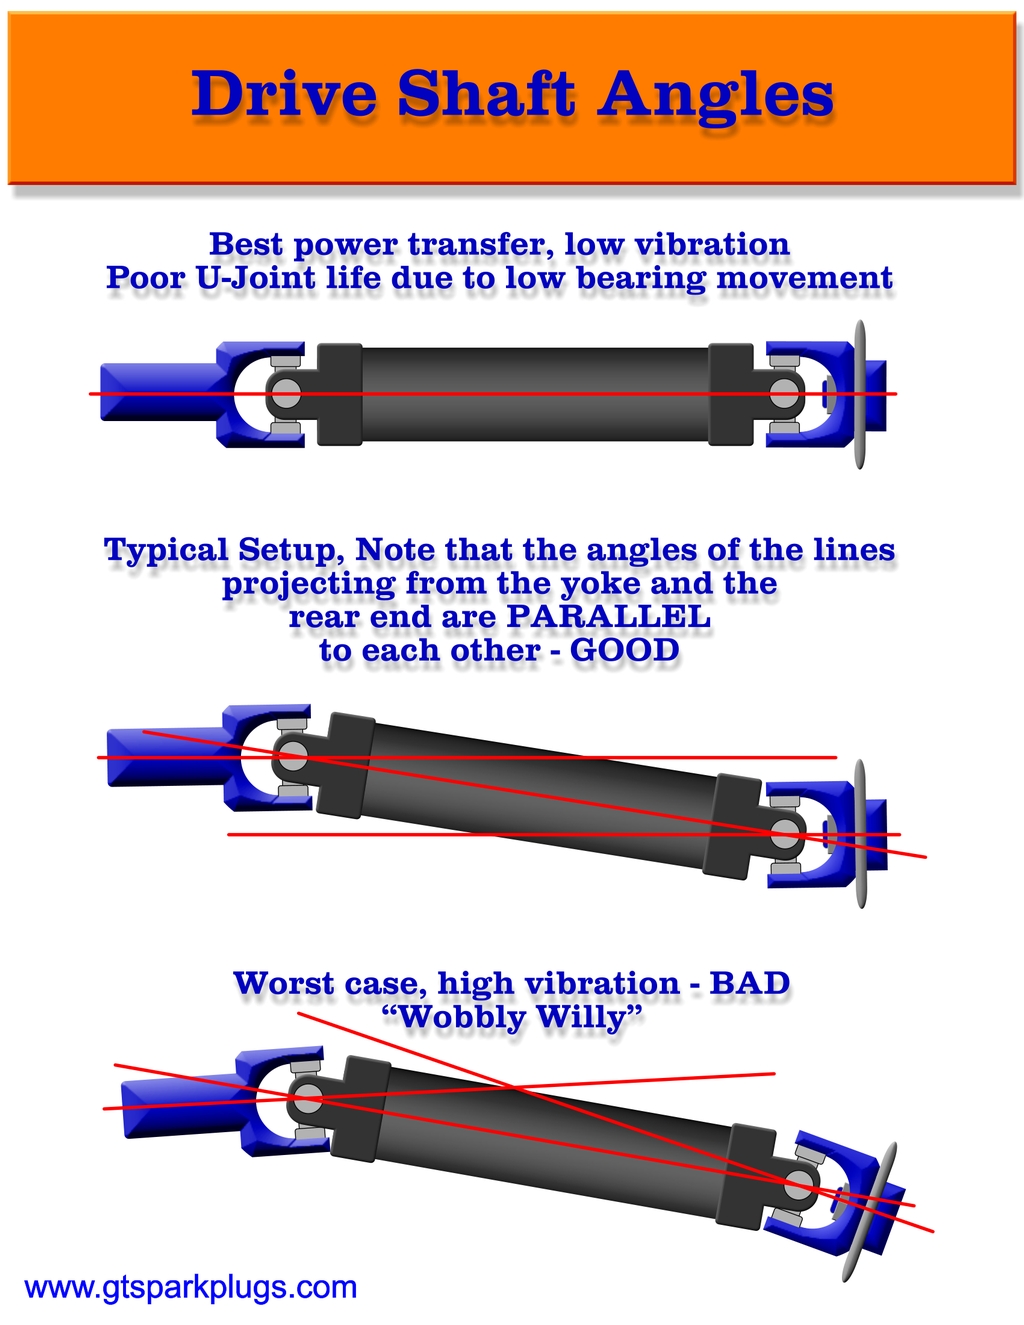
The angles of the drivetrain are critical to extend the life of the driveshaft universal joints, and to reduce the chance of vibration. The factory set it up to be the best of all worlds, but if you’re changing the ride height up OR down you are going to run into problems. The transmission output shaft AND axle pinion shaft need to be phased together. Check out this video:
Ideally, and you will find many a website and a video that suggest phasing the driveline like the middle image here:
This will usually work, unless your vehicle has been significantly lifted or lowered. You really want to have the transmission and pinion angles within 3° of each other, and no more than 3° “operating angle” at the driveshaft (the universal joint only turns a 1-3° angle). Problem is big changes will change that angularity. In which case you will have to make some compromises. You will have to break some rules:
These will likely still cause some vibration, but if you can keep the operating angle less than 3° if can be livable. It will often give a cyclical vibration (VIIIIIIiiiiiiiibbbbeee-VIIIIIIiiiiiiiibbbbeee-VIIIIIIiiiiiiiibbbbeee). At some point, you may need to get a different driveshaft made, one with a “Double-Cardan” or “CV-Joint” instead of a regular U-joint. Oh, and lift/lowering blocks? They make the pinion change MORE, so you might need to have MORE than a 3° difference of pinion angle. On a lowered vehicle you NEVER want the driveshaft to angle UP to a pinion pointing UP (making a “^” shape) – the operating angle will get WAY worse under acceleration as the axle rotates. |
||
BODY LIFT |
||
|
I don’t fully understand body lifts on trucks. The only purpose they serve is to fit larger tires. Why not just do a suspension lift and put those bigger tires to some real use? A body lift is done by unbolting the box and the cab and replacing the factory rubber insulators with aftermarket longer ones. It can be relatively easy to do (a weekend job, easy) IF the bolts are not rusted solid. If they are, you’re in for a real treat. Good luck. The amount of body lift you can do usually depends on how much slack there is in the wiring harness between the chassis and body, and how much you can “adjust” the steering and/or shifter linkages. I have seen some kits where you are told to cut a notch out of the floor so the steering shaft can actually fit.
|
||
LOWERING |
||
|
Lowering a vehicle often poses the exact same challenges and pitfalls as lifting does. The purpose in lowering should be to improve handling. Let’s look at the three different types of suspension (MacPherson struts, Double-Wishbone and Leaf Springs) and see how to lower each: |
||
MacPHERSON STRUTS |
||
|
This is the most common type of suspension at the moment. I’ll try to refrain from expressing my distaste for it.There are four ways to lower a Strut car: 1. Cutting Springs Don’t do it. Okay, you can do it, but don’t get greedy. Like cut no more than a coil or two off. This will actually make the spring slightly stiffer. Don’t believe me? Take a coil spring with a spring rate of 100 lb/in that has 10 active coils If we place 500 lb LOAD on that spring, the spring will compress 5” Travel = (Load) / (Spring Rate) Each of those 10 active coils are contributing 0.5” to the load Contribution = (Spring Travel) / (# of Coils) If we cut two coils off the spring, there will be 8 coils remaining, thus lowering the car 1in (the two coils that contributed 0.5″ each are not there any more) 8 coils, contributing 0.5” each, would compress 4” under the same load New Compression = (Coil Contribution) x (# of Coils) New spring rate would be 125 lbs/in, which is 25% stiffer than original New Rate = (Load) / (New Compression) Now that seems cool – we’ve made the spring stiffer AND shorter! A vehicle at a lower ride height will actually need MORE spring rate or it will bottom out hard and frequently! We need the “Lowered” spring to bottom out at the same force at the original spring. Let’s look: Take a coil spring with a rate of 100 lb/in. and let’s assume we HAD an original suspension travel (bump travel) of 4″, but is now only 3″ (you may recall we just lowered it 1″). We must hit the same BUMP LOAD with the shorter spring in order to prevent bottoming. Therefore the spring rate MUST be higher. Let’s see how much we need: ORIGINAL SPRING: LOWERING SPRING (1″ lower): So while the springs get stiffer the more we cut them, they do not get stiff enough to make up for how much they lower the vehicle. All the more reason not to get greedy. Strut cars also suffer from the roll center completely plummeting when the car is lowered. The roll center is the imaginary point around which the body rolls. The lower this goes, the more the body will roll (the pivot is really far from the mass – a long lever arm). The more the body rolls, the more the handling suffers – especially on strut cars. Harsh Reality: A lowered car does not necessarily handle better!
AFTERMARKET SPRINGS I once bought a set of lowering springs for a car I owned and raced. The stock springs were about 100lb/in, and these springs were 150lbs/in and lowered the car almost 2″. Unfortunately, the car bottomed out all over the place, and handled worse than stock. It was this car that started me learning about suspension design. In the end, I purchased a set of special-order custom-made springs that were THREE TIMES the factory spring rate (300lb.in), and only lowered the car an inch. The car handled a lot better, and actually rode better too, because it wasn’t bottoming out any more!
2. Lowering Springs Aftermarket springs are generally designed using the formulas above. The engineers usually do not appear to take into account increased body roll due to the lower center of gravity and the significantly lower roll center ~ most aftermarket lowering springs are too soft!!! The advantage, though, is that the springs will FIT. At some point, cut springs will become so short that they might fall out of their mounts at full droop, like when you have the car on jack stands or over a really really large bump. While the spring rates are often generally too soft, they are soft enough that most Original Equipment Manufacturer (OEM) style shocks can handle their somewhat increased spring rate. These fall more into the “looks” department than the “performs” department. Although some springs are available with adequate spring rates for performance.
3. Coilovers Coilovers for a Strut care is a misnomer. ALL strut cars are coilovers – the spring COILs OVER the shock. Marketing – go figure. The advantage of these over the OEM style spring, is that the ride height is usually adjustable through threaded sleeves, and that the springs come in standard sizes allowing the rates to be finely tailored for the application. Incredibly cheap coilover kits can be had on eBay, however the quality is often very poor, and the spring rates in these “universal” kits are almost always 450lb/in front, and 350lb/in rear – WAY too stiff for a strut car. But your average John Q. Consumer doesn’t look into these things when he buys them. These kits are designed to slip over the top of the strut body and rest against the original spring perch. They tend not to fit very tightly (the body should be wrapped in duct tape and smeared with silicone to “fix” the sleeve to the body), and the springs are often short enough to become unseated in droop (helper “tensioner” springs are sometimes installed. For these reasons coilovers have a reputation for being rather noisy.
4. Short Body Coilovers These are the way to go. First and foremost: the shock body is shorter, allowing full suspension travel. Many manufacturers do not provide you with enough suspension travel to begin with. Once you lower the vehicle, bottoming is assured. Bottoming the suspension causes the spring rate at the end that bottomed to go infinite – instant slide. You usually want to avoid this. While the spring height is usually adjustable, an desired feature is to be able to set the shock height within the strut body. This allows you to set the spring at ZERO pre-load, and adjust the vehicle height by threading the shock in or out of the body. Zero pre-load is desirable because it improves ride quality and allows full droop travel.
|
||
DOUBLE WISHBONE |
||
|
There are four ways to lower a double-wishbone suspension. Cutting Coils The same rules apply. Can you dig it? Lowering Springs Yup. Same. I knew that you could. Coilovers Not as common as with strut cars. Using coilovers here would require shock bodies that are designed to support the weight of the vehicle, which almost all are not. There are some specialty applications out there…. Dropped Control Arms These are interesting These are a specially made control arm where the location of the bottom spring mount has been relocated on the control arm. They do nothing to correct the resulting bad geometry issues that will cause tire wear (among other things), but they do allow you full suspension travel. The set shown here do not look as if an Engineer has been involved in the design process. Right-angle welds are stress-fracture-inducing wretchedness. These arms scare me.
Dropped Spindles Now these are cool. These are a specially made new spindle casting where the spindle itself is re-located higher on the steering knuckle. This maintains all the correct steering and suspension geometry, as well as maximizing suspension travel and tire life.
I have lowered an older Honda Civic by relocating where the shock mounts into the steering knuckle. Sits lower, and rides the same!
|
||
LEAF SPRINGS |
||
|
There are four ways to lower a leaf spring suspension: Lowering Blocks All the same rules apply for lowering blocks as for lifting blocks. They are, in fact, the same kit, they just lower when the leaf spring is underneath the axle (they lift when the spring is above the axle as per all 4wd trucks).
De-Arched Springs The same rules apply here as well – you’re just going the other way. De-arched springs are better than blocks. When de-arcing the leafs, it is important not to let the leaf spring go flat – the ride quality will suffer as all the leafs stack up. Also, the leaf spring shackle needs to stay in its “happy place” – 90° to the leaf spring or it will not allow the leaf spring to “lengthen” as it compresses.
Read the whole saga of de-arcing my leafs
Re-Drill Spring Hangar This works the same as changing the spring hangar, but it moves the other end of the leaf spring. The front leafs are unbolted from the chassis, and assuming there is enough room, a new hole is drilled higher up in the bracket. DANGER: NEVER have the front spring eye mounted higher than the rear spring eye – this will cause the rear axle oversteer when turning – this is exceedingly dangerous – the front eye MUST be lower than the rear eye.
Flip Kit If you are lowering a truck where the axle is below the leaf springs, a Flip Kit is used to relocate the axle above the leaf springs. Sometimes this will require a notch cut into the frame to re-gain some suspension travel. This usually requires shorter shocks. Shackle flip kits are available too, just like to raise a truck, relocating the shackle can lower a vehicle.
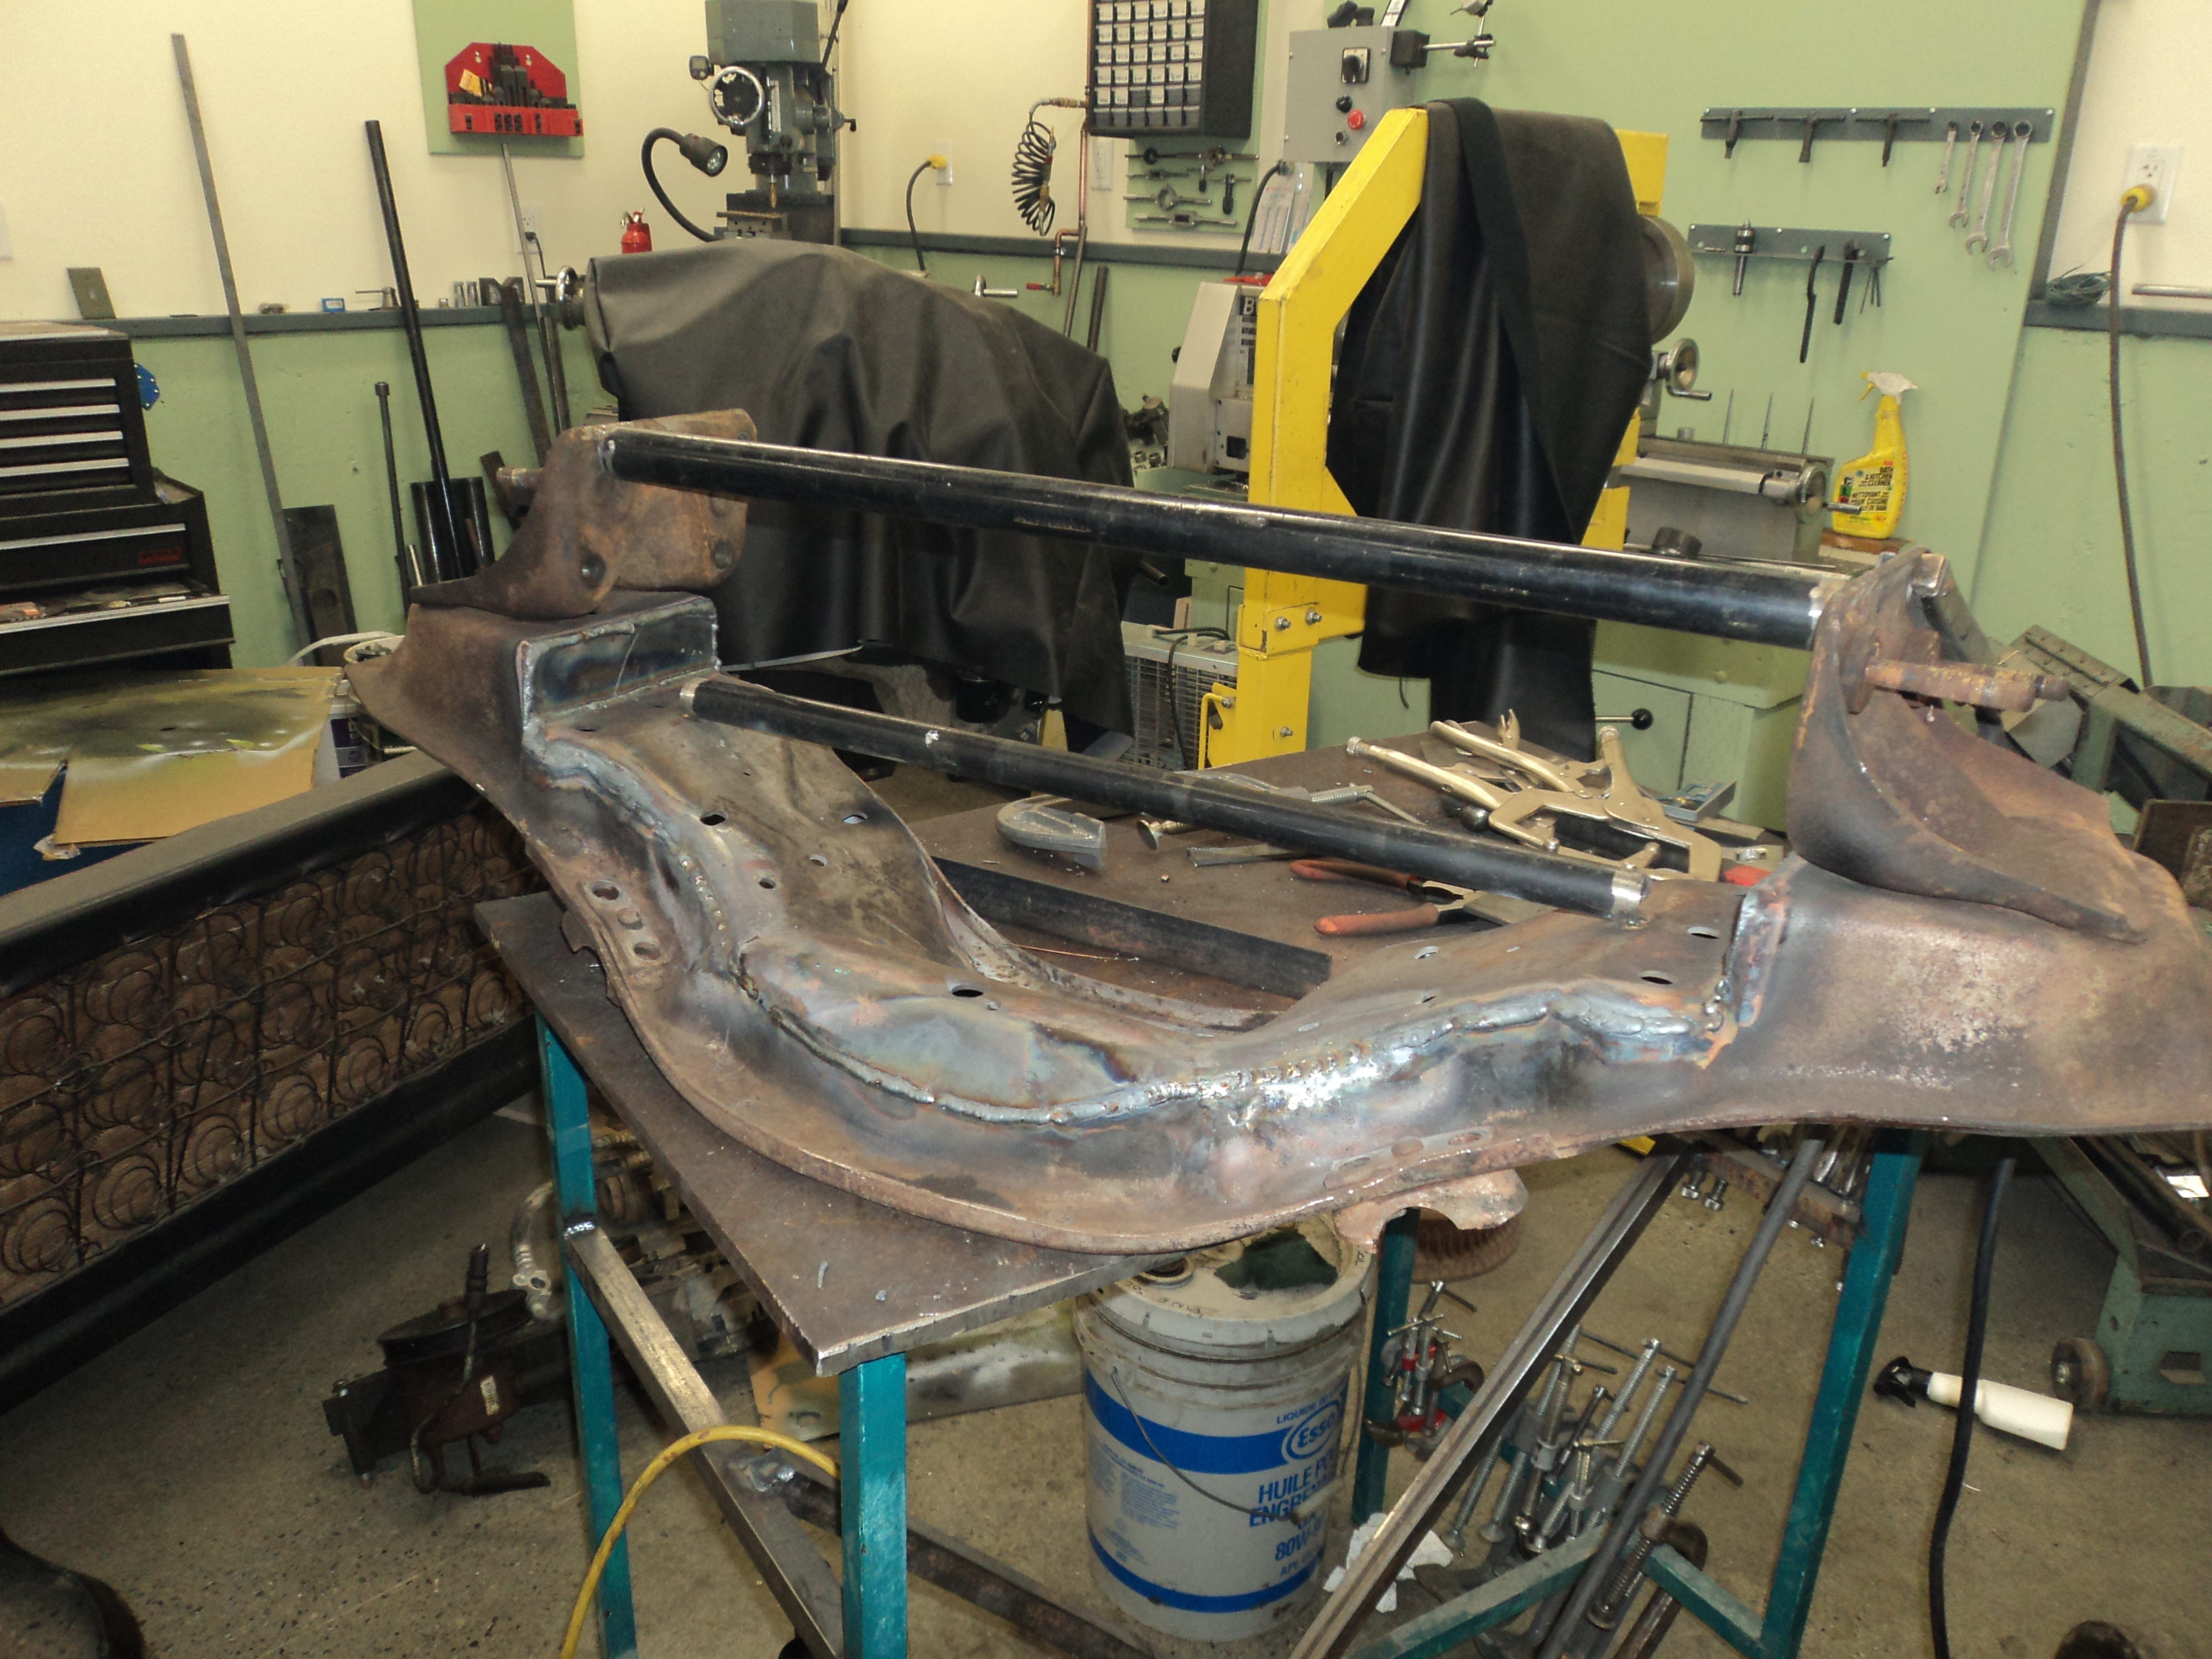
Oh, this is cool: I cut a 2″ section out of the front crossmember on my ’61 Chevy Apache (see the welded-in vertical sections at the ends of the lower black pipe? Oh, and the pipe is welded in before cutting, so the crossmember keeps its shape during the process). This moved the ENTIRE front suspension UP 2″, with no change in suspension travel or alignment settings. Nothing is free, though – there were other things I had to modify to make that all work….
|
||
4-LINK |
||
|
For the ultimate in radical suspension re-design (whether you lift or lower), a complete re-design is usually in order. If this is the case (and yes, it usually is), building a 4-link is the best way to go. Properly designed, a 4-link can give you the most travel while maintaining the correct pinion angle and handling geometry. There are many ways to set your links, but within the design there must be a way to keep the axle centered in the vehicle. Some designs use a Panhard Rod (actually a 5th link that mounts horizontally behind the axle preventing it from moving left and right), or as a Satchell link (I have met Terry Satchell) where two bars are angled to prevent left and right movement. ||||||||||||||| |
||
FOR THE CRAZY PEOPLE |
||
|
When you are ready to risk it all, there’s always hydraulics or air bags. Both systems allow full control over ride height. HYDRAULICSHydraulics use a reservoir of hydraulic oil, a pump, solenoids and four hydraulic rams acting on suspension springs to set and/or adjust the ride height. They use a lot of batteries to provide the current needed to run the electric pump, and the hydraulics tend to be leaky. Hydraulics can act very quickly, and are used in the cars you see “hopping” on TV. AIR BAGSAir Bags are much cleaner, and use an electric compressor, an air tank reserviour, solenoids and four air bags which replace the springs entirely. Air Bags act relatively slowly, although very high pressures can get them hopping. Bags can provide a very soft, floaty ride. NO FREE LUNCHBoth systems require extensive and often illegal mods to your vehicle to install. Both systems make is difficult to fit shock absorbers, leaving the ride dangerously uncontrolled if they are not installed. Mind you – some manufacturers are starting to develop bolt-on kits for the more common vehicles. If you can go this route, it’s the most hassle-free.
|
||