
[The Engine] [Cylinder Heads] [Engine Blocks] [Fuel System] [Ignition System] [Cooling System]
Click to Print – QUESTION SHEET |
||||
We are going to look at:
|
||||
HISTORY |
||||
| The Cylinder Block is strong and rigid, houses the crankshaft, connecting rods, pistons and cylinders. Usually made of Cast Iron or Aluminum. This bolts into the vehicle, and the transmission bolts to this.
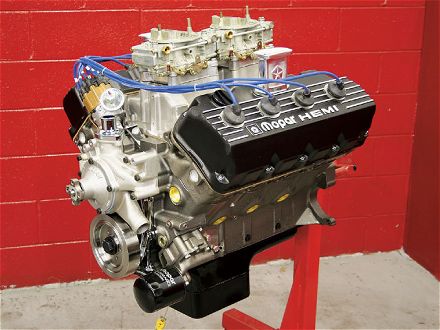
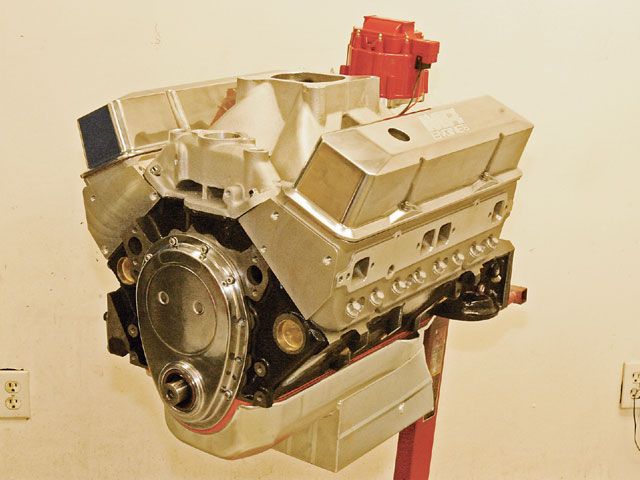
The ENGINE BLOCK: Holds all of the engine’s internal parts Holds the engine and transmission in the frame Gives the engine structural strength A Cylinder Block and an Engine Block are the same thing. I will use both terms interchangeably. A “long block” is an engine block that is assembled with cylinder heads, while a “short block” is an engine without cylinder heads. When you purchase a rebuilt long block, the engine does not come with intake or exhaust manifolds, oil pan or valve covers, water pump or (usually) timing cover. You would be using the parts from your old engine. A “crate” engine is a complete engine, top to bottom. You take it out of the crate, bolt it into the car and start it up. Different manufacturers will do some things different than others, but regardless of the differences, the basic engine is the same for all of them. If you can rebuild ONE engine, you can rebuild ALL engines. “An engine doesn’t know what name is on the valve covers”
|
||||
COMPONENTS |
||||
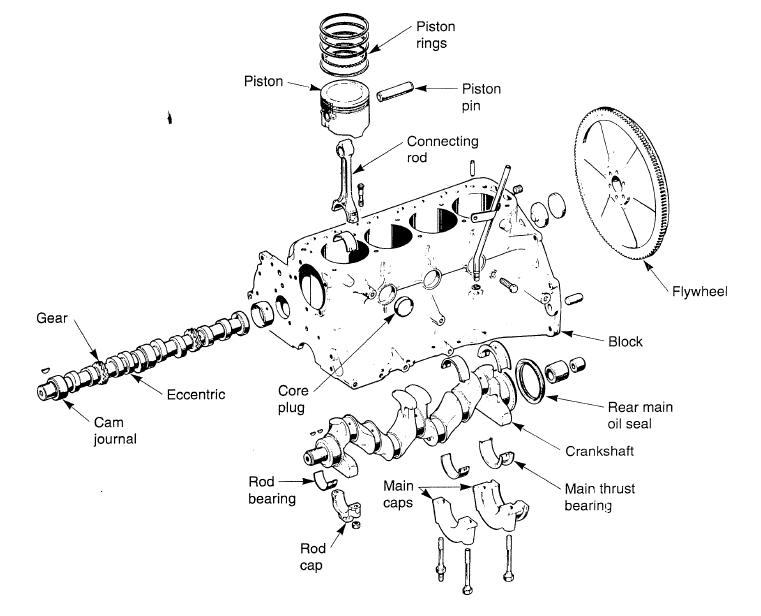
All Engine Blocks usually contain the following: CrankshaftReceives the force from the piston and connecting rod and turns combustion into a rotational force.
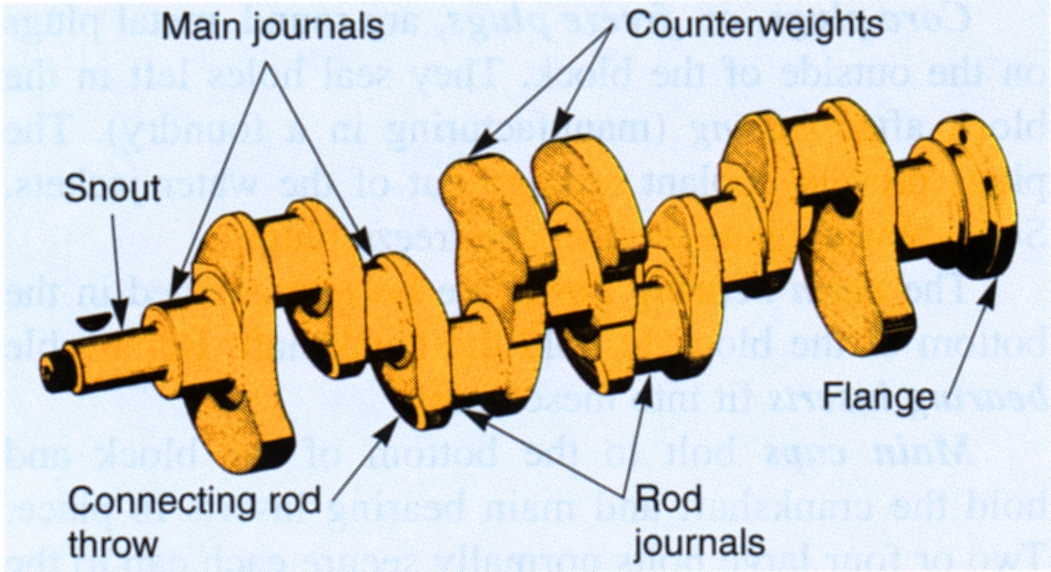
MAIN BEARING JOURNALS – support the crankshaft; the crankshaft rotates on the main journals ROD JOURNALS – the pistons connect to these via the connecting rods THROW – the distance from the Main JOURNAL rotational axis to the ROD JOURNAL centerline. The crankshaft STROKE is double the “throw.” COUNTERWEIGHTS – heavy mass opposite the ROD JOURNAL – it is sized and balanced to counter the weight of the piston and the big end of the connecting rod. When you change pistons, you should get the rotating assembly re-balanced. SNOUT – this is the FRONT of the crankshaft. Cam drive and pulleys connect there. FLANGE – is where the flywheel attaches to drive the transmission
Harmonic BalancerI wasn’t sure where to put this component in our theory – it’s vitally important, but it’s not actually inside the engine itself. The Harmonic Balancer absorbs vibration. Too much vibration from the guts of the engine running can (and does!) fracture or break the crankshaft. To absorb this vibration, a heavy ring of steel is glued to a rubber insulator band glued to a steel hub. This steel hub is keyed and bolted onto the snout of the crankshaft. The outer ring can “move” a little bit because of the rubber insulator, countering any vibration the engine might have. Rubber doesn’t age well, so when the insulator starts to crack and fail, the Harmonic Balancer gets replaced. If you are building a Race Engine, there are high-performance Harmonic Balancers that do a much better job of keeping your engine together. I have heard it said (I think from Keith at Flyin’ Miata) that EVERY Supercharged Mazda Miata that has had the harmonic balancer removed and an underdrive pulley installed (these delete the balancer) had BROKEN the crankshaft. The extra vibration of spinning a supercharger off the crankshaft by a belt was too much.
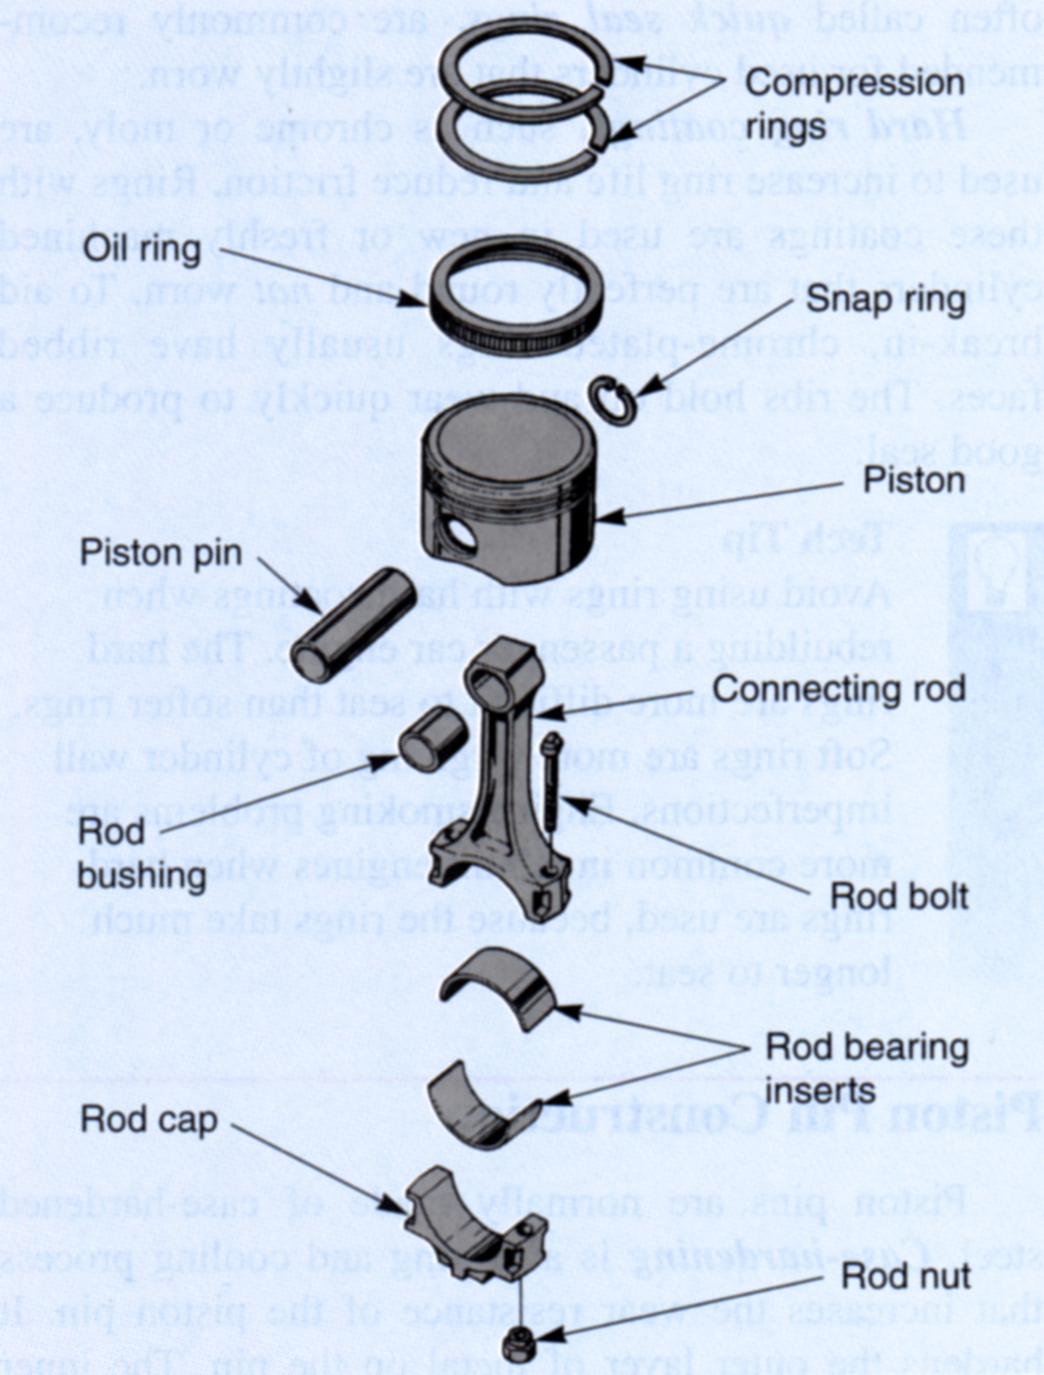
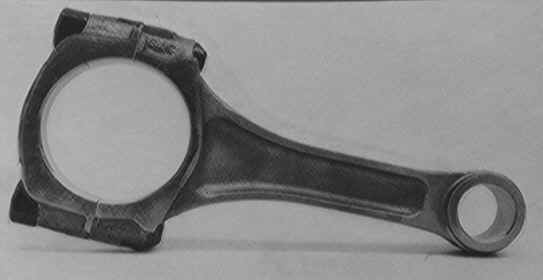
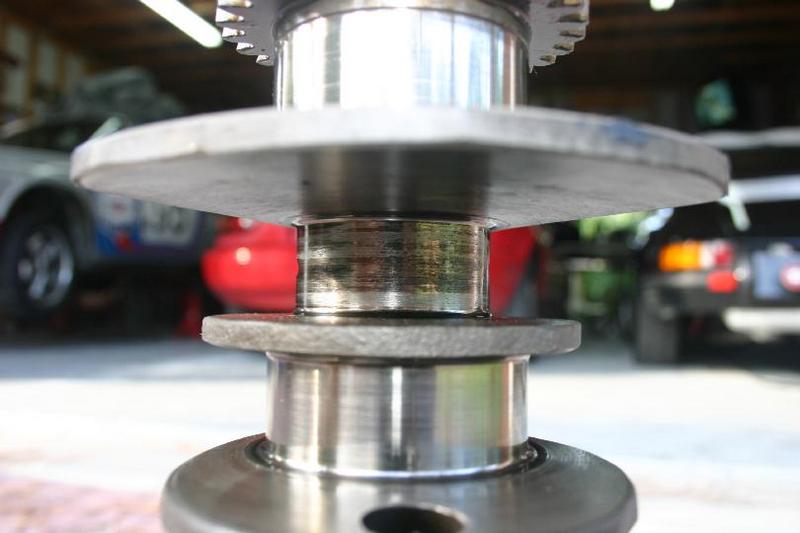
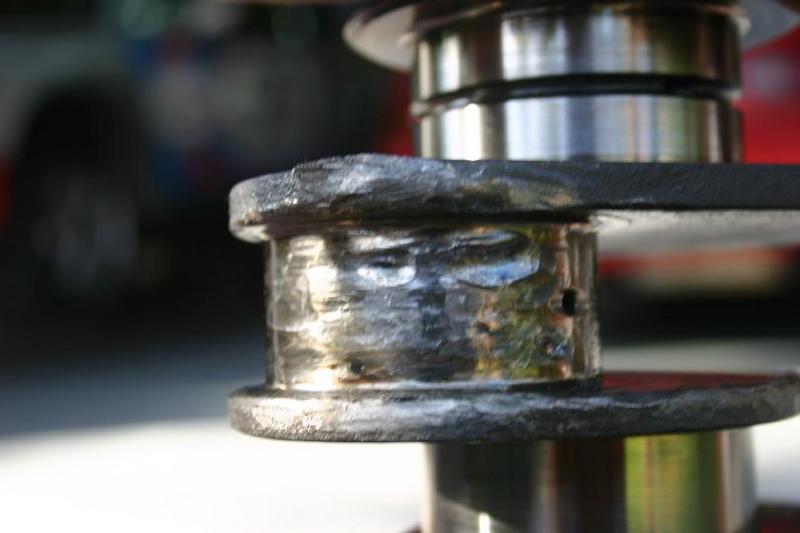
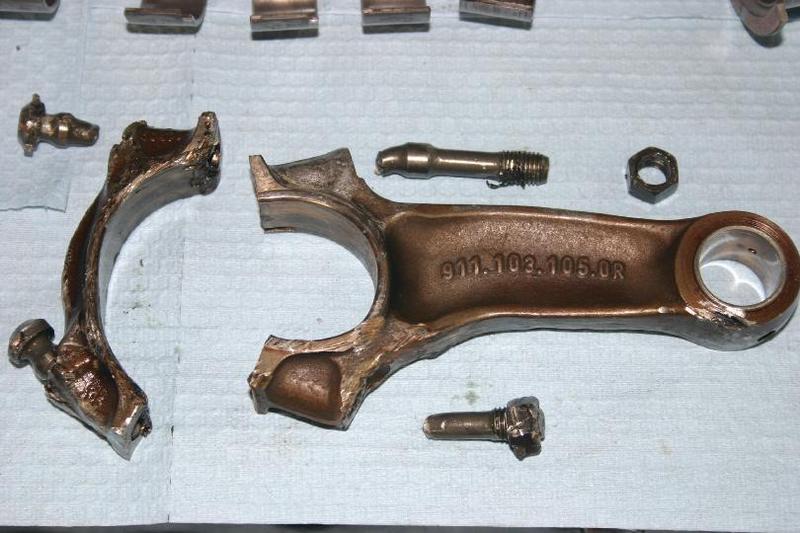
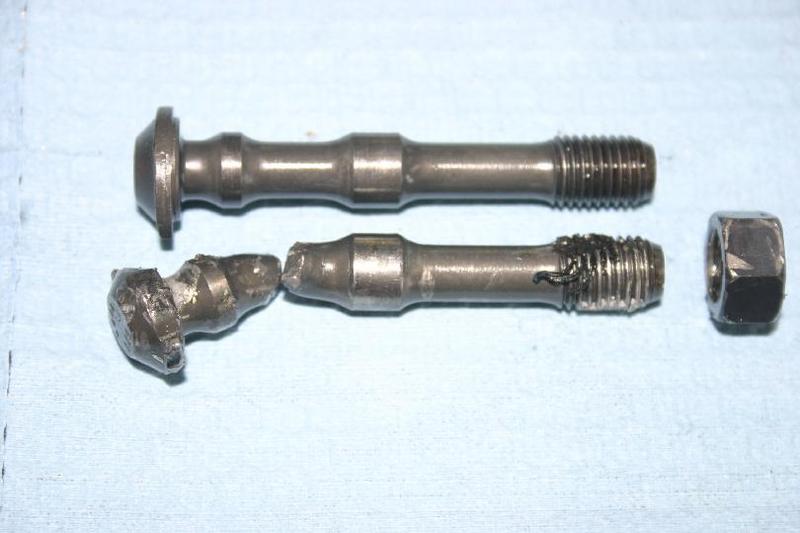
Connecting RodChanges the reciprocating (back-and-forth) motion of the piston to the rotating motion of the crankshaft. This has to withstand considerable force. When you blow an engine up – this is usually what breaks – either the bolts, or the rod itself.
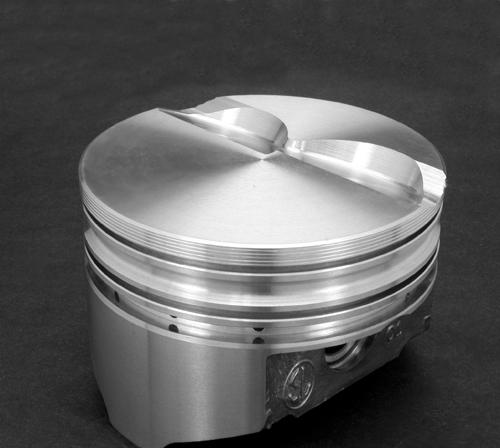
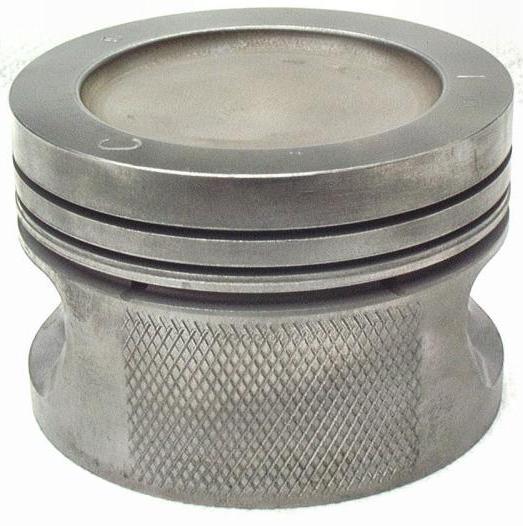
PistonDraws air and fuel in, compresses it, receives the force of combustion, and pushes the exhaust out.
WHY IS WEIGHT THE ENEMY?Weight has inertia and momentum (it wants to keep moving in a particular direction). In an engine, many parts need to constantly change direction.
To make an engine survive at high RPM, components need to be as LIGHT as possible, yet STRONG enough. You young guys who want to rev your engine to the freaking moon, or bounce off the rev-limiter in parking lots, are always surprised when the engine GRENADES. Not me, I’m not surprised at all. Oh, by the way…. One of the WORST THINGS YOU CAN DO TO AN ENGINE is to rev the snot out of it with NO LOAD against it. Bouncing off the rev-limiter in neutral is an ENGINE KILLER! You don’t want to be an Engine Killer, do you? EVEN WORSE? Doing that when the engine is COLD! In a racing engine, we try to make things as light as possible, yet even stronger than they were before. This usually means expensive and exotic materials. You want your engine to last? Keep the revs down! Interestingly: a Wankel Rotary engine, which is ONLY rotational motion (no pistons to stop and start), makes much MUCH more power for its size.
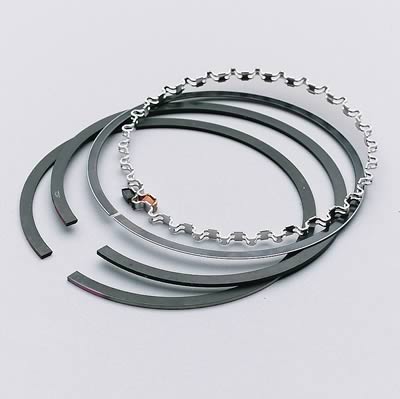
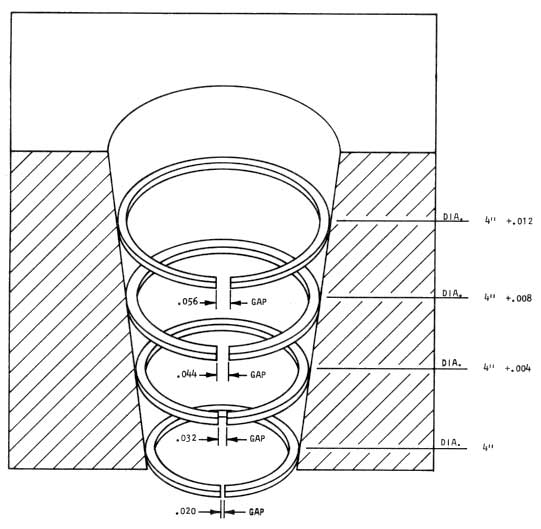
Piston RingsSeals the cylinder so nothing from the cylinder gets into the crankcase, and nothing from the crankcase gets into the cylinder. The rings can be made out of a variety of materials (cast iron is common – cast iron breaks easily). The rings have GAPS so they can be installed into GROOVES in the piston. The Gap needs to be a specific size for the engine, so that as things HEAT UP and the rings EXPAND, the ends do not touch. If they touch, the will buckle and BREAK your pistons. More gap is safer, but will burn oil because big gaps do not seal well. Rings are also “springy” – if you overheat the engine because you didn’t look after the cooling system, you will bake the “springiness” out of the rings, and it will lose power and burn oil.
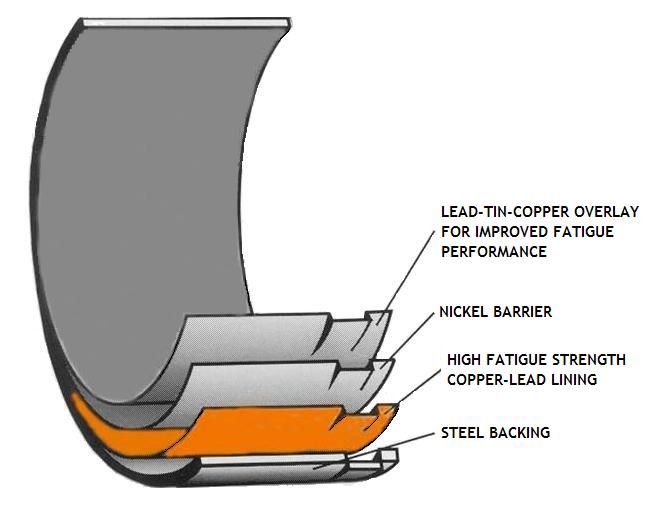
Bearing ShellsProvides a soft, replaceable surface for support moving parts to ride on. Usually lubricated by oil from the lubrication system (in fact, if the oil is doing its job, the parts will ride on a thin cushion of oil, not metal-on-metal (kind of like hydroplaning in your car) – cool, eh? The oil clearance is about 0.0015″ – the thickness of a hair on my head. There are MAIN BEARINGS which support the actual Crankshaft. There are CONNECTING ROD BEARINGS which support the Connecting Rods. There are (usually) CAMSHAFT BEARINGS which support the Camshaft – on a V-engine they are usually PRESSED into the block. ALL V-engines have cam bearings, but not all an Over Head Cam engines use cam bearings – the cylinder head itself is the bearing surface. We currently have a 5.3L Chevy LS in the shop where one of the press-fit cam bearings came loose in the block and welded itself to the camshaft! (I use Red Loctite on the cam bearings when I install them to help prevent this from happening)
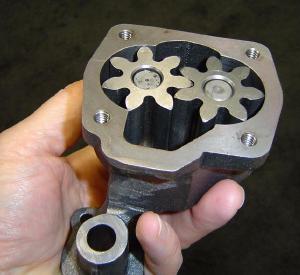
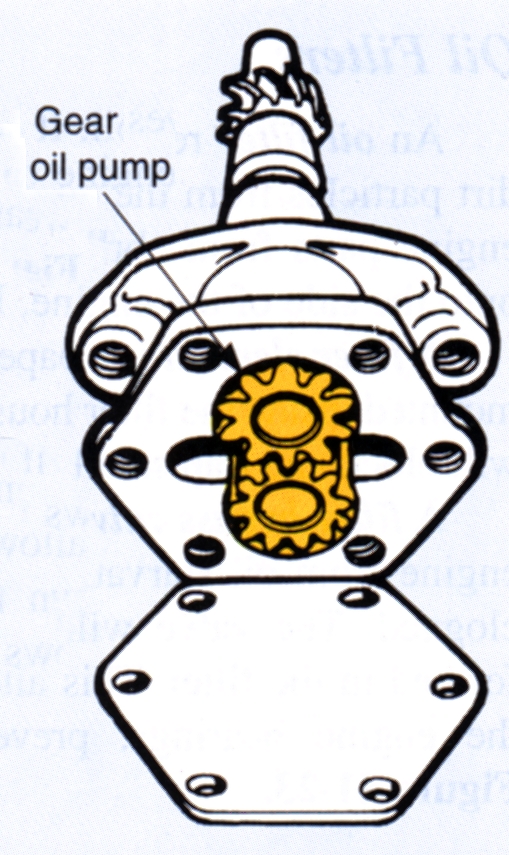
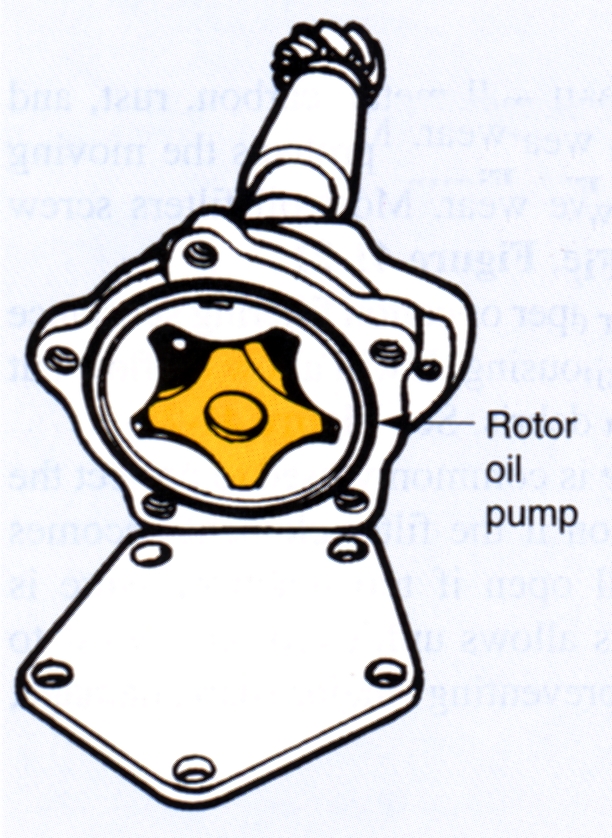
Oil PumpDraws oil from the oil pan (also called the sump), and pressurizes oil through oil passages in the engine block and crankshaft to lubricate all moving surfaces. Oil is run through a filter so that any impurities can be removed from the oil. The oil pump is often driven directly off the front of the crankshaft, or by a shaft off the bottom of the distributor. You can always buy stock oil pumps (you’re in there – why would you NOT replace the pump? It’s the lifeblood of your engine!), but you can often buy high volume oil pumps, and high pressure oil pumps, depending on what you want. Oh, by the way: You want your engine to last a long time? Change the oil! Change it regularly. I change mine every three months!
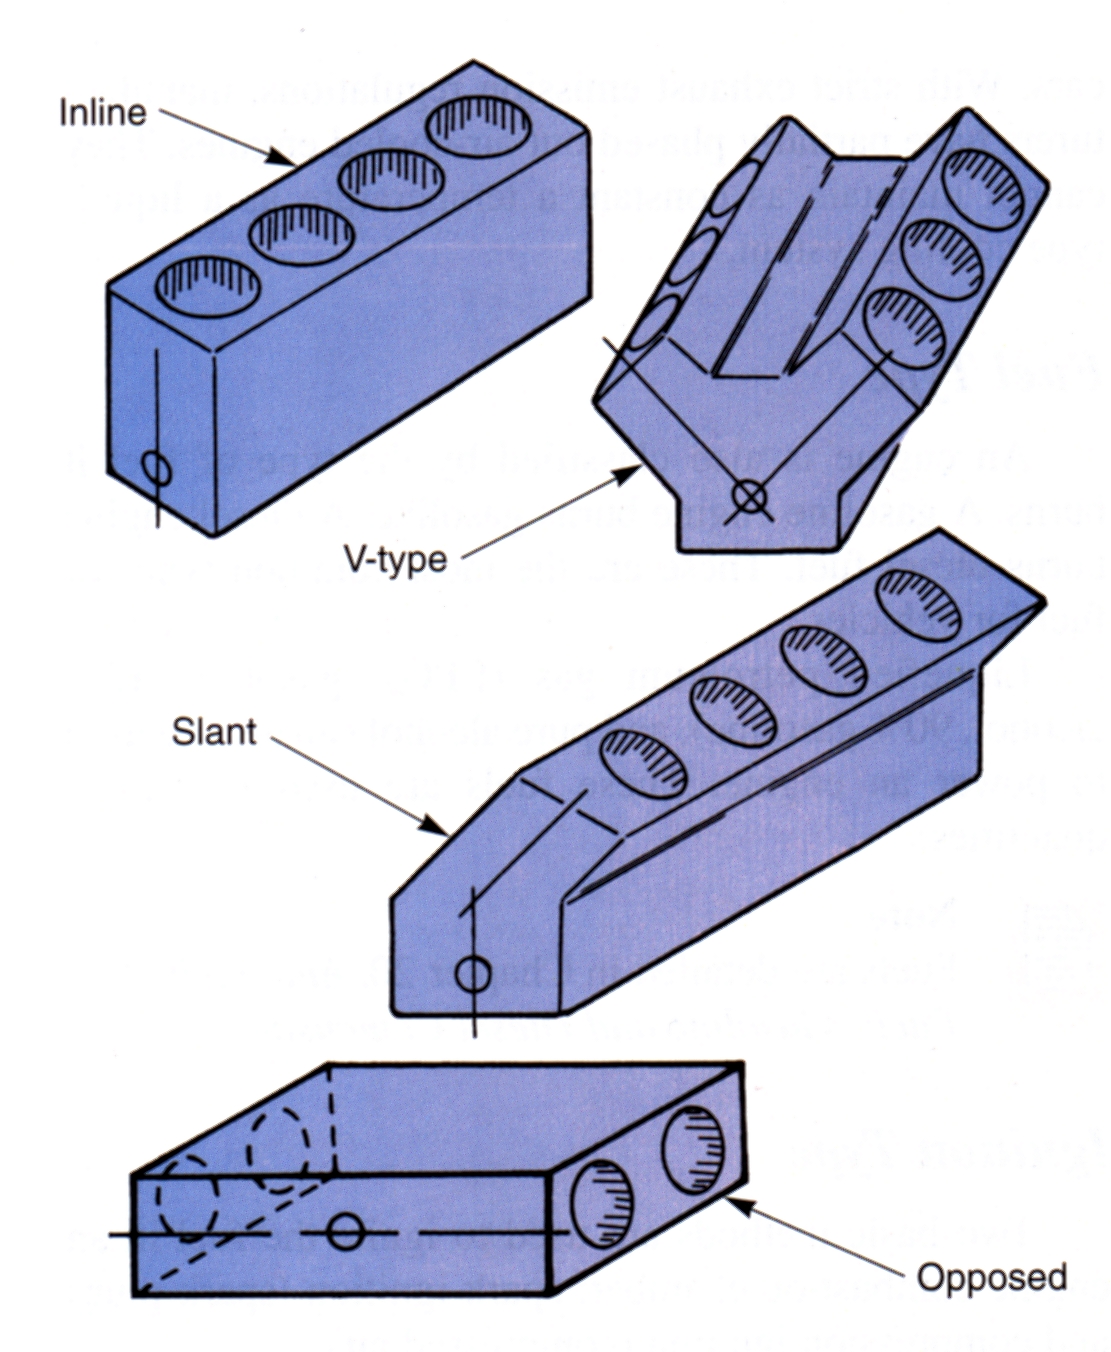
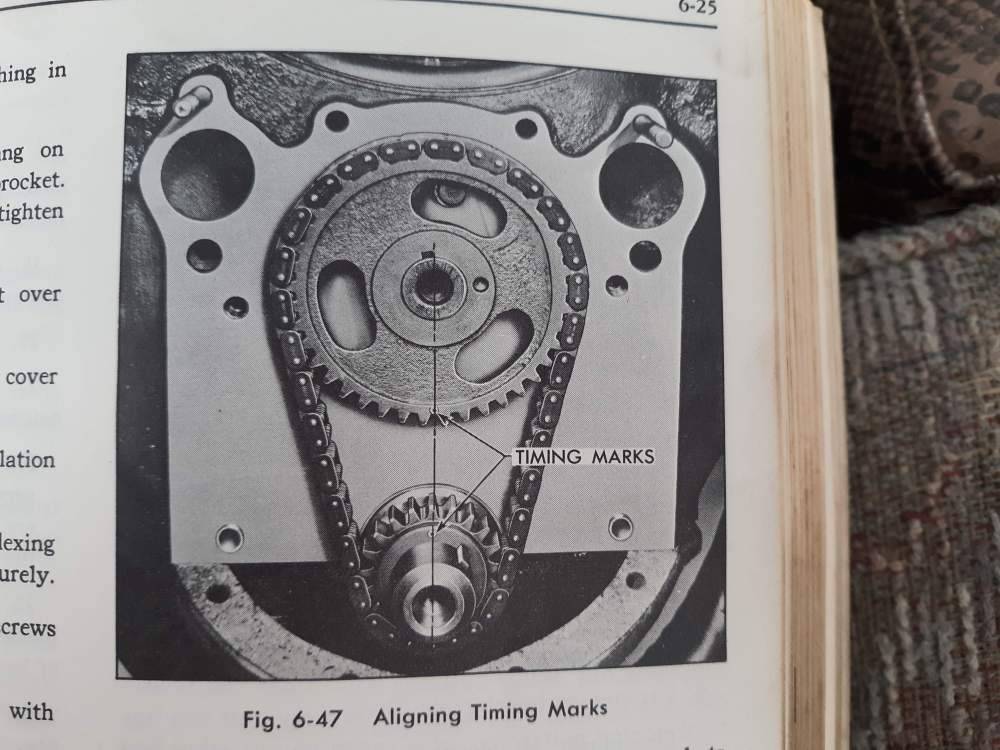
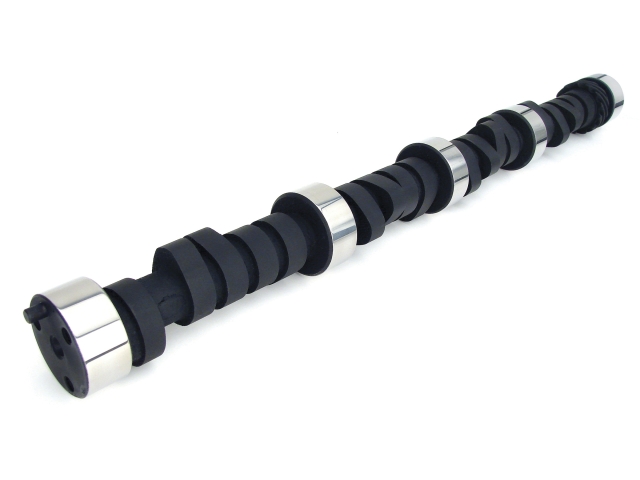
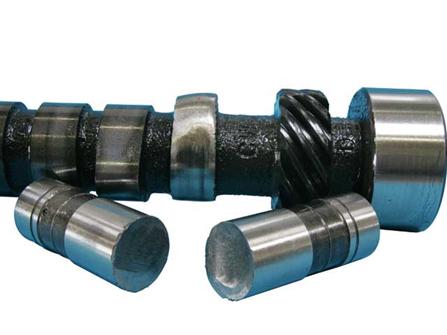
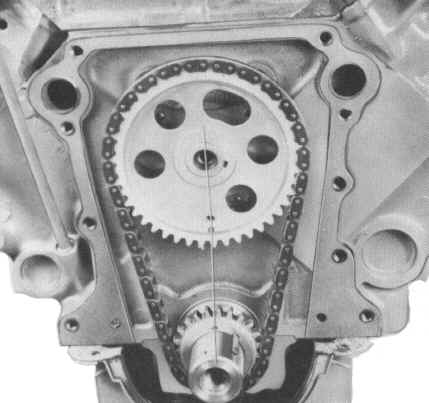
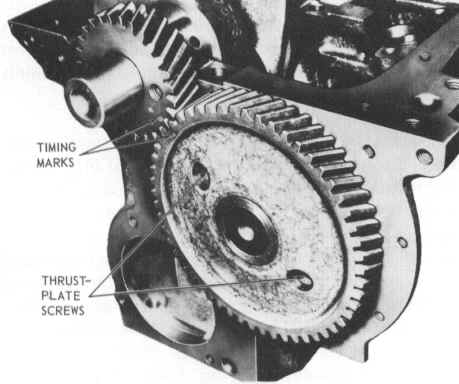
The Cylinder Block of overhead-valve (OHV, cam-in-block) engines ALSO contain:CamshaftThis opens the valves at the correct time. Driven directly by the crankshaft through chain, belt or gears. The camshaft turns at half the crankshaft speed (valve do their thing once, while the pistons go up and down twice). A cam sprocket or gear will ALWAYS be TWICE the diameter and have TWICE the teeth of the crank sprocket. Its alignment and timing with the crankshaft is C-R-I-T-I-C-A-L. So much so that there is always a diagram for HOW EXACTLY to put it together.
If the camshaft opens the valves at the WRONG TIME (even so much as gear tooth off), the engine will either run poorly, not run at all, or have the pistons BEND ALL THE VALVES trying to close them for you.
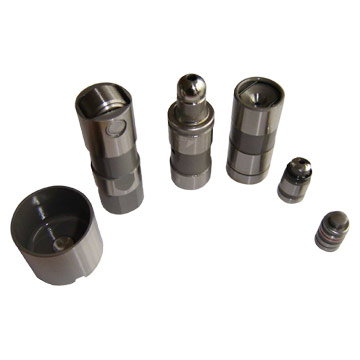
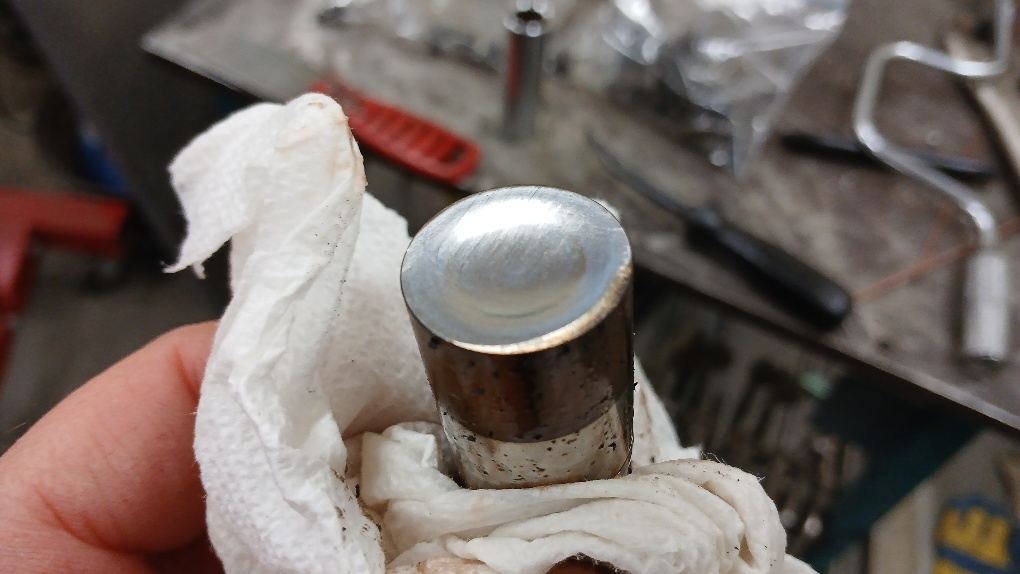
LiftersChange the rotating motion of the camshaft to a lifting motion for the pushrod and rocker arm. May be solid, mechanically adjustable, or hydraulically adjustable. The friction contact surface of the lifter to the camshaft may be completely flat (boo), or have a low friction roller built in (yay). Many OHC engines have a “Bucket” lifter or “lash adjuster” that may have a rotating disc on the contact surface to reduce friction. If Flat-Tappet lifters do not rotate during operation, they will WIPE the cam lobes OFF the camshaft (and then… where do you think all that metal goes?)
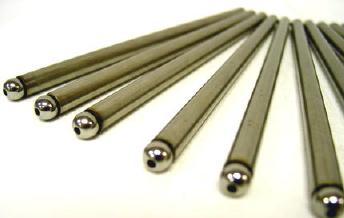
PushrodsSends the motion of the lifter to the rocker arms on the Cylinder Head
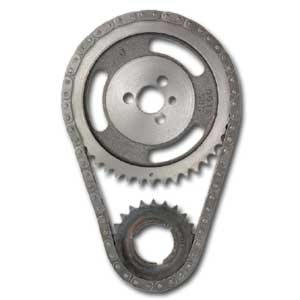
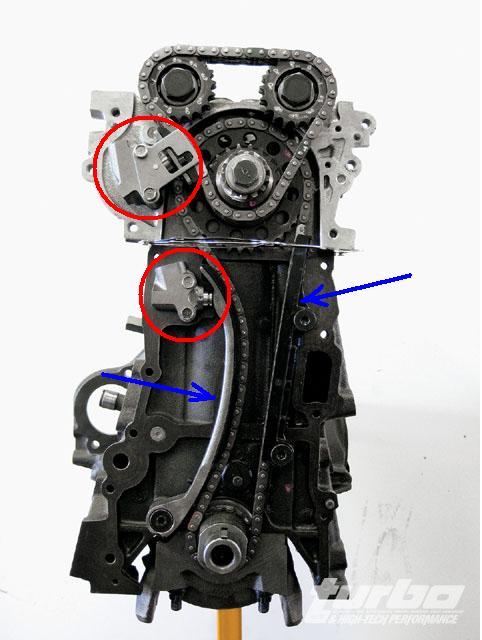
Timing Chain, belt or gearsProvides a method of turning the camshaft. There are “silent” chains that run relatively quietly. There are “roller” chains that last longer. Many domestic timing chains in the bad old days had aluminum cam sprockets with plastic teeth on them – SUPER quiet, but not the longest lasting. Chains get noisy as they age and stretch. When I can, I use roller chains. Below is a roller chain. Belts are much more common on Over Head Cam engines (but not all OHC engines use belts). They should be replaced every 100,000km – if they break, disaster happens (I got THIS CAR cheap because the previous owner did NOT replace the belt, which destroyed the cylinder head when it broke). Gears are more common on older 4 and inline 6 cylinder engines. The original Ford Model T had fibre gears to drive the cam. Notice the alignment dot at the bottom of the cam sprocket. There will be matching one on the crank sprocket as well.
|
||||
DISASSEMBLY |
||||
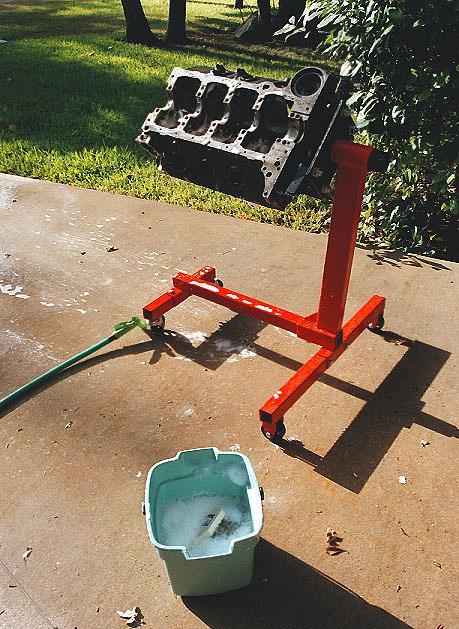
Here you must be sure to keep track of everything. Most students do not pay attention during the disassembly and lose many of the parts vital to the life of the Cylinder Block.
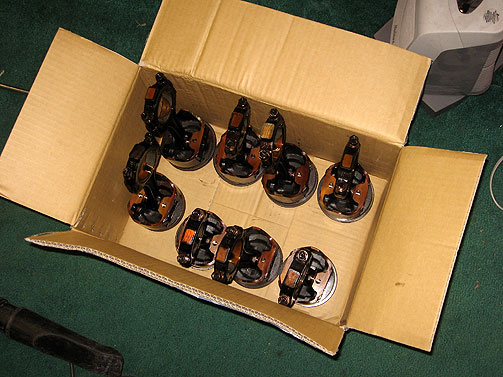
KEEP TRACK OF EVERYTHING!Take pictures! Take notes! Label parts! Store in containers! Consult the service manual to see how things are disassembled – they will show you the correct procedure. Some tricks I use to help me rebuild blocks: Stamp the cylinder number on the connecting rod and cap before your remove them. Number them with the correct cylinder number. Every piston belongs to its cylinder – don’t mix-and-match them. Every piston has a “FRONT”, indicated by a notch towards the pulley end of the engine. Ring Ridge, the unworn edge at the very top of the cylinder will be caught by the piston rings, preventing the piston from being removed. Forcing a piston past this ridge will cause the rings to break the piston! Pull One Piston at a Time THEN worry about the crankshaft. Removing every visible fastener first makes it REALLY difficult to remove the pieces individually. Rubber Boots (a small section of hose works fine) must be put on connecting rod bolts so you don’t NICK the crankshaft journals when you remove the pistons. Write the cylinder number on the head of each piston as you remove and clean it – every piston is balanced with its connecting rod – don’t mix-and-match them. Store the pistons and rods in order, as they appear in the block, with the connecting rods, caps and bolts all attached – rods and caps are a machined set, they are NOT interchangeable. Hang the crankshaft by the front crank bolt – large crankshafts can “bend” just by laying them on their side. Thread fasteners back into their holes so you know where they came from Pictures are worth a thousand words – take lots of them. PAY ATTENTION NOWRODS AND CAPS ARE MADE FOR EACH OTHER – THEY CANNOT BE MIXED, FLIPPED, SWAPPED, or CHANGED. MIXED UP RODS AND ROD CAPS CAN RUIN THE BEARINGS, AND EVEN PREVENT THE FINISHED ENGINE FROM TURNING – IT WILL NOT RUN! MANY MODERN ENGINES USE FRACTURED RODS (SEE THE CLAMPING SURFACE BELOW) – INSTALL IT WRONG ONCE AND YOU’VE RUINED IT!
SOMETIMES CYLINDERS ARE HONED TO FIT EACH PISTON – MIXING THEM UP CHANGES THEIR CLEARANCES, RISKING PISTON FAILURE.
Machined surfaces of the block, crankshaft and camshaft are very fragile – protect them from damage at all costs. You have no idea how expensive these parts are individually. Once the block is completely disassembled, cleaning can begin.
|
||||
CLEANING |
||||
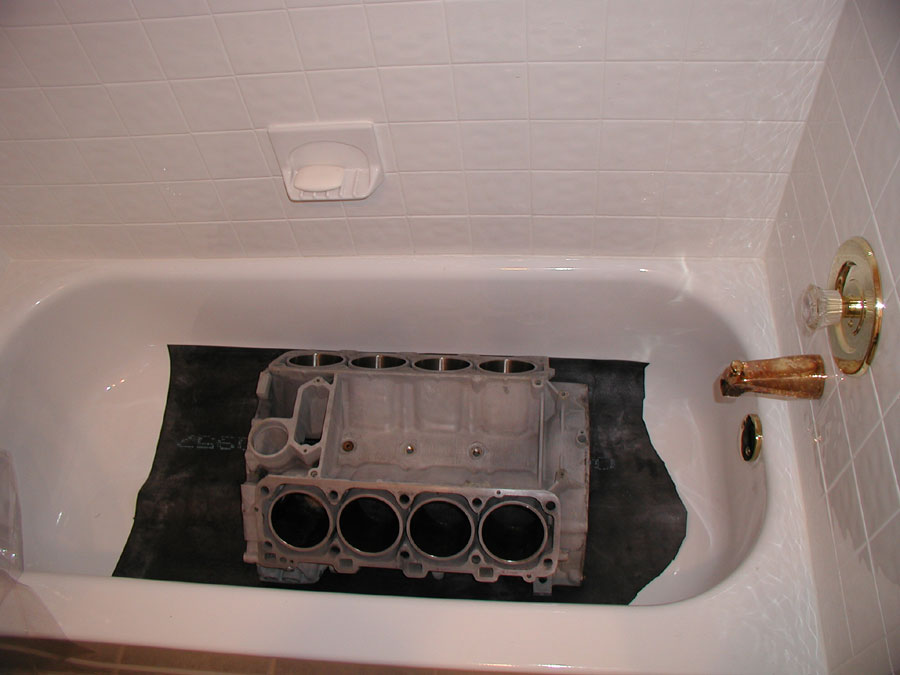
| ENGINE BLOCK
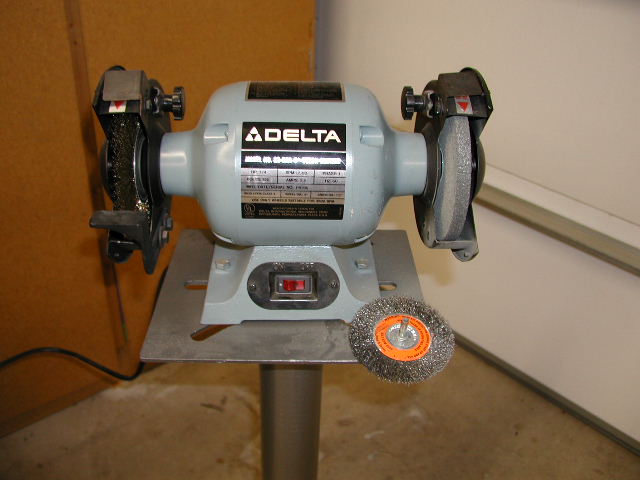
The cylinder block must be white-glove clean. You do not want any dirt or crud inside your freshly rebuilt engine. Blocks can be cleaned by most machine shops using a caustic solution. It will be thoroughly cleaned, and all grease and paint will be stripped off. I always clean parts again by hand just prior to assembly just to make absolutely sure they are clean – I do not trust anybody, only myself. PISTONS Piston heads (the TOP SURFACE ONLY) can be easily cleaned using a WIRE WHEEL on a bench grinder. Carbon and crud from the oil cakes onto the piston when the engine is in use – a Wire Wheel is often the only way to get it off. DO NOT wire wheel the ring section or the skirt area of the piston, they are aluminum and the surfaces are very fragile.
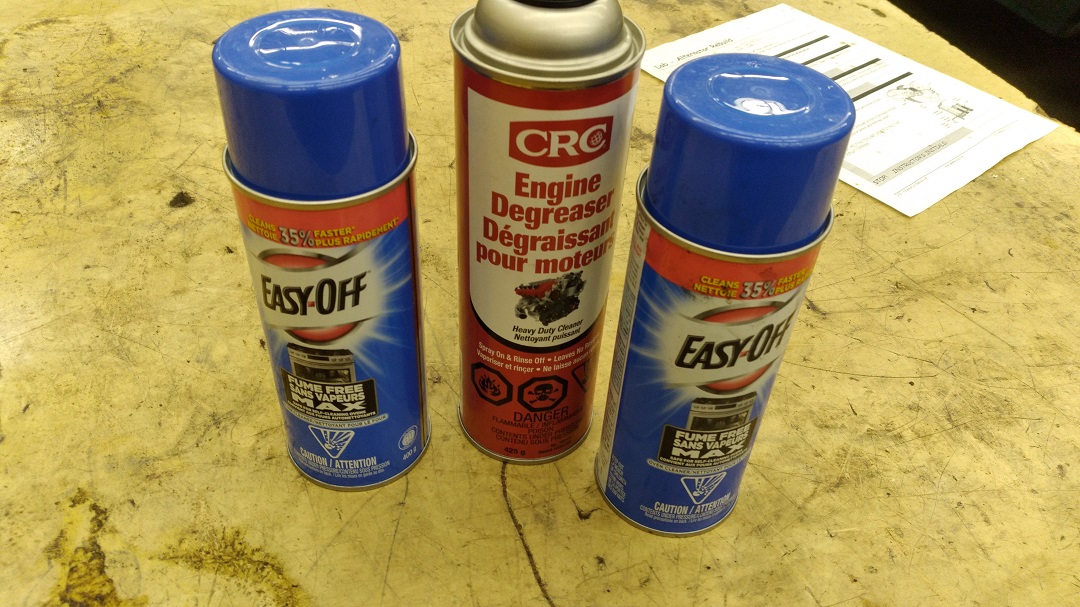
I’ve used oven cleaner to remove carbon build-up, because oven cleaner dissolves carbon. YOU are a carbon-based life form, so wear eye protection, skin protection, and lung protection!!
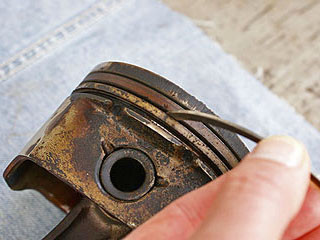
RING GROOVES Burned oil and gas become carbon deposits behind the piston rings. This MUST be removed when installing fresh rings (the carbon prevents the new, thicker rings from sitting where they are supposed to sit – making the pistons a press fit into the cylinder instead of a sliding fit. THIS IS BAD!). I like to break one of the old piston rings (they are very brittle), and use the non-broken end (because it’s square) to scrape carbon out of the piston ring grooves (make sure the drain-back holes in the grooves are clear! If the scraped oil can’t get back into the pan, it’s going into combustion). (photo: nbdntools.com)
There are “Ring Groove Cleaners” (Google them, you saw them in the “Hand Tool” section), but I find them aggressive and imprecise.
Once the block and all the parts are thoroughly clean, we can inspect, measure and rebuild the block.
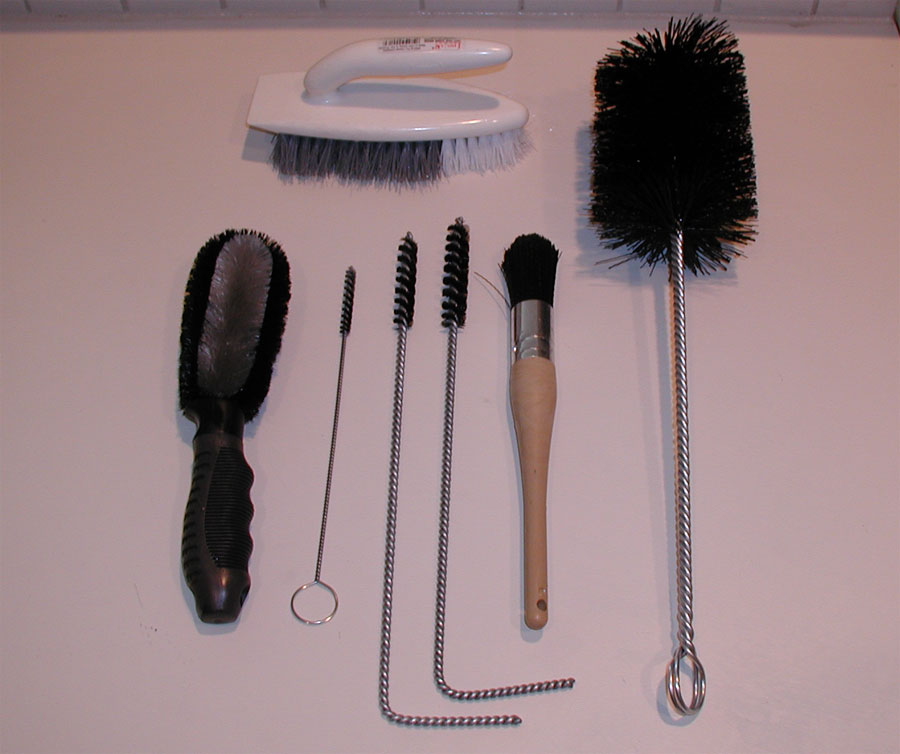
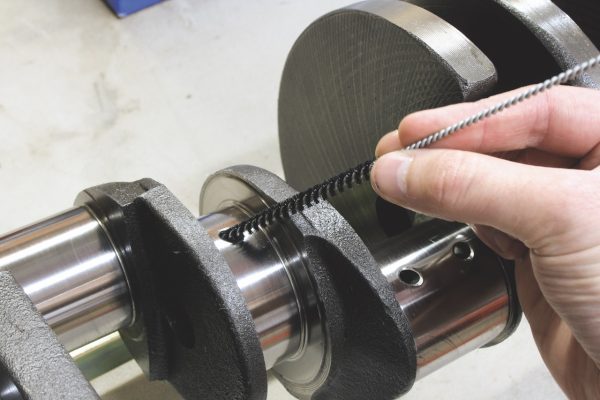
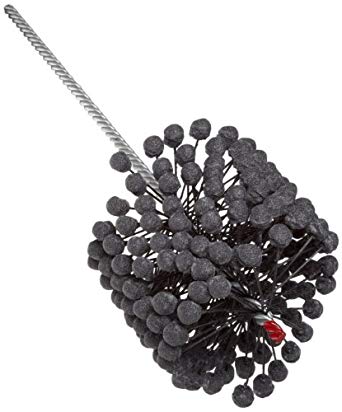
CLEAN EVERYTHING! Rifle Brushes work great for cleaning internal oil passages
|
||||
INSPECTION |
||||
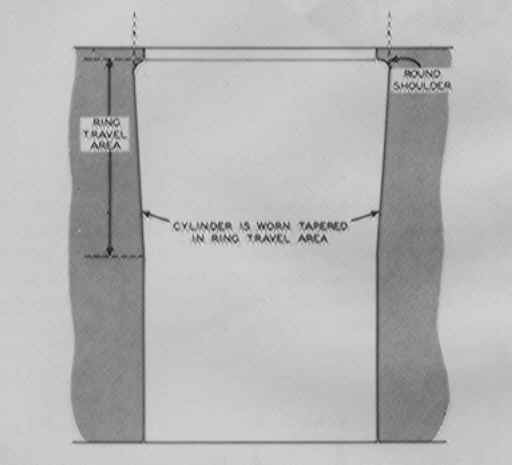
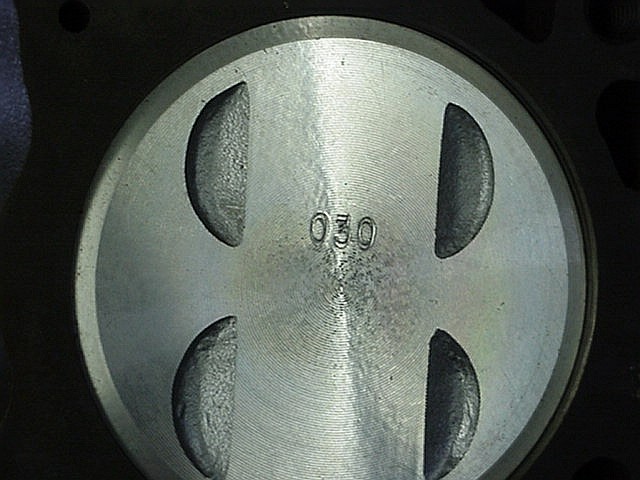
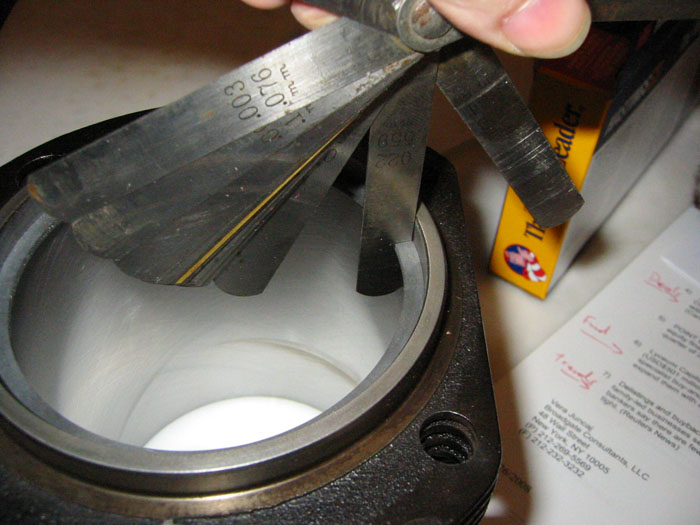
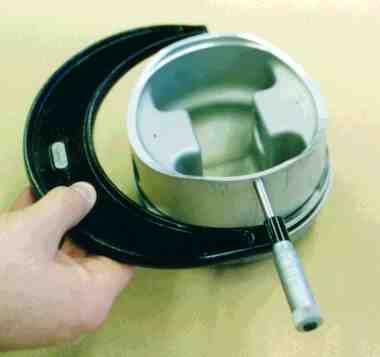
INSPECTING THE CYLINDERSThe first thing I want to know when I take an engine apart is “how worn are the cylinders.” This will determine whether or not the engine is even worth rebuilding. The bottom of the cylinders are constantly splashed by oil coming off the crankshaft and bearing journals – they don’t wear out at all. The top of the cylinder is furthest away from all the oil, any oil that gets there is scraped off by the rings, and any oil that gets past the rings is thinned by gasoline and burned in combustion. The top of the cylinder wears the most. Because of this, cylinders also wear into a taper – that is: the top wears a LOT more than the bottom. If the wear is still within specification, we can “de-glaze” the cylinder for a fresh surface that new piston rings love, and put it all back together. If the wear is excessive, the cylinder needs to be bored out to a larger diameter, and oversize pistons installed. This can get expensive. Measure the top of the cylinder and the bottom of the cylinder to find the taper. Oversize pistons usually come in .020″, .030″ and .040″ oversizes, with oversize piston rings to match. Some engines cannot be bored very big, some can be bored bigger. Get me to tell you my story of boring an engine 0.250″ oversize! (“… and the machinist’s jaw hit the floor”)
If the Cylinder Block is acceptable and rebuildable, then inspect the block for any cracks or defects. No point pouring money into a block with a fatal flaw in it. Any defect can be repaired – there’s nothing money can’t fix, but you have to decide if it’s worth it.
Tapered cylinders also fatigue new rings faster!
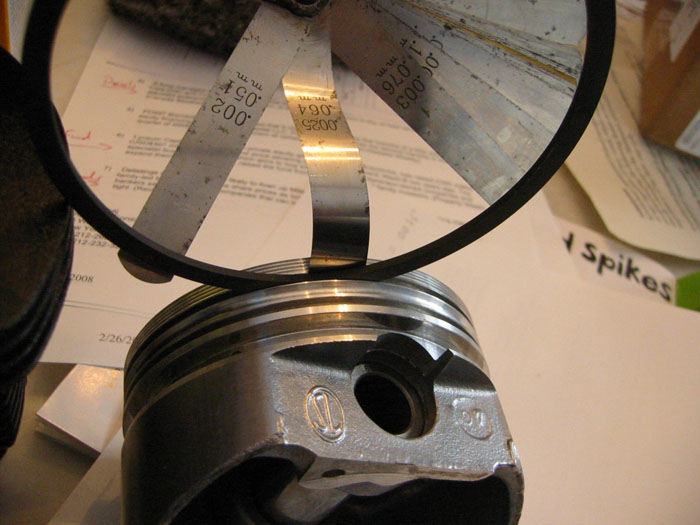
INSPECTING THE PISTONSAssuming the cylinder bores are good, measure the pistons to see if they are still good. I’ve put good used pistons in a different good used block – what matters is the measurements! The pistons are measured at the same height as the piston pin, but 90° to it – across the skirts. Piston skirts usually have a slight taper to them, to help them deal with expansion from heat. An engine that has been overheated might have cracks on the skirts because the piston have expanded more than they were was designed for (overheated engines never really recover). Rock the piston and pin to see if there is any play – any play is bad, and the piston should be replaced.
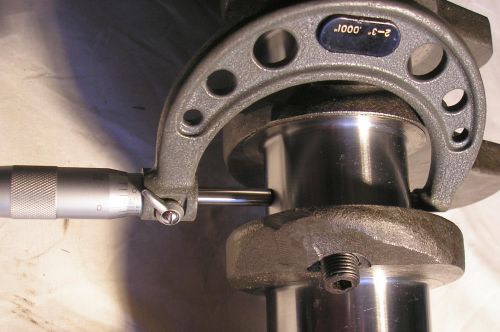
INSPECTING THE CRANKSHAFTThe second area I want to know about in an engine is the condition of the crankshaft. Run your fingernail along the main and rod journals of the crankshaft. If you can catch any grooves, the crank should be re-ground. This makes the journals slightly smaller (usually .010 or .020 undersize), and new thicker undersize bearings are installed. Measure all the bearing surfaces for any that are worn smaller, worn tapered, or worn out-of-round.
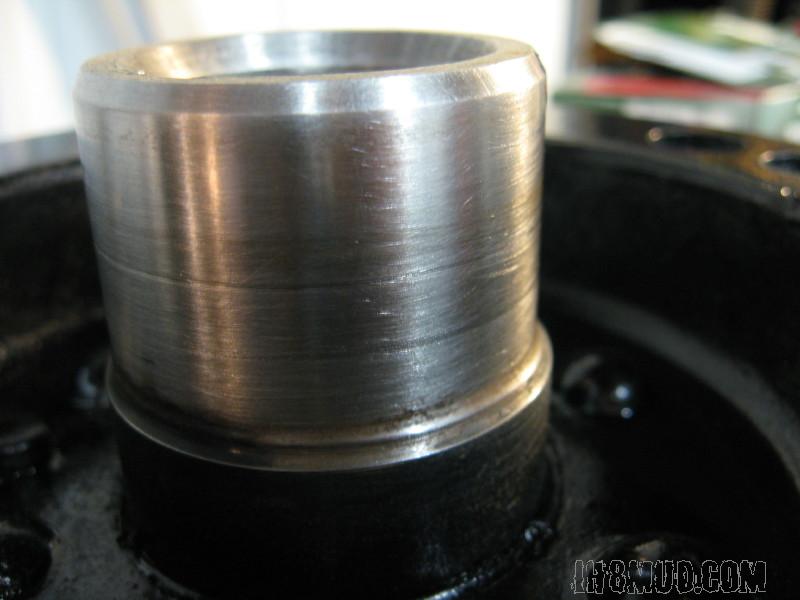
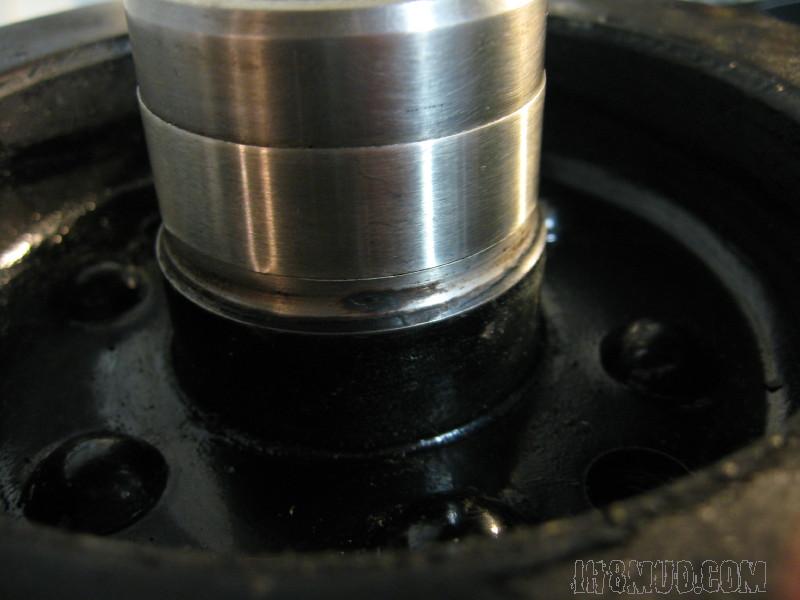
Check the snout of the crankshaft pulley or Harmonic Balancer, where it passes through the front main seal. The rubber often wears a groove in the steel. A Speedi-Sleeve can be installed which provides a new, hardened surface for the new seal to ride on.
Also check the THRUST SURFACES of the crankshaft – there are two flanged surfaces that ride against a THRUST BEARING to prevent the crank from moving forward and backward in the block. Keeping the clutch pedal in at lights tends to wear out one side of the bearing, because your clutch is pushing the crankshaft forward.
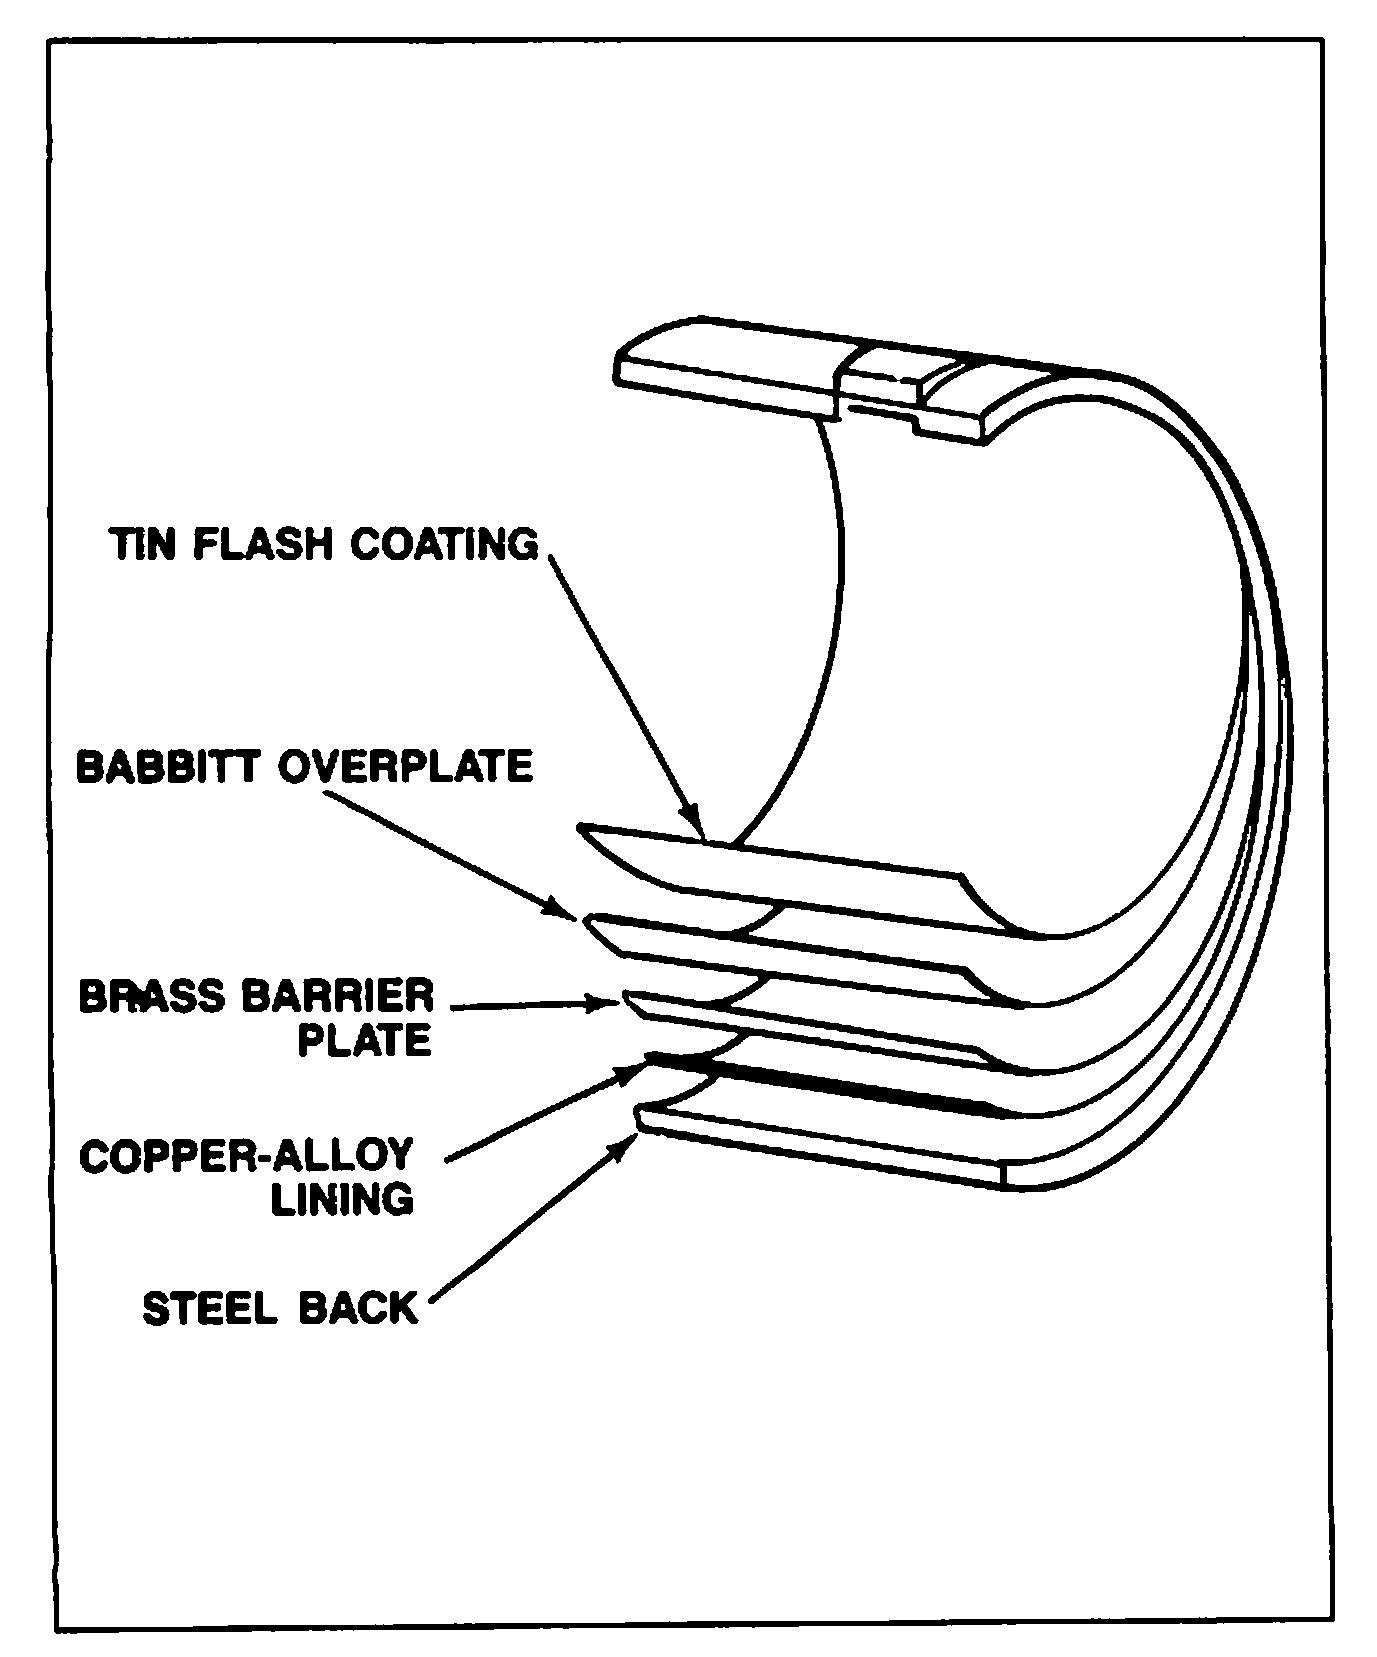
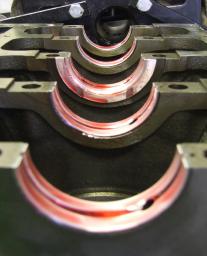
INSPECTING THE BEARINGSThe bearings in an engine are a friction bearing, which means the journals slide over the bearing surface, as opposed to a ball bearings or roller bearing. The bearings don’t actually touch the journals – they work much like car tires hydroplaning on a puddle of water – a wedge of oil builds up between the journal and the bearing, lifting the journal off the bearing and supporting and cushioning the journal with oil. The oil absorbs the shock of combustion, cools the surface, cleans the surface, and lubricates the surface. Can you see why running quality oil and changing your oil at the required interval is so important? The bearings are made just slightly larger than where they are installed (called “crush”), so they become a press fit. Bearings are installed into the block dry, and the press fit prevents them from moving or spinning. Bearings are made with the following layers:
Most bearings have an oil feed hole that lines up with oil passages in the block Most bearings also have a tab that fits a groove in the block to ensure correct alignment on assembly. If the oil is not changed frequently enough, and/or the engine is abused, the bearings will be damaged.
Worn bearings also result in increased oil clearance. This added clearance will allow more oil to leak past, and splash onto the cylinder walls. If the rings cannot control the added oil, oil will get into the cylinder and be burned.
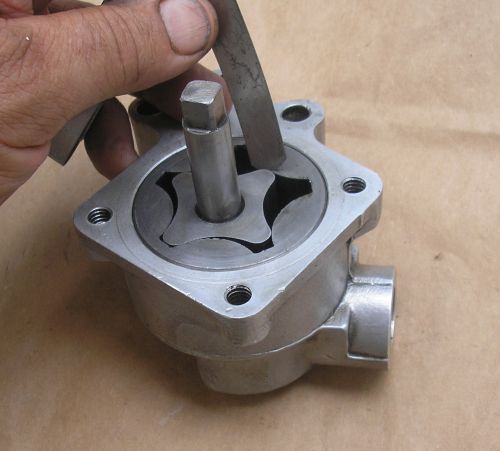
INSPECTING THE OIL PUMPThe oil pump is the heart of your engine. In the bad old Flathead days, since the camshaft, crankshaft and everything was inside the block, we could get away with a simple “splash” lubrication system. Once we went overhead camshaft to improve power, rpm and economy, we needed to get oil up there. So now we use a pressurized lubrication system. All oil pumps come apart. It’s usually a good idea to use a brand new oil pump on your freshly rebuilt engine. Inspect it carefully for grooves, gouges, or damage. It’s interesting to see what went through it. I’ve seen bits of valve seals that became brittle, floated down to the oil pan and got sucked up. I’ve also seen the tin foil seal from the top of oil containers go through the oil pump. That’s never good.
Checking oil pump clearance. Seriously though, just buy a new one – they’re cheaper than a whole new motor.
|
||||
REPAIRING |
||||
REPAIRING THE BLOCKWhile fixing the worn cylinders is the usually fix, sometimes a block have have other issues. Those issues need to be fixed first, and can be, but usually it’s not financially wise unless you NEED to fix THAT motor (for whatever reason). EVERYTHING in the block’s machining is based off the location of the crankshaft, so the bores for the crankshaft are made perfect diameter, and perfectly inline. This is called “Align-honing.” The next machining is making sure the cylinder head mounting surface (called the “deck”) is perfectly parallel to the crankshaft and perfectly flat. This is called “decking.” Then the cylinders are bored perfectly centered with the crankshaft perpendicular with the crankshaft, perfectly spaced between each other, and perfectly sized. This is called “boring.”
The answers you cannot find are in this ^^^^ fast-paced video
Once the cylinder has been bored, it is then honed to the exact clearance required for the piston. An expected piston-to-cylinder-wall clearance might be around 0.005″. This must be done with a Rigid Hone, which cuts cylinders walls perfectly parallel. A glaze breaker and a ball hone do not cut perfectly parallel – they follows the defects of the cylinder.
If the cylinders and pistons were fine, you can get away with using either a Glaze Breaker or a Ball Hone to finish the cylinder. Honing cuts through the polished surface of the cylinder and produces a slightly rough surface to help new rings wear into the cylinder for a good seal.
To hone a cylinder:
The entire engine will have to be thoroughly cleaned to remove any honing grit and garbage.
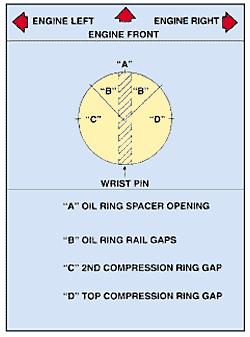
PREPARING THE PISTONSThere isn’t much machining to do with pistons. They either work or they are replaced. Some really cheap people will put a piston in a lathe and knurl the skirts, making the piston slightly larger. The cylinder is honed cylindrically with a rigid hone, and the piston skirts are then carefully sanded by hand until they fit the cylinder perfectly. Probably only a reasonable repair on something antique and obscure where NO pistons are available. The ring grooves should be cleaned to remove all carbon, and new rings should be installed with piston ring pliers (not your fingers). Spread the rings only enough to get them on the pistons – they can break easily. The ring gaps should be set according to the ring manufacturer’s recommendation. They are usually offset to better seal the cylinder (anything leaking past the ring gap must travel 180° around the piston to get to the next gap).
REPAIRING THE CRANKSHAFTAny bearing journals on the crankshaft can be machined smooth again. Machining, of course, makes them smaller, so you will need to get thicker bearing shells (called undersize bearings, because the crankshaft is now undersize). Bearings are usually available in STD (standard), .010 and.020″ undersizes. Badly damaged, yet expensive or impossible to replace crankshafts can have metal added to the bearing journals, and the journals re-ground.
|
||||
REASSEMBLY |
||||
FINAL CLEANINGThe cylinder block should be thoroughly cleaned one last time. At this stage I use hot water and dish soap. It has to be white-glove clean. This also includes running a tap through all threaded holes so that all the fasteners will engage properly and give accurate torque readings. Rust is your enemy, especially on iron blocks – once you’ve finished cleaning the head, blow it thoroughly dry with compressed air, and coat it with oil to prevent it from rusting. Some people like to paint the block before assembling the engine. You can certainly do this at this time.
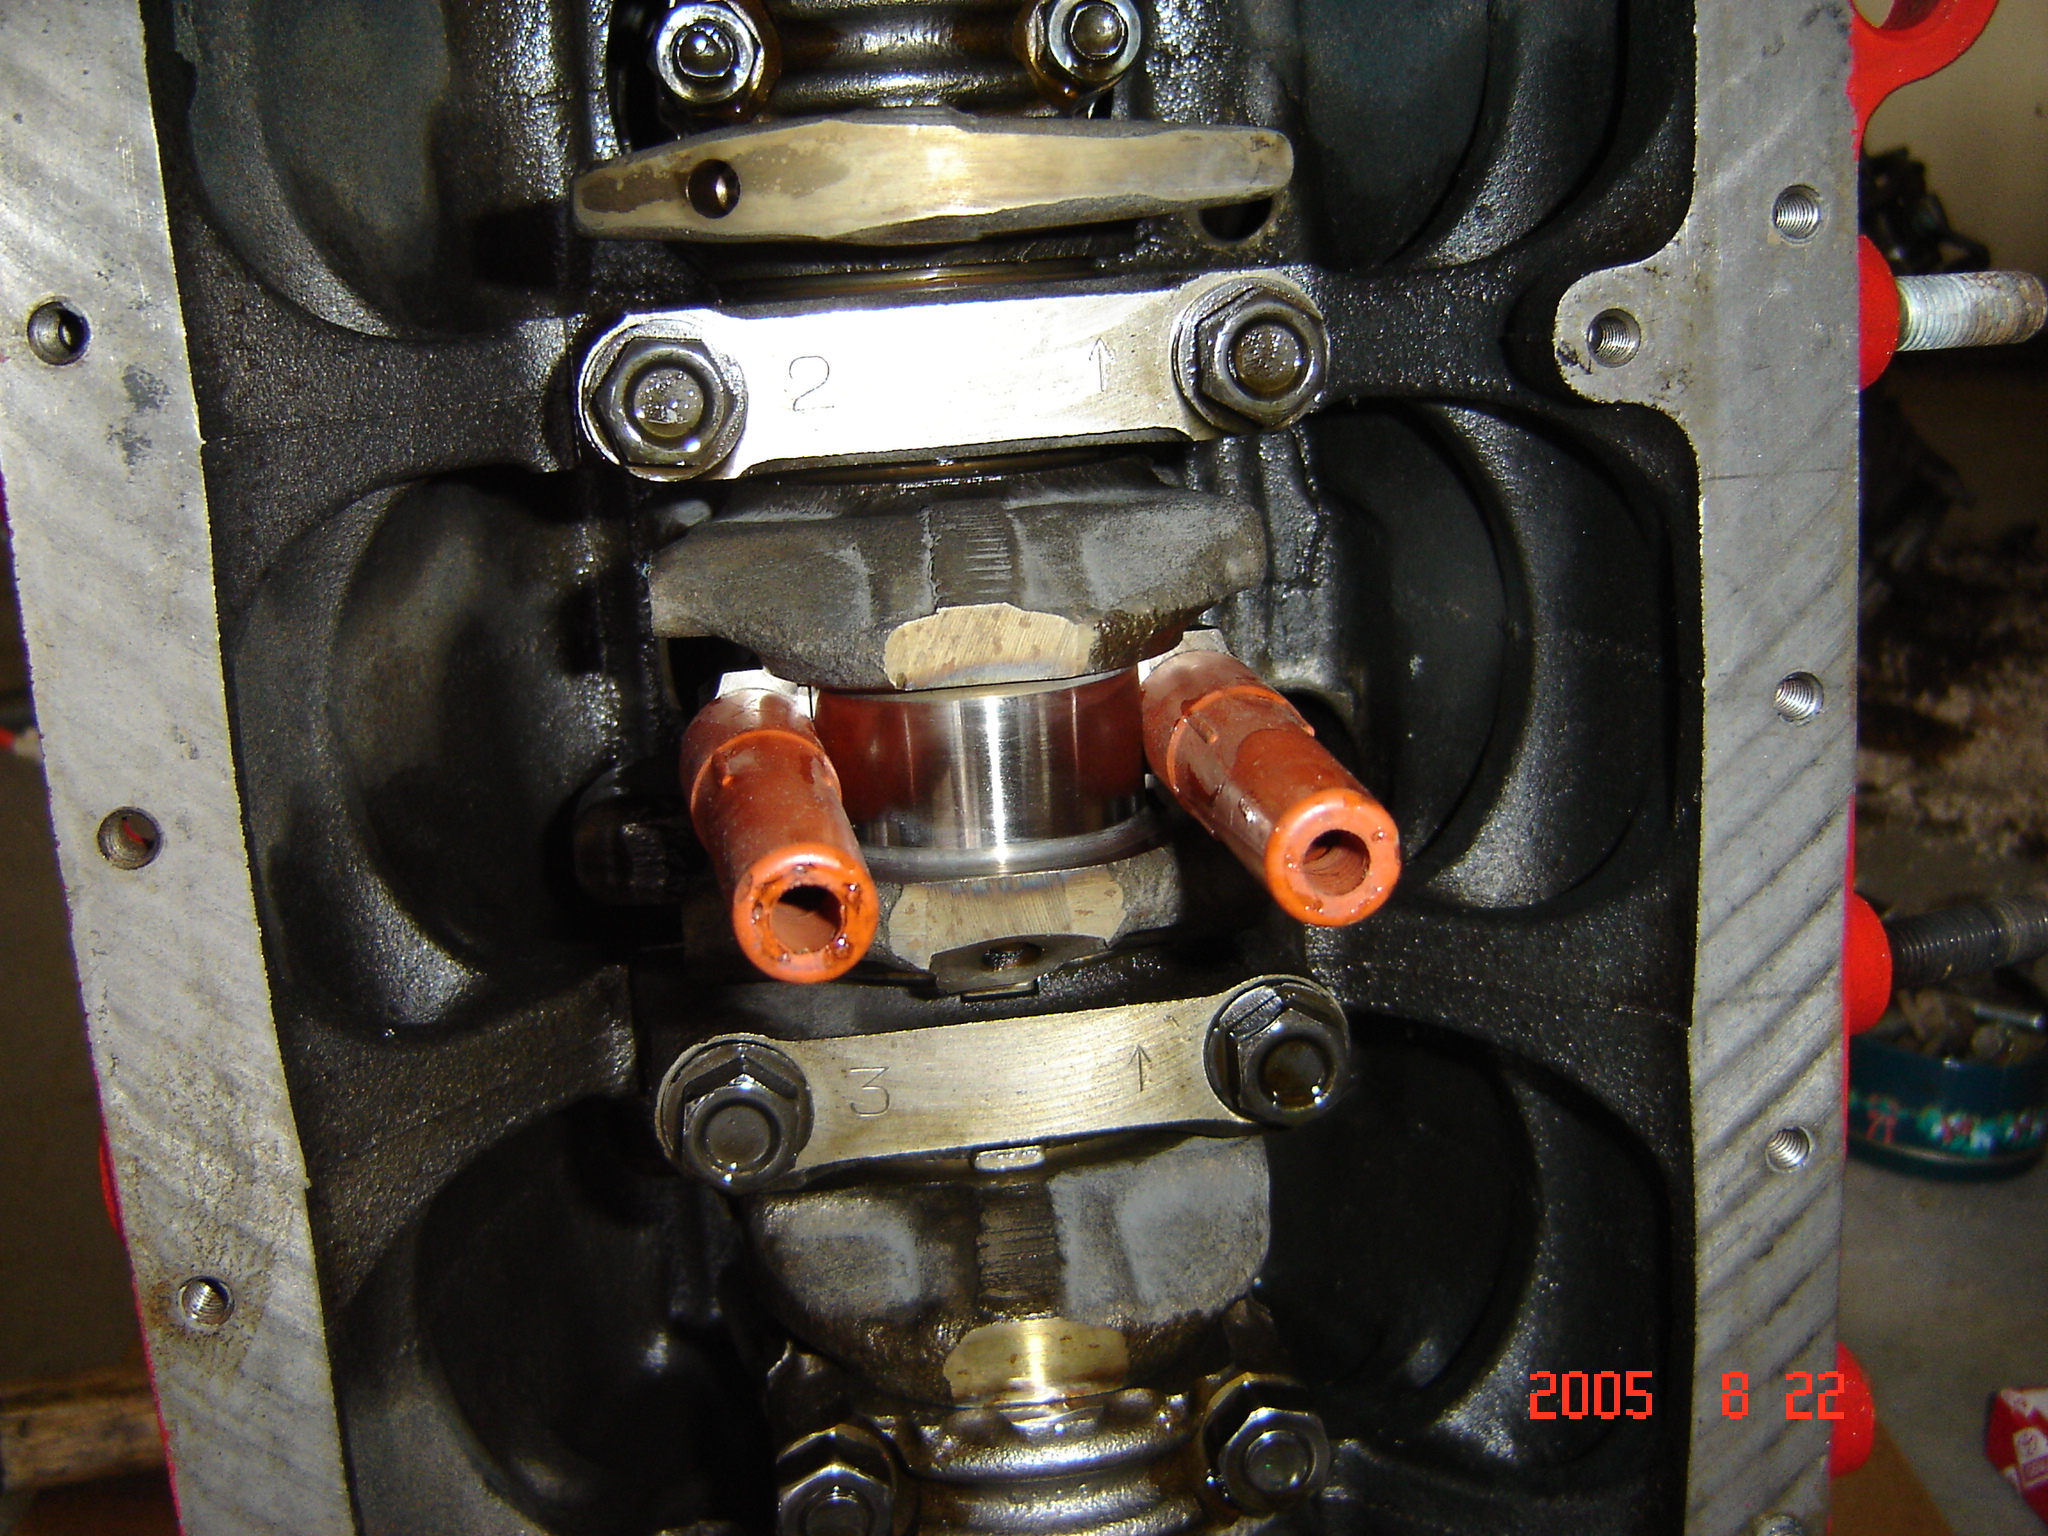
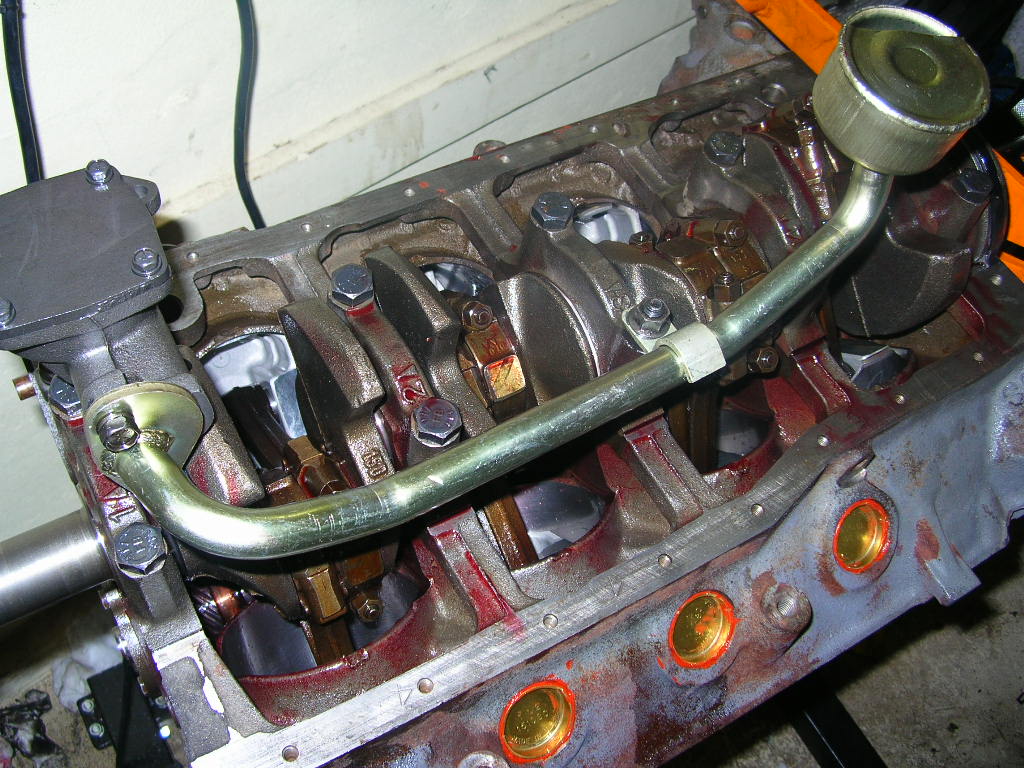
INSTALL BEARINGSInsert the new bearing shells into the block. Bearing shells are installed DRY into the block. Camshaft bearings on many OHV engines are removed and installed using a Special Tool that looks and works much like a slide hammer. Notice a little tab in the main and rod bearings that fits into groove. Also notice if there is a “top” bearing and a “bottom” bearing – sometimes they are different. Also notice where the oil holes are for the crankshaft – don’t put the bearings in wrong and cover up an oil hole.
INSTALL CAMSHAFT (OHV)If the engine is a typical V6 or V8, you want to put the camshaft in first – it’s a bugger to do this once the crank and pistons are in. Adequate and proper oil is REQUIRED for a flat-tappet camshaft to last. Due to environmental requirements, the main ingredient in engine oils that helps camshafts survive the sliding-friction of flat tappets, Zinc, has been reduced considerably. This is causing flat-tappet cams to wear out in a matter of kilometers or even minutes. If you want your classic muscle car or recently rebuilt engine to last, READ THIS: ARTICLE – PM Zinc Oil Additives
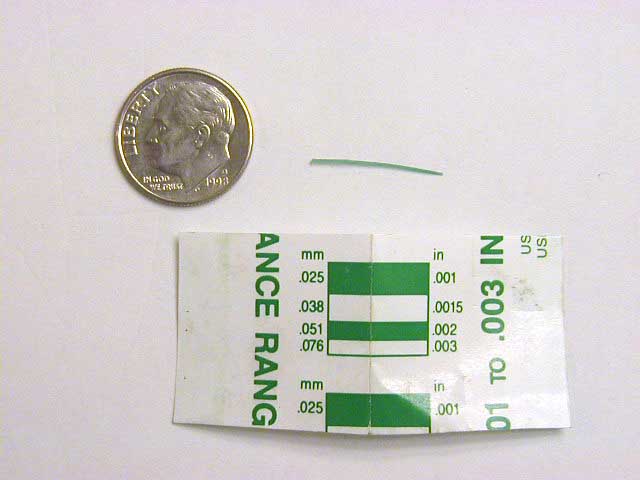
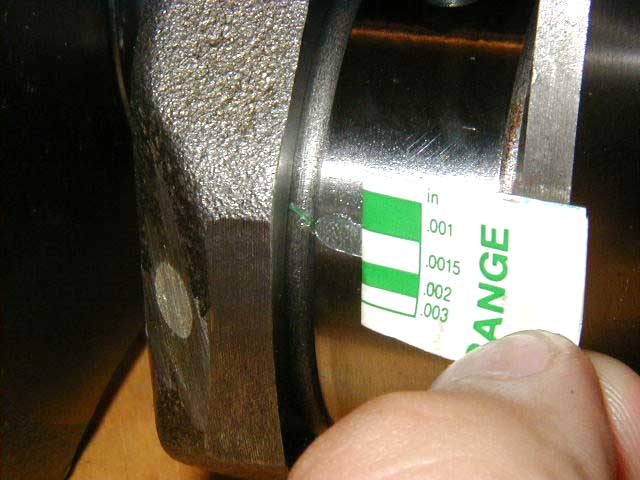
INSTALL CRANKSHAFTPlace some oil on the main bearing shells. I use 10W30 motor oil if the engine is going to start right away. I use 80W90 gear oil to assemble it if it’s going to sit for a while. You can also buy proper “Engine Assembly Lube.” Some people use White Lithium Grease to assemble. It comes in a tube. I don’t believe in it: Don’t use anything that you wouldn’t pour into the crankcase of a running engine. I cannot imagine opening a tube of Lithium Grease and squeezing it into the valve cover of my running engine – but that’s just me. Gently lower the crankshaft onto the bearing shells in the block. Carefully install the main bearing caps, making sure they are in the right place (they are numbered, right?), and facing the right direction (there are arrows, right?). Rotate the crankshaft by hand – it should move smoothly and easily. If it doesn’t, you’ve done something wrong. Now is a good time to check the main bearing clearances with Plasti-Gage. Plasti-Gage is a wonderful device – it is a thin wire of deformable plastic. You place it in between the crank journal and the main cap and bearing, torque the cap down to spec, remove the cap and see how much it squished. The more it squished, the tighter the gap is. Plasti-Gage comes with a “gauge” to convert “squish” into “thousandths of an inch.”
Plastigage
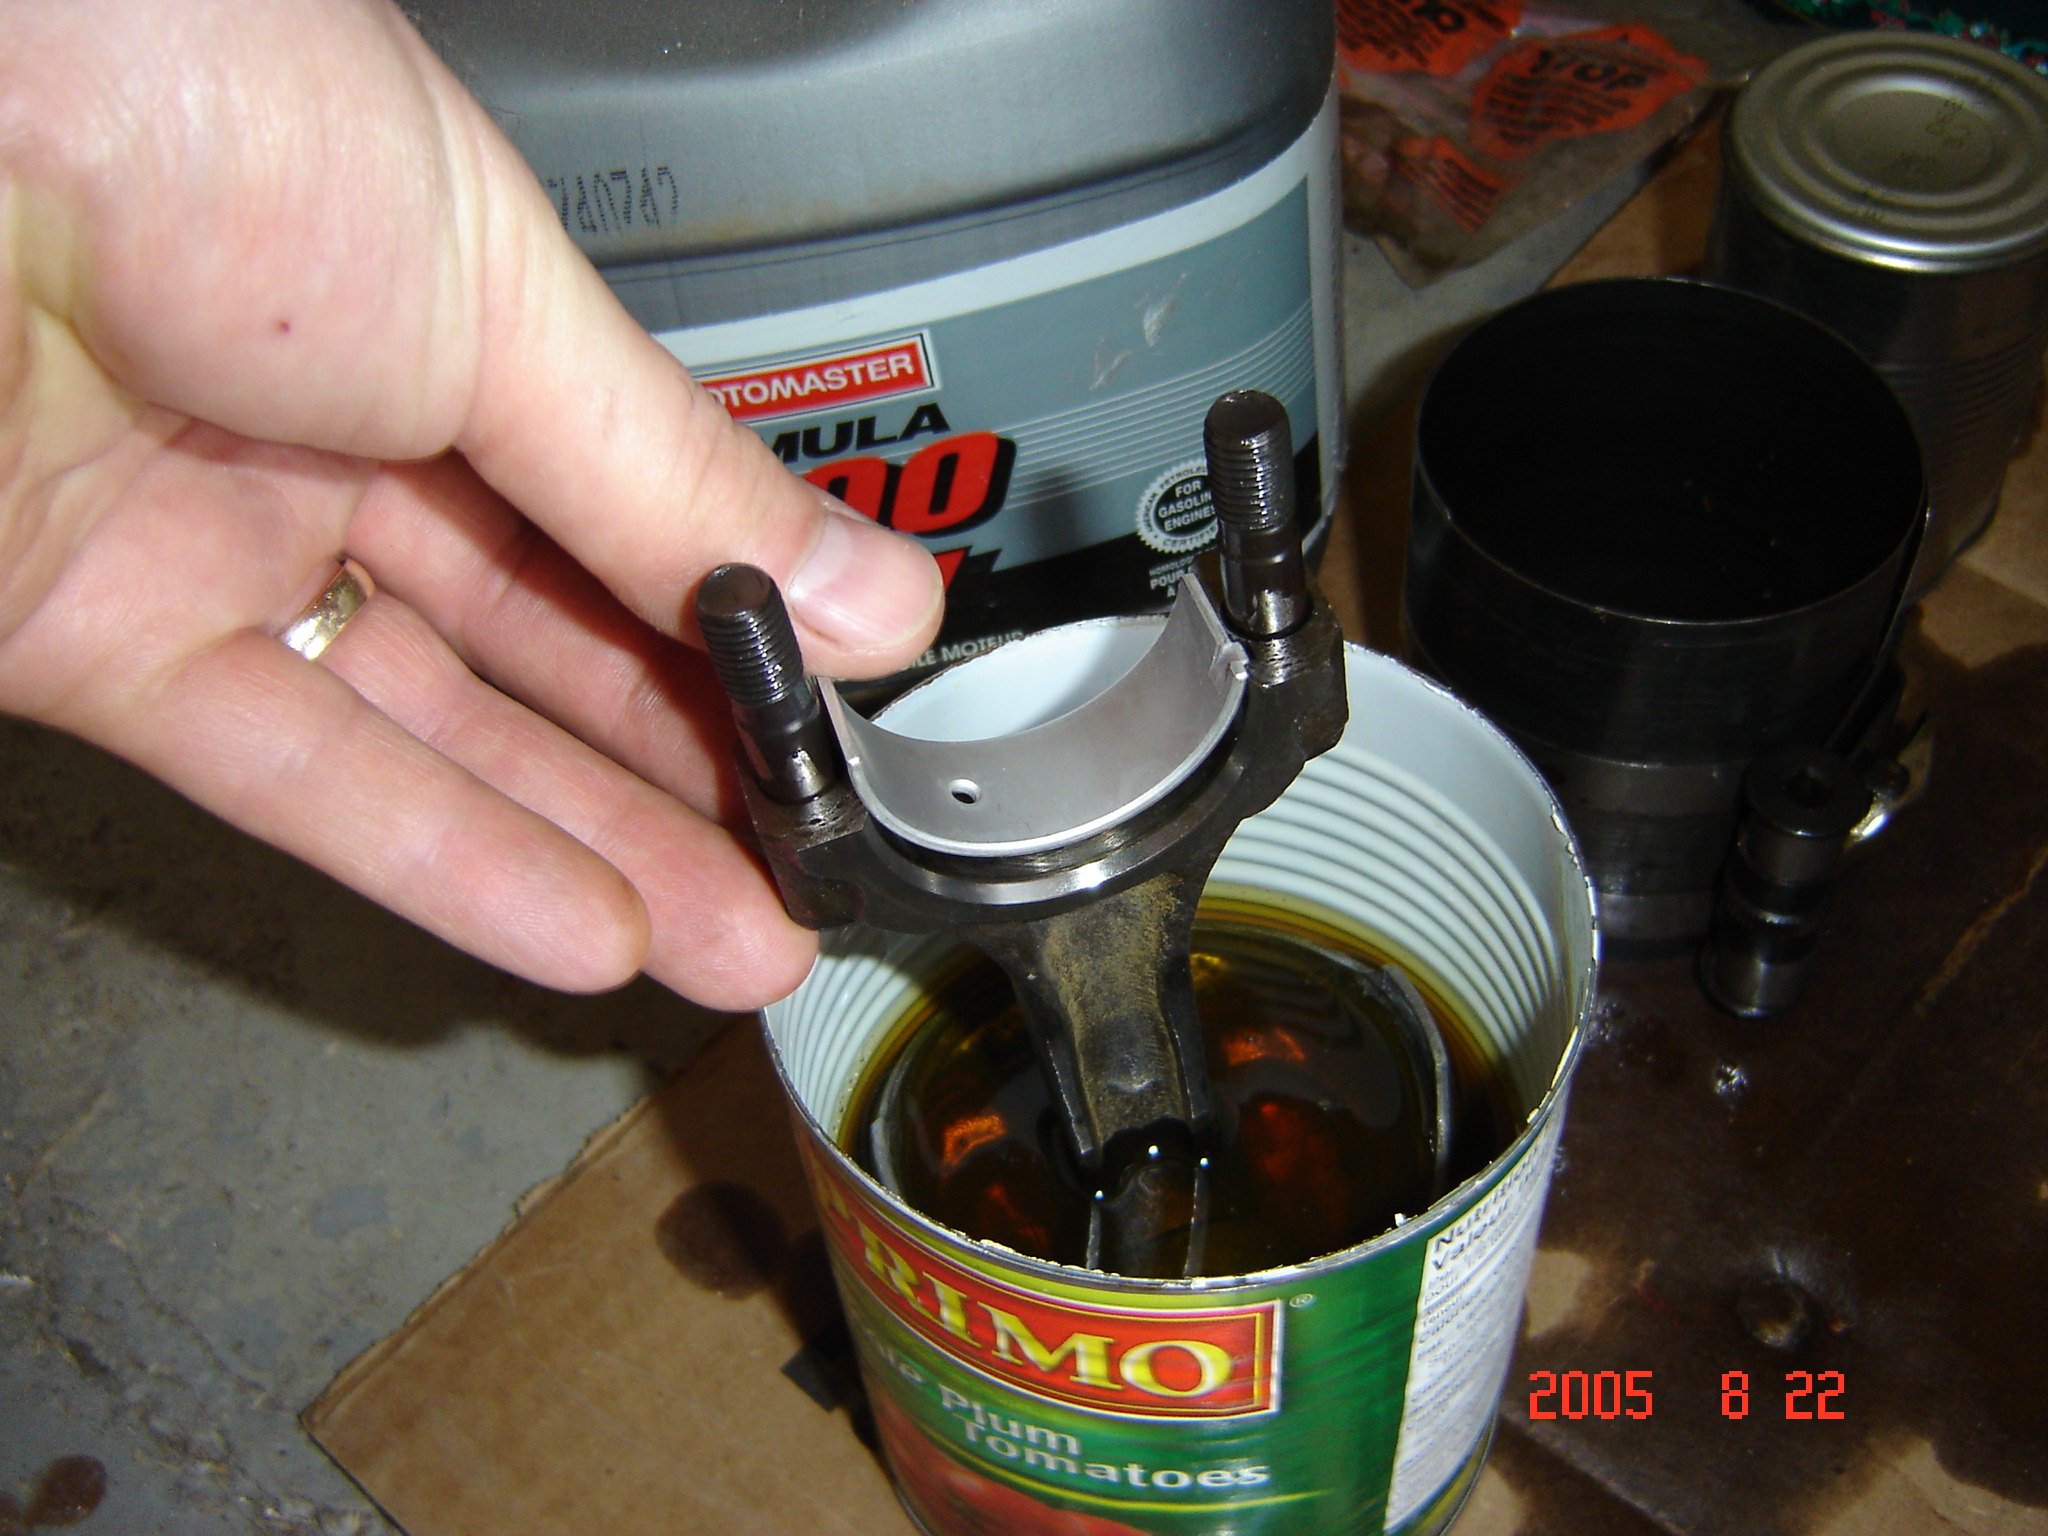
INSTALL PISTONSInsert the new bearing shells into the connecting rod. Bearing shells are installed DRY into the rod. Put some oil on the bearing surface itself. Set the piston rings to their correct location. Place rubber hoses on the rod bolts to protect the crankshaft journals. I like to dunk the entire piston into a can of oil – it’s fast, and it makes sure everything is well lubricated. Others prefer to just lightly coat the piston with oil.
Compress the rings with a Piston Ring Compressor, knock the ring compressor around the circumference to make sure it is well seated against the deck of the block, and tap the piston into the cylinder with a hammer handle, guiding the rod to the crankshaft. Connect the rod cap and torque the rod bolts to spec. Now is a good time to Plasti-Gage the rod clearance just like you did for the mains.
INSTALL OIL PUMPIf the pump is driven off a shaft, consider getting a brand new shaft. Oil pumps are designed to pump oil, not air, and a dry pump might not create enough suction to draw oil into the engine when you start it. This will result in bearing damage. Fill the oil pump with oil so that oil is already in there for start up.
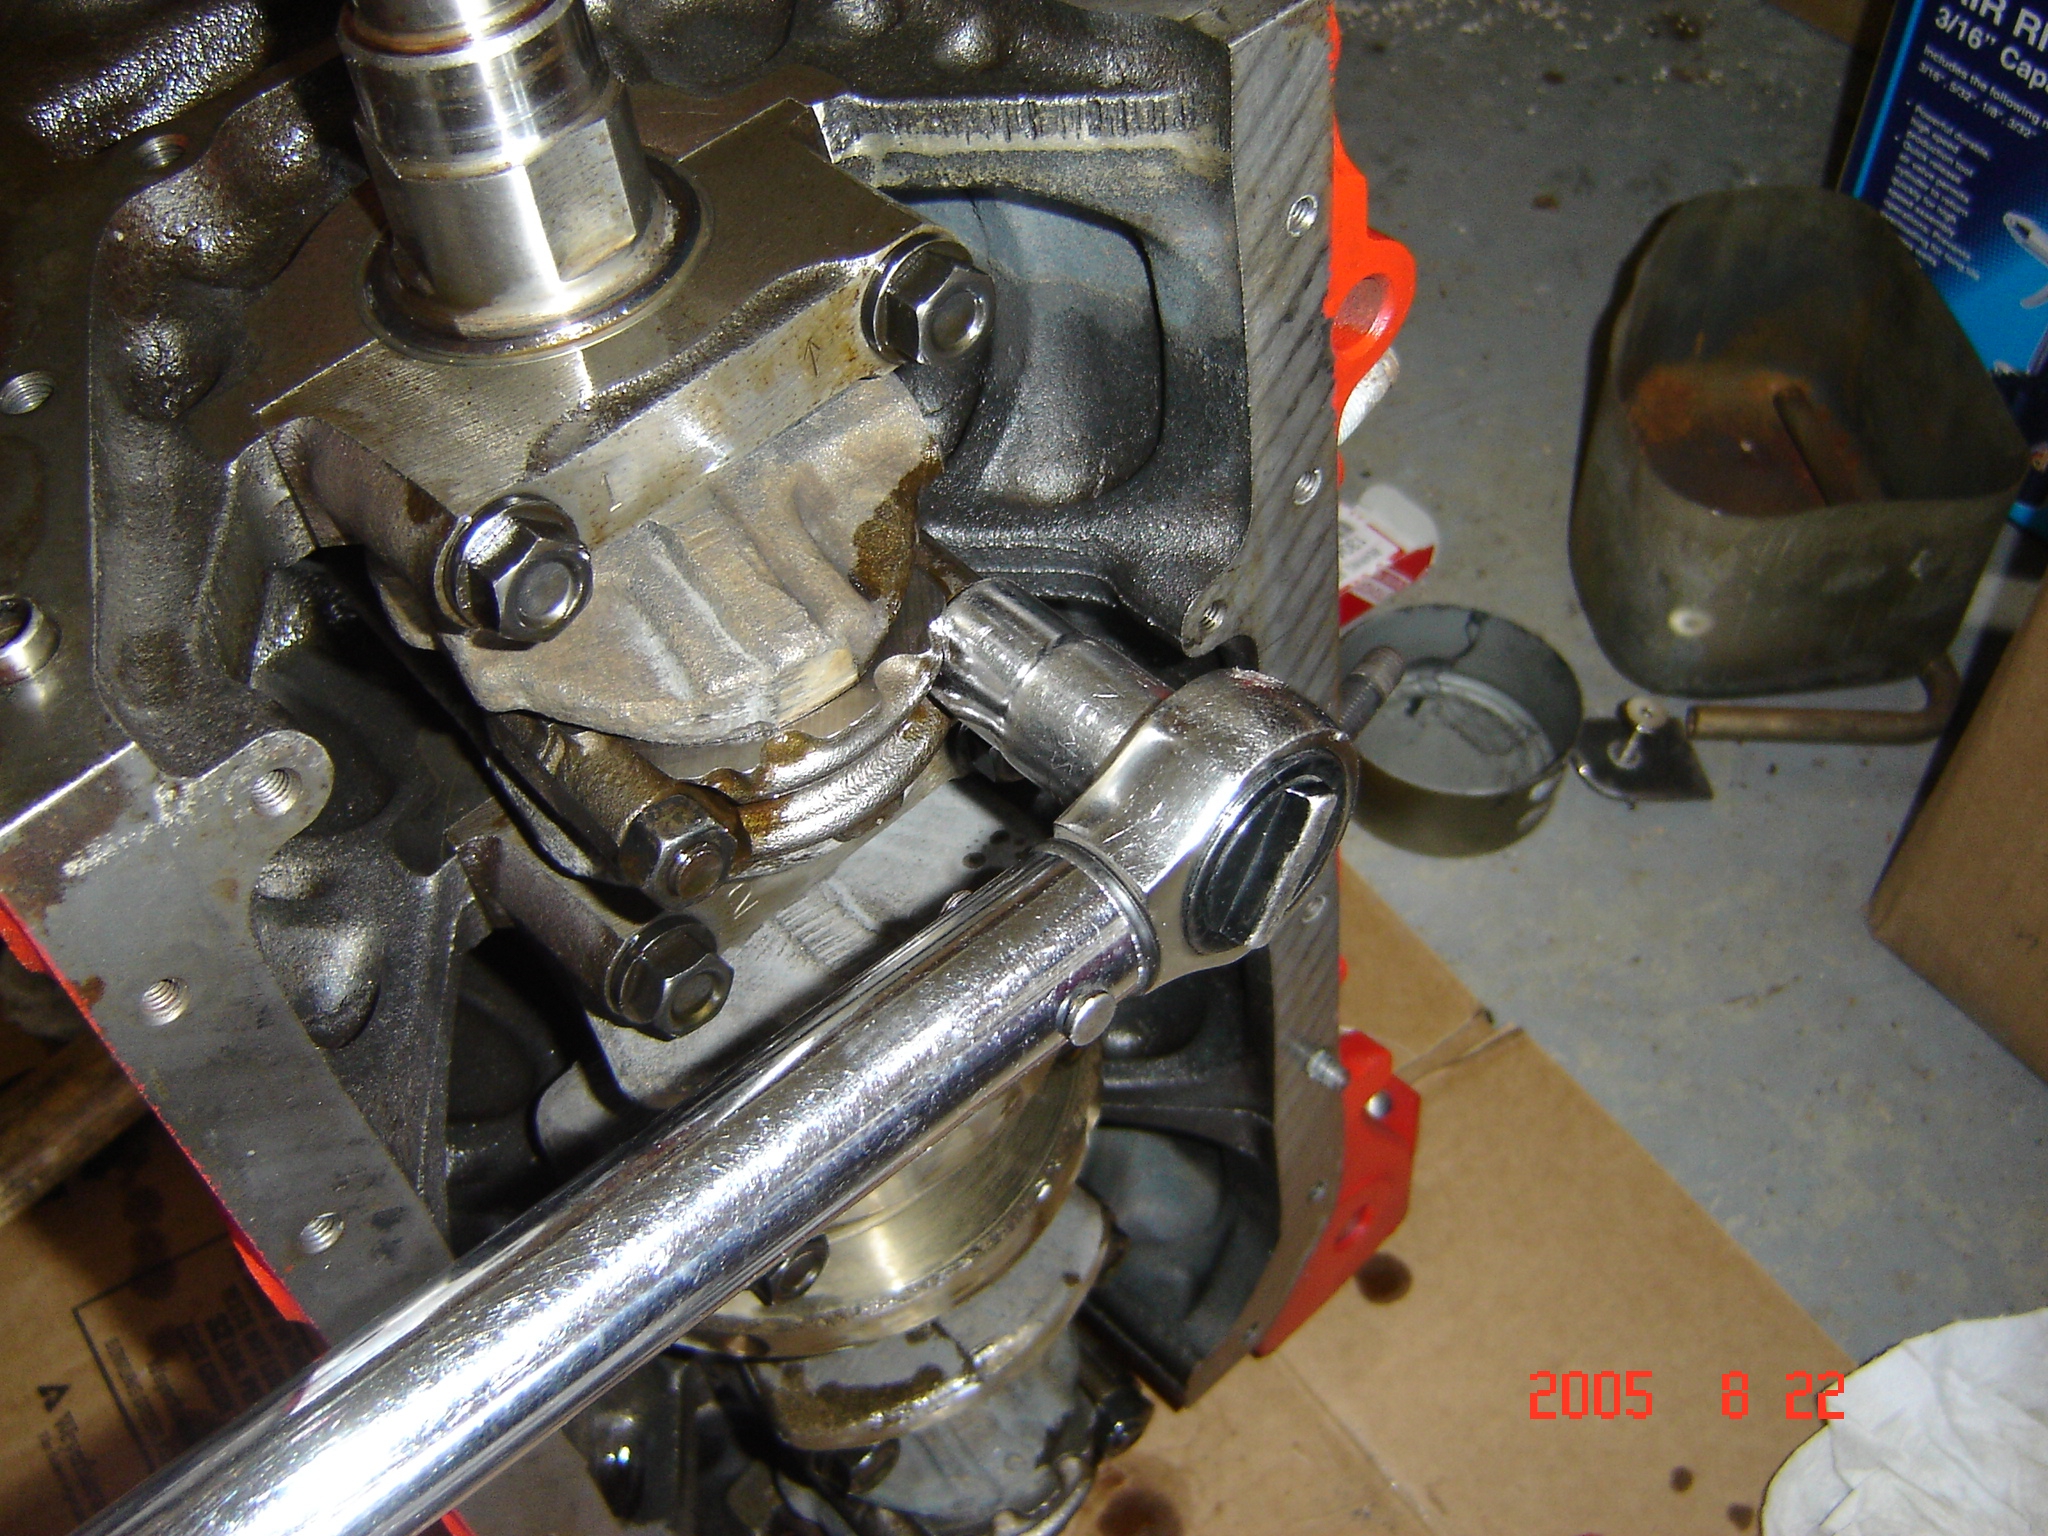
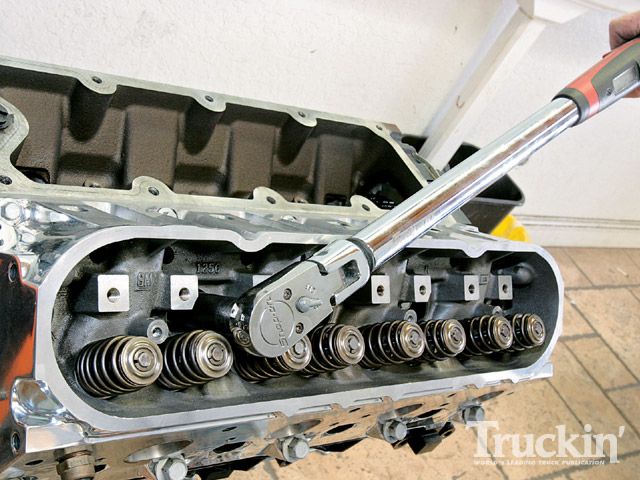
INSTALL CYLINDER HEADSAlways use a new gasket. ALWAYS torque head bolts to the manufacturer’s specs – READ THE MANUAL. An under-tightened fastener does not clamp the gasket enough to secure the gasket – the gasket will fail, or the loose faster will fall out and then the gasket will fail. An over-tightened fastener will stretch, losing its ability to secure the gasket – it will fail, or the fastener will snap and the gasket will fail. ALWAYS use a new head gasket to attach the Cylinder head to the Block. Head bolts need perfect threads (you ~did~ tap the holes, right?), and to be torqued in STAGES, in a SPIRAL pattern, starting from the CENTER out. On OHV engines, you will adjust the valve clearance once the head is on. Some engines use “torque-to-yield” head bolts. These are tightened right to the point of almost failure. They are replaced with brand new fasteners every time they are removed. Often “torque-to-yield” fasteners will have a relatively low initial torque, like 20ft-lbs, and then something like “tighten an additional 120°”. You will need a Torque Angle Gauge to do this (shown below).
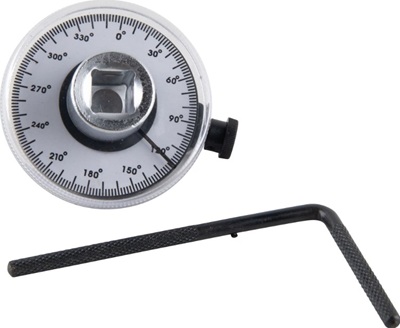 Torque Angle Gauge (source:www.princessauto.com) Torque Angle Gauge (source:www.princessauto.com)INSTALL CAM DRIVE (CHAIN, BELT or GEARS)The Camshaft MUST be aligned properly to the crankshaft to ensure that the valves open and close at exactly the right time. If it is even out one tooth, the engine might not run at all, or the pistons might hit and bend all the valves. There are specific marks that must be aligned or it WILL NOT WORK.
Timing chains for OHC engines have a very long chain. They use chain guides to keep the chain from flopping around and also a chain tensioner run by oil pressure to keep the chain tight. Timing belts use a belt tensioner that must be adjusted properly or the belt will come off and damage occurs. Read the manual! DO NOT GUESS.
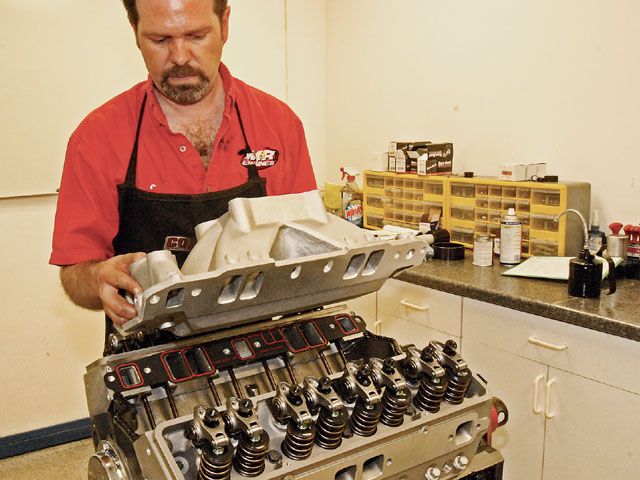
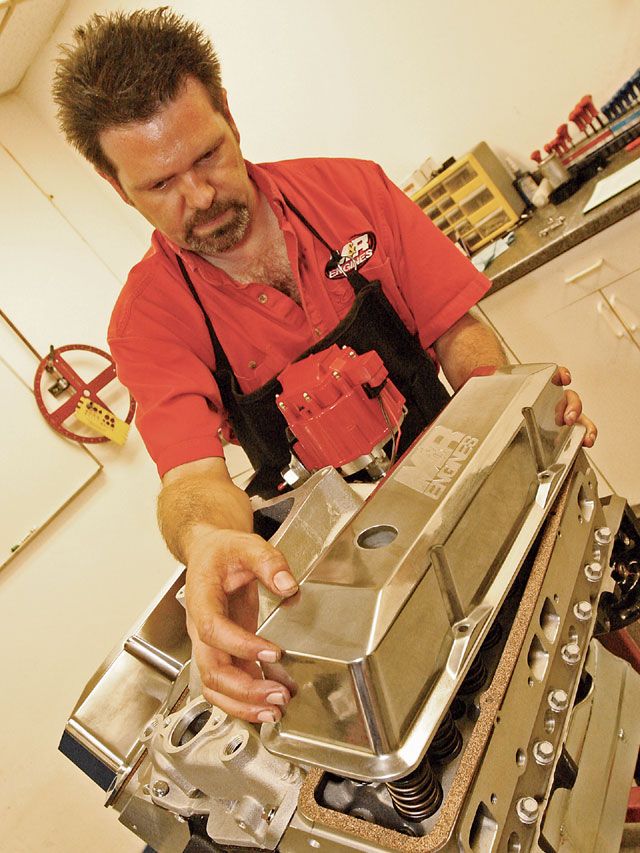
INSTALL MANIFOLDS, COVERS, ETC.Install the intake and exhaust manifolds, the timing cover, oil pan, valve cover, water pump, sensors and other bits you removed when you took it all apart. If you carefully noted, labelled, recorded and photographed everything, this part is the easiest and the funnest part of engine building.
INSTALL DISTRIBUTORYou will need to set the engine at its “Timing Mark” near Top Dead Center (TDC). This may mean rotating the CRANKSHAFT of the engine by hand, with your finger on the #1 spark plug hole, feeling for “compression pressure” from inside the cylinder. You want to set the spark to happen at the correct timing. For many vehicles, this will be around 10° BTDC. UPDATE 2020: “When you rotate the engine by hand to find TDC on compression to correctly place the distributor, that DOES NOT mean pull the pin on the engine on the stand, and physically revolve the engine in its entirety on the stand. That’s dumb. At 575lbs of top-heavy gravity-driven rotation, it will flip over really fast, with your buddy’s finger still in the spark plug hole.” ….Hopefully his finger won’t get broken. One kid wasn’t so lucky. Distributorless engines do not do this at all; it’s set.
INSTALLATION & START UPPutting the engine back in your vehicle is merely the reverse of pulling it out. If you carefully noted, labelled, recorded and photographed everything, this part is easy. There are some tips that can help you out: Take your time – as much as you did your best to keep track of it all, you will have missed something. A rebuilt engine has a lot of friction, and friction produces heat – make sure the radiator and cooling system are good enough to deal with this extra heat Hook up a complete exhaust system – if your engine is making death noises, you’ll want to be able to hear it Keep a fire extinguisher near by – you just never know Have a fully charged battery – just in case it doesn’t start right away. Have a buddy check for leaks – an extra set of eyes and ears is always good. When it comes time to start the engine for the first time, follow these tips to ensure the most success: Set the ignition timing correctly – don’t let fate decide if the spark plugs are firing at the right time or not – all you have to do is line up some marks, so set it correctly right from the get-go (if the plugs fire too soon, detonation might destroy your pistons. If they fire too late, it may run hot and burn the valves and/or pistons. No stress!) Prime the fuel system – we don’t want the engine cranking away waiting for fuel to get there Prime the lubrication system – this is easier on some engines than others, it involves driving the oil pump externally to build up oil pressure in the engine to ensure oil is absolutely everywhere Once it starts, Keep the engine running around 2000rpm for about 20 minutes. Many parts of the engine are lubricated by splash, and there isn’t much splash happening at idle, not to mention that oil pressure is lowest at idle. For an OHV engine, this part of startup is VITAL for the camshaft to break in (the camshaft is lubricated ONLY by splash). Check everywhere for leaks Shut it off right away if there is any problem If everything check ok, you are ready to drive the vehicle. There are some differing opinions about breaking in a new engine: Some people prefer driving very gently for the first 1000kms or so Some people prefer driving just like you normally drive all the time I learn how to break-in engines from a fellow who built Top-Fuel Funny Cars. This is what I do: I warm the engine right up Then, while driving, load the engine harder and harder FULL ON and FULL OFF throttle, working from low speed all the way up to redline within a few blocks of driving. Then you’re done. I want the engine to break-in NOW. Rings seal with combustion pressure, so I give them LOTS of combustion pressure to seal them. After I’ve broken it in, I’ll change the oil. I ran across THIS ARTICLE about break-in procedures and laughed to discover it was the same method I use. I met a fellow once who believed in dumping a tablespoon of Borax in the intake while sending the engine to wide open throttle for just a second. He felt the Borax helped to seat the rings instantly. I’m not sold on this idea.
ARTICLES & VIDEOS(Nice to know; not required; you will not be tested) |
||||