[ Start ] [ Wheels & Tires ] [Bushings ] [ Springs & Struts ] [ Sway Bars ] [ Alignment ] [ Drivetrain ] [ Miscellaneous ] [ Racing ]
Tachometer
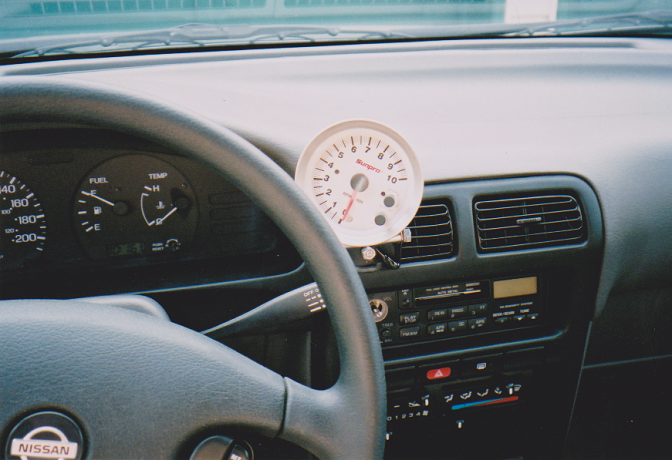
After spending many years with the Heinous Honda, I came to rely on the tachometer in my driving. The regular Sentras do not come with a tachometer, and I really wanted one, especially for racing!
I bought a Sunpro 3.5″ Performance Tachometer from Canadian Tire. This tach features an adjustable shift light, which I thought would be helpful. They also have a much larger tachometer, with an additional large external shift light, but I did not want such a large gauge, nor did I want to part with the additional $50 it cost. I can easily hook up another light if I find it necessary.
Hooking it up was a bit of a challenge. I did not want the gauge to take up my view of the road, I did not want it to block other gauges or idiot lights. I did not want to drill any holes, and I wanted whatever I did to be reversible. Turned out to be easier than I thought!
Wiring was a bit of a chore.
Tach Wiring
|
Since the horsepower of this engine peaks at 6000rpm, and since most engineers design a car such that an up-shift at the horsepower peak will bring you conveniently to the torque peak, I set the shift light for 6000rpm. This gives me a bit of forgiveness as I have until the redline of 6900rpm to decide which gear I want (or where the gear went). Fuel shutoff begins at 7100-7300rpm.
Mounting the Tachometer was creative. I decided to mount the tach vertically in front of the center left air vent. Taking the center console out, I noticed that the vents had a hole drilled longitudinally through them, supposedly for some air door? I ran a length of 1/4″ ready rod through through the holes, physically secured with nuts inside the vent.
I used 1/4″ x 3″ eye bolts, insulated with 5/16″ rubber grommets inside the eyes, through which the ready rod passed. These eye bolts passed through the vent blades, to which the bracket could be fastened.
I made up a piece of 1/8x1x2″ flat steel to butt against the vent opening, since the tach bracket was slightly smaller than the vent opening. I used “pal-nuts” to secure the mounting brackets to the eye bolts.
The tach wires were run through the vent and in behind the dashboard. Looks sweet, meets all my criteria, and is solid! Great!


Tachometer Take II (Addendum)

I ran the car with the Sunpro tachometer for three years and finally found a factory tach cluster at a wreckers in Surrey BC, the Mecca of autowreckers. I searched through over two dozen Sentra’s before I found one in a GXE. It seems these clusters are very rare.
Nissan decided in their infinite wisdom to use totally different wiring harnesses between the two different clusters. This requires you to pull the pins from all four cluster sockets, and relocate them in different socket locations. Odd.
To make this easiest, when you take a tach cluster from the wreckers, don’t leave the plugs behind – cut the wires right out of the harness and take the plugs with you. Then when you get home, you can sneak the wires out of each plug making it much easier to put in the new wires – put your wires into the now empty plugs.
Nissan Performance Magazine did a writeup on swapping a tach cluster into a non-tach car in February 2003. I followed the writeup for the first bit, and although it was very well written, there were either inconsistencies on pin assignments or I was becoming confused as I worked.
I ended up sitting in the car with the two clusters in front of me, tracing the paths of each wire in each cluster to determine where everything should go. I found this much easier than following the directions at NPM, but this might not work for everyone.
I also swapped my original speedometer into the new cluster (they are a direct swap), as I did not want to have to explain why I had changed it, and risk the suspicion that I had tampered with it. Especially since the tach speedo was 60,000km less.
A couple things to be noted: The tach wire from the ECU is BLUE with a BLACK stripe, at one end of a connector on the right side of the center console. You will have to remove the cup holder and goodie box to get at it. If you splice the end of one of the unused black (ground) wires, you can snap in the new tach lead into the appropriate cluster plug. I used Scotch Locks to splice a new wire into the ECU wire. This merely saves the trouble of running a wire up to the ignition coil as I did before.
It would be a good idea to cut the harness wrapping back from the plugs to where they all splice out of the main harness. I ended up separating them and tying them together with zap straps. There is plenty of room – they will reach.
Harness Bar
I learned from the Civic how well a good racing harness can improve your overall performance, so I made a harness bar for the Sentra.
My first harness bar for the Civic (GWI) used clevis pins, and was featured on the Heinous Honda page. Unfortunately it was too wide to fit the narrower Sentra. The second bar (GWII) dropped the bar lower about 6″, secured the shoulder straps from moving, braced the back of the racing seat and was welded solid.
This is the third incarnation of the Harness Bar, dubbed “GWIII.” I needed two requirements met.
- It had to be easily removable for back seat access
- It had to be easily manufactured, as I did not have access to metalworking tools
The brackets were made for me by a local steel fabricators for $20, and the bar I got from a local scrap metal dealer for $4. Spring clips were purchased for $1.50 /pair. The bar extends through the brackets to butt against the backside of the B-Pillar, preventing rotation in the event of an accident, and consequential loosening of the shoulder harness.
The brackets are 3/16x2x7″ steel but should have been 1-2″ longer between centres (poor measuring on my part). The brackets were bent to line up with the bar since the B-pillar is angled 20°. They also had to be tweaked about 10° axially since the shoulder strap mounts were not perpendicular to the centerline of the vehicle.
The holes were drilled for 1″ diameter 0.120″ wall tubing. If you decide to use Schedule 40 pipe (ewww), the holes will need to be drilled for the larger outside diameter.


Strut Tower Bar
The purpose of a Strut Tower Bar (STB) is to link the left and right strut mounts together to brake the chassis more rigidly, thus preventing unwanted flex and camber change in a corner. Often, an upper brace is called a “Strut Tower Bar,” while a lower brace is called a “Chassis Brace.”
Forever leery about the usefulness of a STB, I once again put my fabrication skills to the test to build one for the Sentra. Apparently these bars are much more effective on a prepared car, where the suspension has been sufficiently stiffened. Not about to pay $100+ for one, I bought some square steel tubing and angle iron for around $10 and made my own.
I made the brackets out of angle iron, cut to around 2″ in length, with a hole drilled to attach to the strut mount. I tightened them down and then placed the tubing on the intake plenum to decide how much clearance I wanted, and where to place the angles. I cut slots in the bar so I could bend the ends down to meet the brackets.
With a bit of fiddling I could clear both the engine and the hood. When I was happy, I welded the slots up solid, and welded the ends to the brackets. I added two angled braces to support the bar, and hopefully strengthen the inherent weakness generated by the angled ends.
In retrospect, I should have attached those farther inboard, so as to better triangulate the bar for more rigidity. It don’t flex though.
Did I notice a difference? Yes (hesitantly). It seemed somewhat more crisp on turn-in, but it wasn’t a jaw-dropping performance gain. Could I live without one? Yup.


LOWER
A significantly better solution is a lower control arm brace, as Nissan put very little reinforcement there. The control arm brackets are tabs that hang down below the chassis, with little (if any) support. I fabricating a lower brace (illegal in Super Stock rules to have more than one brace at one end of the car), tying it into the lower crossmember with a U-bolt.
The difference the lower brace made was huge. Jaw-dropping performance. I had to re-learn the car, and change my tire pressure settings. The front just stuck and I was fighting oversteer again. Astronomical. This is well worth the money.


Lower Chassis Brace Take II (Addendum)
Sadly, a brace that ties into the crossmember is not legal in F/SP rules. Also, the thickness of the mounting tabs I made, removed the “centering” feature of the shouldered control arm bolt. This allowed me to pry the control arms outboard a bit for a bit more negative camber and a bit wider track. At least, that it, until they slip. I made a new brace that mounts on the back side of the subframe ears, and is straight tube. Legal, if not a tad bit less effective. Alas, I cannot find an image.
REAR
A fellow in the states sat down and designed a simple rear strut tower bar, since there wasn’t one available on the market anywhere. He made his template available (shown below), be sure to print full-size.
The brackets are made from 3/8″ steel plate, and the bar is 1″ square tubing. The seat hooks need to be trimmed to clear the bar.
I have read a lot about the B13 chassis being relatively flexible. Whether it is or not I really can’t tell. In watching video of my Sentra autocrossing, there is a fair bit of movement in the rear suspension – some unusual camber changes happening. This may be due to flex of the chassis, or compliance in the upper strut bushing.
Huge gains? Nope. The car might be a bit more solid feeling, but again, not a life changing modification.


Print FULL SIZE
Shifter Bushing
When I installed the Polyurethane Bushings, I did not install the included shifter bushing because when I did that in the Civic, the shifter became very buzzy and uncomfortable – you could feel virtually every movement of the motor through the shifter. I didn’t like it at all.
The general opinion on the various Nissan forums indicated that this bushing was the absolute best purchase they had ever made for the car, and that everyone should do it. I was leery. Especially since an unfathomably large number of people’s opinions out there don’t amount to much when all the hype is removed. I even asked one guy to describe the difference the bushing made, explaining my hesitation to change the bushing. He said (and I quote) “It’s like night and day.” Thank you Mr. Intellectual. Next.
After another year of thinking about it and reading comments lacking any empirical analysis whatsoever, I finally decided to break down and try it. I’ll keep the old bushing in case I don’t like it.
The bushing was changed in less than half an hour. This is my analysis:
The bushing dramatically reduces the “mushy” feel of the factory shifter. There is no increase in noise, vibration or harshness coming through the shifter, although you can feel the detail of the synchros and all inside the transmission. The shifter feels very precise and solid, with no “am I there yet?” when shifting. I had found with the original bushings, that my hand would move the shifter to where it should be when it’s in gear, and my brain would tell my foot to let out the clutch, but the transmission wasn’t finished yet because of the springiness of the bushing, and I would grind gears as the synchros were not done. I am anticipating that this mistake would be reduced, but at the time of this writing it is too soon to tell.
In essence, it is a worthwhile change, with no ill effects, unlike others I have done.

Conclusion
There are a number of conclusions I have drawn about the finished product (still growing).
- Bushings were a fabulous purchase, despite needing greasing every 15,000kms
- Off-the-shelf lowering springs tend to be too low and too soft. This can actually degrade handling
- Spring rates and ride height must be properly chosen for best results
- Struts must be very firm in rebound, fairly soft in compression for best handling and ride
- Rear sway bars are totally awesome
- Camber still eats tires
- MacPherson struts are not the best for a competition vehicle
- Front wheel drive is not the best for a competition vehicle