
[ Heinous Honda ] [ Suspension ] [ Drivetrain ] [ Miscellaneaous ] [ Racing ]
Transmission
I knew about weak transmission input shafts from the early Civics (especially when swapping in bigger motors). I didn’t think that I would be wrecking one this new.
After my first race, everything was fine, but one month later I was driving my folks out to see my new house and my car began making odd noises. At first I thought it was another bad Constant Velocity (CV) joint (I’ve gone through three in one year), but it didn’t show the right symptoms of a CV. After much discussion with a few friends and colleagues and a number of test drives, I believe that I may have chipped a tooth on the input shaft and/or ruined the input shaft bearing. Another possibility (although I am not sure yet) is that I may have chipped a spider gear in the differential.
I picked up a used 5 speed for $300 and installed it with the intent to keep the costs down. A Civic Si transmission has a steeper final gear, which would give me quicker acceleration, however they are not at all easy to find in Canada. The Integra transmission has closer ratios, and a deeper final gear, but will not fit the 1500cc engine. Figures. Once I got the thing apart I found that I had to replace the entire clutch assembly. I bought a “Honda” clutch because I am not very good at getting jobber clutches to work nicely. This one was really nice – no “chatter!” In replacing the clutch, I ruined the shifter linkage and stripped three bolts. Funny how a simple assignment never works out to be simple. At least it works now, and feels just like new…
I believe that I wrecked the transmission because I downshifted to first to exit corners. That, coupled with some relatively wide and sticky tires, has produced more strain on the drivetrain than was intended. As my saying goes: “If you don’t break traction, you’ll break something else.”
Short Throw Shifter
For traditional domestic transmissions, we used to run out and buy a “Hurst” shifter. These aftermarket shifters would shorten the shift-lever distance between gears, theoretically reducing the time shifting, and thus making your car faster. In the import world, such a thing did not exist until recently, and at $100+, too steep for my stingy wallet.
The theory behind a short shifter is simple levers. A standard import shifter is mounted to the floor by a spherical pivot. This allows smooth, easy motion in any direction for any gear. A long lever arm extends into the passenger compartment, while a shorter arm extends beneath the vehicle to actuate the transmission shifter rod.
A change in length on one end of a lever will change both mechanical advantage and speed (they are inversely proportional). By shortening the “shifter-side,” we gain shifting speed at the expense of mechanical advantage. The same is true if we lengthen the “chassis-side” of the shifter. Since lengthening the chassis-side would be less noticeable and keep the shifter knob at a nice hand-height, I got out the hack saw.
After removing the shifter from the car, I cut off the bottom of the shifter and welded in a section of steel pipe, re-locating the bottom about 1″ or so longer.
After re-assembly, first gear was almost where neutral was, and second gear was a bit closer to neutral. In shifting, you need only move your fingers or (as in the higher gears) your wrist, not your whole arm. It is, however, much more difficult to shift because it is at a reduced mechanical advantage so you must work harder. As in life, everything is a compromise.
Axles
When I first bought the car, it needed a driver’s side constant velocity joint (CV joint) really badly. I bought a “re-manufactured” axles from a reputable auto supply store, which began clicking within one year. I took it back for warranty, and it began clicking again within one year. I took it back for warranty again, and the supplier (out of frustration) replaced it with a new axle, which has had no problems so far.
Shortly afterwards, the passenger side axle began clicking, so I replaced it with a “re-manufactured” axle from a different supplier, who assured me that his supplier made far superior axles. It began clicking within three days.
I have learned to never replace the entire axle, even though you think you’re getting a good deal. Go to the dealer, and buy a replacement end. Don’t mess around.
Incidentally, Honda has a recall on right side axles. You might want to check into it if yours is clicking.
Exhaust
When the exhaust fell off, I went to a muffler shop and asked for 2″ pipe front to back. The salesman tried to dissuade me, but that was what I wanted, and he begrudgingly took my $350. The results, however, were awesome. The flow of the system is much better, the exhaust note is deeper, and more throaty (not flatulent like these sporty mufflers with the dinner-plate sized tailpipes), and the car seems more responsive.
Unfortunately since the factory pipe was much smaller (1 5/8), I lost the flexible joint, which isolates the exhaust from the vibrations of the motor. Every six months the welds would break and the pipes fall off at the header. That’s loud! The header down pipe split in two, which required re-welding, and worked fine until the vibration broke the studs off and the header down pipe fell off at the manifold. That was repaired with new studs and then another section of pipe had sheared itself free. I finally broke down and bought a braided stainless flex joint – $110, which was torn off when I accidentally drove over a curb….
After having driven the car for a year with the over-sized exhaust, the car has nice upper-RPM power. The camshaft is (apparently) ground more for torque than horsepower, and I’m wondering if I am feeling the car want more cam. It feels like it wants to go faster, that it has the capability to do so, but is running out of breath. It’s hard to describe, but that’s what I feel. Perhaps a traditional cam, carb and header trick?
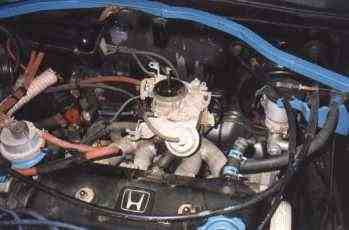
Weber
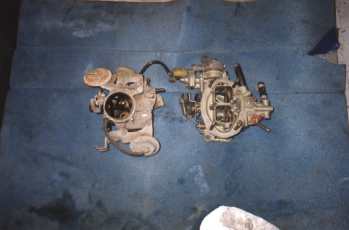
One modification I undertook was to adapt a Weber 32/36 2-barrel progressive carburetor These are the carbs that never run right on a Pinto/Vega/Omni/K-Car/Rabbit, but once they are properly set up they serve very well. They flow good enough for a 2.0L, and should be fine on a 1.5L. These are the same carbs that are often used in the aftermarket on 510s and Beetles.
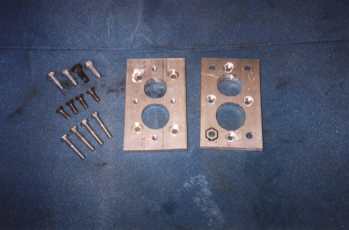
No one sells a manifold or a manifold adapter to run such a carb, so I prototyped a design. My prototype was computer designed (which doesn’t necessarily mean it’s any good! Computers just do what you tell them – it’s you who ultimately makes the design). This first design used 3/8″ aluminum plate, and offset studs. Although in theory it should work, I wasn’t totally happy with the finished product.
The second design used two plates: One plate fastened to the manifold with countersunk screws. The second plate had counter sunk bolts as well (sticking up to mount the carb) and was bolted to the top of the first plate using (again) countersunk screws. This much height made it easy to gently taper the throttle bores into the factory manifold. I wanted to make it easily reversable, in case I fail AirCare, or decide to sell the car.
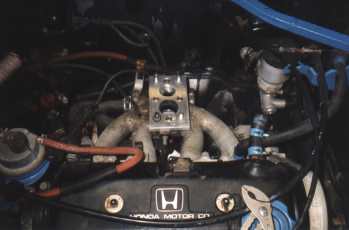
I bought a second factory air cleaner housing, cut out the inside and hammer-formed a new piece to fit the air horn of the Weber, yet use the “stock” air cleaner housing.
With the second adapter design, the car feels only slightly quicker in acceleration. It also sounds different – more like the air-sucking sound of a Rochester Quadrajet. With time spent to properly tune the carb, I’m sure it will be very enjoyable.
Ram Air Intake
Cold air intakes are another gimicky item people always seem to buy for their cars. There’s nothing to them really, so I decided to make my own.
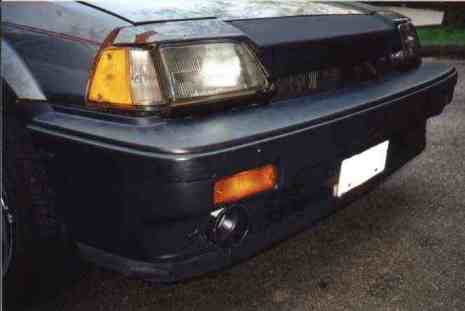
The factory air inlet is right behind the right front corner light. Not much air can get in there, so I bade one out of 2″ ID PVC Electrical Conduit tubing that would draw cool air from the front of the car. The tubing ran from the (shortened) factory snorkel to the PVC tubing down to a hole in the bumper below the passenger-side signal light. I cut a hole to fit a 3-to-2″ reducer, so as to “funnel” the air into the tube.
The theory behind this gizmo is this: Since an engine needs oxygen to help burn the fuel, if we can provide more oxygen, we should be able to burn more fuel, and thus go faster. The engine will draw in a set amount of air – this is determined by the displacement of the engine. If we could have more oxygen molecules in that air, we would have, in essence, more oxygen. If we cool the air, the molecules get smaller, and thereby take up less space. In the same volume of space, there would be more oxygen molecules. Since the Engine will still draw in the set amount, more oxygen molecules will be drawn into the engine! Facing this inlet into the wind should also ram even more air into the engine. Sounds reasonable – does it work?
The first thing I noticed was nothing. There was no difference in bottom end power. Out on the highway however, There was a noticeable improvement. I’m not talking a tire-scorching performer, but it was indeed noticeable. The car required less pedal to go the same speed, and seemed to pull better in fifth. Recently I got 40 mpg on the highway (not the 55 mpg I was used to in the Firefly, but better than the 5 mpg in the Vega).
Don’t bother removing the little plastic deflector inside the air cleaner housing. Removing it creates a horrible cyclic drone on the highway at about 120km/h. I found no difference in power from removing it. (…and a good thing I kept it.)
Camshaft
Colt Cams in Langley BC can grind a good street grind for this engine. About 270°/274°, 2800-6500 rpm.
Ignition
The original plug wires had started to die, so instead of some cheap-o replacements, I bought a set of 8.5mm Jacobs plug wires, in a custom do-it-yerself kit. Nice kit. Very easy to assemble, and they seem to work well. The only complaint now is that I hear the plugs firing on the radio when it’s wet outside or the car is cold. I also discovered that my ignition interferes with television reception. Sorry.
Over time, the Jacob’s wires seem to be deteriorating. There is a lot of corrosion at the plug connection, and they feel “sloppy.” I might try a different brand once these finally die.

In the meantime, I installed an Accel Super Coil (Part Number 140008). The installation was somewhat tricky as Accel only lists Ford and GM applications for this coil. I was not deterred.
![]()
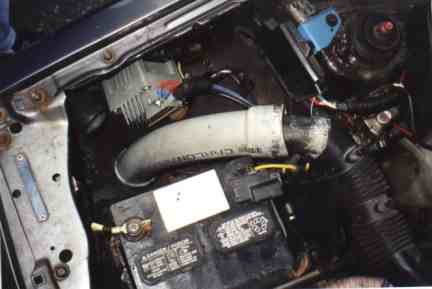
The 86-87 Civic has an ignition coil which appears to have more than the standard primary and secondary windings. There are TWO sets of Blue and Black/Yellow wires to TWO sets of connectors on the Honda coil, both of which need to be hooked up for the car to run. The wiring diagram was not helpful in telling me why, but I figured that since the resistance between the two terminals was minimal, and the wires were indeed the same colour, I could probably join them together to run a “normal” coil. I did so and tried it out.
It worked! A substantial gain in performance? Nope.
For the past few years, I have been running with the ignition advanced a few more degrees than the factory settings. This is an old hot rodder trick to get more power. Lately I did some actual testing to see if there is a difference. Guess what? Autocross times did not deteriorate with factory timing, idle speed was smoother and quieter, fuel economy increased from 320 km per tank to 400 km – same driving style, and power is no different. It’s not worth it to advance the timing. In fact, I met a guy who raced these 3G Civics in showroom stock road racing, and he said that in all their testing, they ran fastest with factory timing. I guess Honda knew what they were doing.
Big Brakes
With the popularity of large, open custom wheels came the appearance of the brakes. Many people paint the calipers and cross drill their rotors, while others spend the bucks for a “Big Brake Kit.” Unfortunately, once again the aftermarket is a little shy with the 84-87 Civic. I was, however, surprised to find that Honda has some interchangeability between their various models. Lucky for us, we can use some components from newer (or in the case of the Integra, different) cars.
The 3G civic comes with Front Brakes consisting of 9.2″ vented rotors, and a caliper consisting of a 94mm long pad, and a 48mm piston. There are two methods of upgrading that I have done so far:
- 88-89 Civic DX or Si 9.4″ rotors
- 88-89 Civic DX or Si calipers (113mm long pad and 48mm piston)
- 86-89 Acura Integra 9.4″ rotors
- 86-89 Acura Integra calipers (110mm long pad and 51mm piston)
These brake swaps DO work, I have done both Civic Si and Integra parts. If you can pull a caliper and a rotor off a car, you gots da skills. It is a simple bolt-for-bolt swap.
Huge difference in braking? Pretty much. It has noticeably better stopping power.
The 3G Civic comes with Rear Brakes consisting of 7 1/8″ rear drums. I have purchased the complete rear 8 1/4″ drum assembly from an Integra RS, but never swapped it (one rusty bolt wouldn’t come undone).
I have read of others swapping in the rear discs from an Integra, but I won’t be doing that swap any time soon. I am not convinced that they will stop significantly better than the drums. I know they won’t fade as easily, and apparantly they are easier to “modulate,” but it’s a lot of work, some extra weight, and I don’t think the gains are significant. Mind you, I might swap them anyway in a couple of years, just for the sake of doing it….