Body Chassis Drivetrain |
Electrical Interior MegaSquirt |
First Drive Racing Media Daily Driving |
Body
At the time I started this project there were a few suppliers, most notably “Champion Motor Cars” (CMC), supplying fibreglass for the Locost industry. In the UK, most folks were buying reproduction or original Lotus 7 parts and modifying them to fit. As of this writing, there are many suppliers in the UK who build fibreglass to fit the Locost chassis. In North America, where the Locost scene is just beginning, there aren’t so many.
I really wanted clamshell fenders, and though CMC offered clamshells, they (CMC) fell into some difficulty and disappeared.
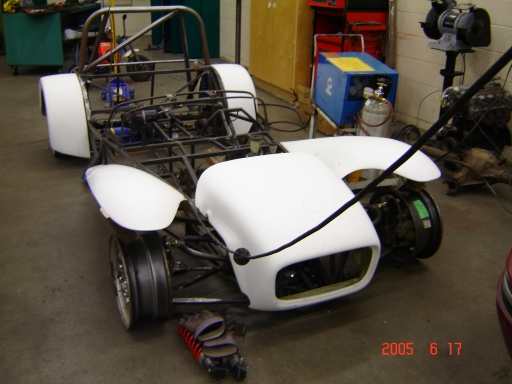
Dennis Ortenburger (author of several “Lotus 7″ books) bought a set from Curtis Unlimited out of northern California. The cool thing for me was that Curtis offers widened clamshells, a variety of fender widths, and a number of noses, including a taller version of the S2 nose. For about $500 I was able to get 10″ wide rear fenders, widened clamshells, and the 1.5” taller nose. A very pleasant company to deal with, too. Very personable! Sadly, they have NO website, but can be contacted through curtisunlimited@aol.com or by calling 707-443-8523 and talking with Bert or Faye.

1.5″ taller nose, widened clamshells

10″ wide rear fenders
The quality of the fibreglass is reasonable. You may need to do some finishing before paint, but I take that to be expected with fibreglass parts. There were numerous small voids and pinholes, and a bit of wavy-ness. I painted it “Resale Red” (’86 Corolla “Bright Red” code 3E6) with PPG’s Imron Acrylic Urethane Enamel
I was unable to satisfactorily shape some aluminum fender guards for the leading edge of the rear fenders as they seemed to have a compound curve that I lacked the skills in shaping. I tried “mirror” sticker material, but was unhappy with the results. I then tried a can of Plastikote truck box liner in a spray bomb. I followed the instructions to the T, and the coating still wrinkled like a 90 year old Arizona ski bunny. *sigh* It’ll do.

Spray bomb box liner (complete with splattered bugs)
Bimini Top
My friend Gord used to run an upholstery shop, and fabricated up this nifty top for the car. It attaches to the windshield with a bent 1/2″ aluminum rod that hooks onto the bottom of the windshield frame, and attaches to the roll bar with two snaps, an elastic cord, and two adjustable nylon straps. It works really well! Though a touch hard to get in and out of the car….

Gord’s Bimini Top – nice!
Aluminum
18ga aluminum sheet was purchased used from Knox Mountain Metal at $2 a pound. Approximately $100 was used. The floor was 14ga aluminum sheet, cleaned up with a wire cup on a Princess Auto which burst into flames. The best tool I purchased for the skinning was an air rivet gun from The Tool Place. I riveted with Avdel 3/16 aviation rivets spaced 1″ apart on the sides and transmission tunnel, 2″ apart on the rear bulkhead. All panels were also secured with Sikaflex purchased at Trailer Master.
The body panels were wet sanded to a satin finish. While I know it will dull over time, I am not interested in spraying a clear only to have it peel off and look worse than dull aluminum….
Knox Metal didn’t have any pieces big enough for the hood or rear panel – the pieces I had to do next. My father bought me a 4×8′ sheet of aluminum from Millenium Alloy for Christmas. But, possibly due to the changes I made to the chassis, the sheet could fit the rear panel, or the hood, but NOT both. Nice. I ended up messing up the first rear panel, so the sheet wasn’t a complete waste. I’m getting better at working with tin, but I’m not neccessarily enjoying it (grin).

Popping rivets into the floor with an air-rivet gun (money well spent)

A finished side panel

Progress on the frame

The tranny tunnel – the top is held down with screws

Scuttle version 3

Firewall, steering shaft fit (close), engine placement

Why make it once when you can make it twice (or even thrice!)?