Building a V8 Vega
About a year after I had built and sold my V8 Pinto Wagon, I found it again driving around in Salmon Arm, BC. The new owner had begun painting it, had installed the 9″ differential, and had also done some minor repairs. Unfortunately, I fell in love with it again.
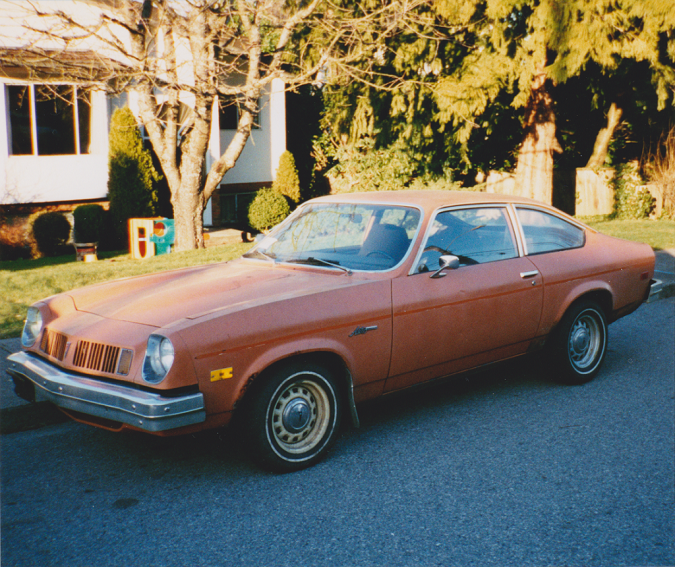
Instead of running out and buying a fourth Pinto (gasp!), I found a ’75 Pontiac Astre (Chevy Vega Clone) for sale in the Buy & Sell. It had a Very tired 283, and a four speed. It was a faded, rusty orange, and looked almost as sad as it was. The ad said “needs TLC.” When you read that, believe it.
Yeah, I know, it’s an Astre.
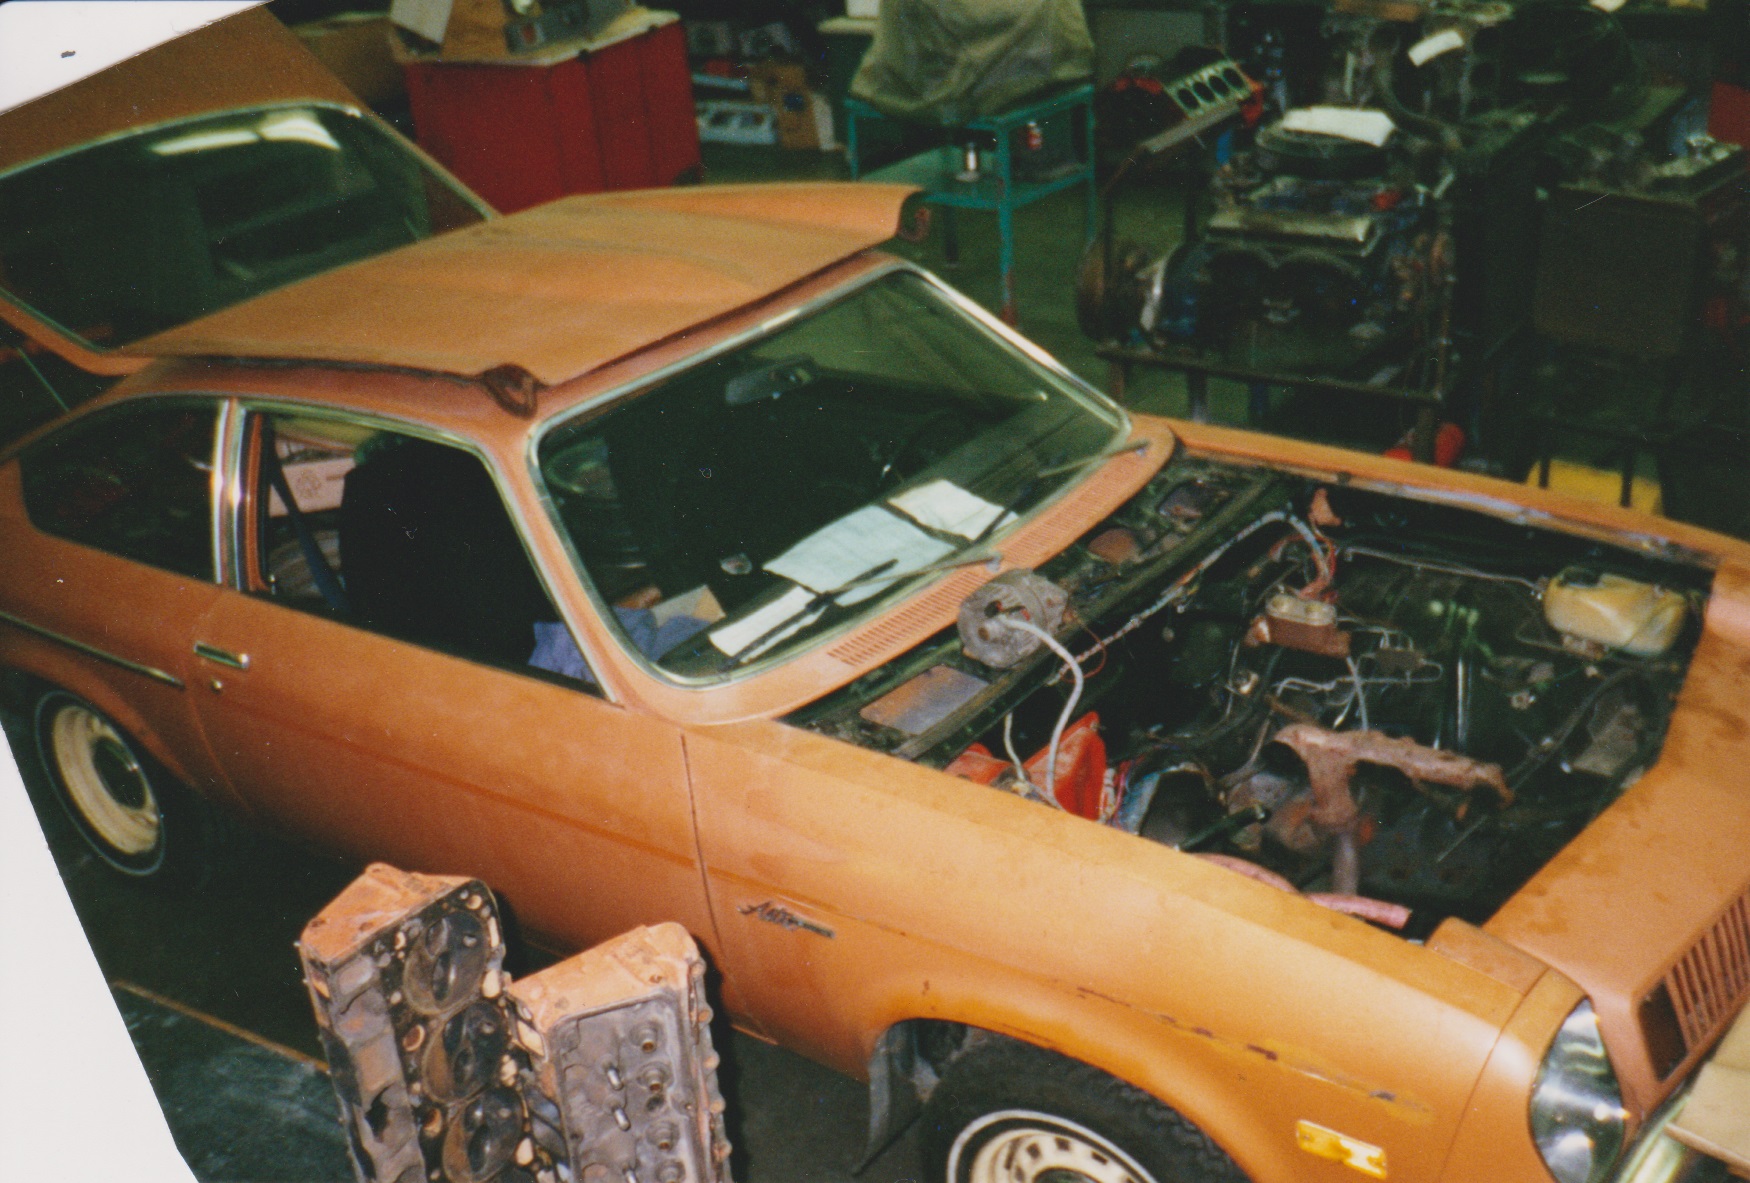

350 4-bolt LT-1 block, Isky 270 Mega cam, Offenhauser manifold and Rochester Quadrajet. Saginaw 4-speed and stock rear end.
Engine
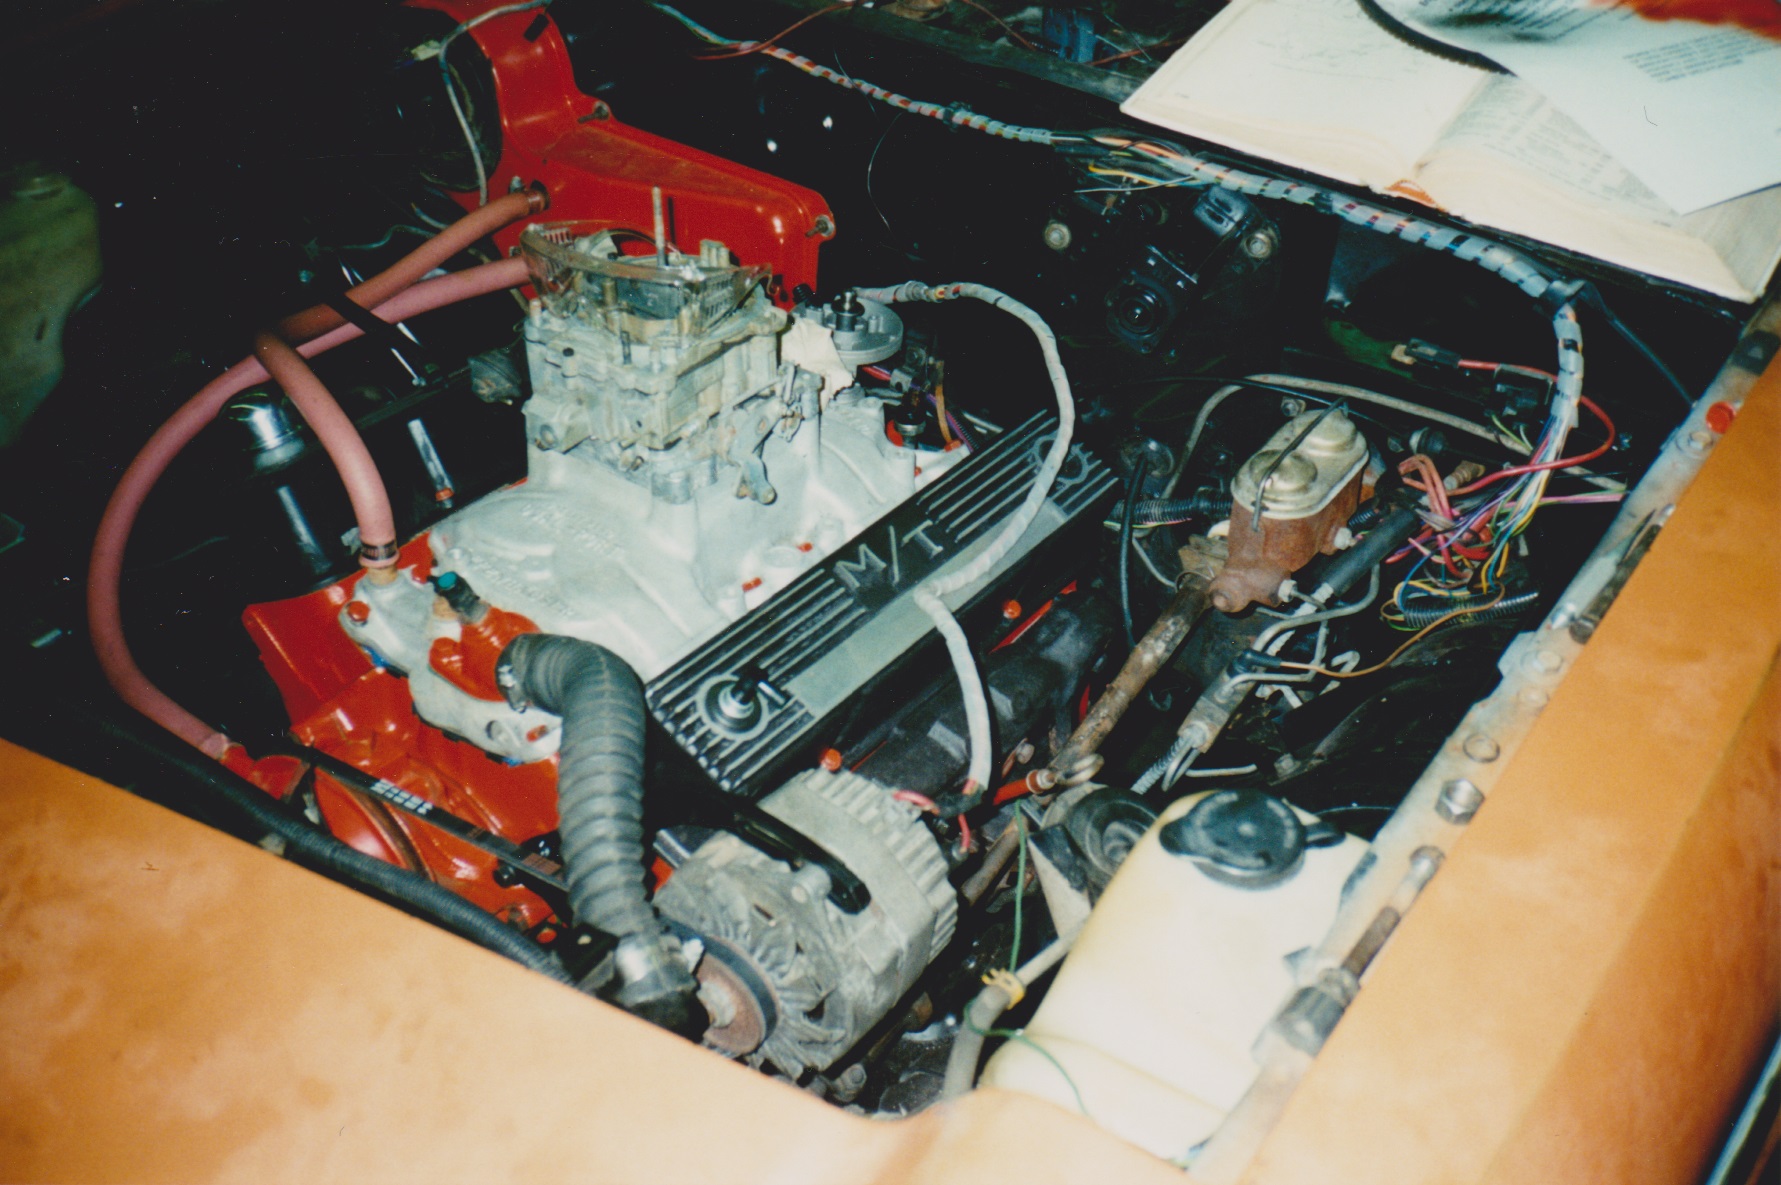
I was in college again, and brought the Vega to school. I did a compression test, leakdown test, and emissions test, and then yanked the 283. I found a four-bolt 350 (3970010 casting), with “882” (1.94) Heads and an Offenhauser Dual-Port highrise manifold for a case of beer. It was already bored .030, the crank was turned .010/.010, and I just freshened it up with new rings and bearings. I chose an Iskenderian Racing Cams 270° Mega Cam, because these grinds use more overlap than others – this improves mid range torque, at the serious expense of idle quality (a 280 would have been better, but I bought the 270 with the intent of using it in the 283, but the 283 was pooched). I doctored a Rochester Quadrajet as shown in a Chevy Hi-Performance magazine, put in a new clutch, machined the flywheel, and squeezed it back into the Vega.
Mounts
The original V8 had been installed using V8 Monza mounts, manifolds and oil pan – a lesson I learned in doing V8 Pintos (use factory parts!). Since all the parts were there, I was pretty pleased. The motor was plumbed through the original catalytic convertor, and single exhaust. Since I was on the cheap, I kept those.
Cooling
A fellow by the name of Robert Herndon sent me an email outlining how to keep a V8 Vega cool.
| I have built V8 Vega’s for over 20 years now, first starting when the cars were almost new. I felt compelled to tell you the tendency of these cars to run hot is not inherent to the confines of the engine compartment or any other design flaw.The correct combination will yield temperatures in the 175° to 185° range on a typical 100° day and never more than 190° even while idling in 100° ambient temperatures.
The solution is to block the thermostat bypass opening on the water pump and add (2) 1/8″ vent holes in the Robertshaw 330-160 (160°) thermostat. Additionally, 3 and 4 row radiators will not help to cool these engines because there is no room to place an adequate fan behind the radiator. The solution here is a 15″x21″ V8 Monza 2 Row Radiator with a constant-pitch Monza 7 Blade Engine Driven Fan resting inside a V6 Pontiac Sunbird Radiator Shroud. The only modification required when using these parts is the construction of a pair of drop brackets to lower the stock vega radiator mounting points 3″ overall. Everything else is a bolt-in affair. I thought I would also mention that many people overlook the success of the V8 Monza when trying to address their own cooling system problems. V8 Monza’s had a unique ‘short’ water pump with a high-flow impeller that differs from the standard GM Short (Early) Water Pump. V8 Monza’s also used a special water pump pulley that was over 2″ smaller in diameter than the crankshaft pulley to speed up coolant flow and cooling fan rpm. Another lesson to be learned from the V8 Monza is radiator surface area. So many V8 Vega’s I see suffer from overheating problems and in almost every case, a 3 or 4 row radiator is used with a very dense (14-16 fins per inch) fin count. While high fin counts do offer more contact area, they are also more restrictive to airflow and more susceptible to plugging with debris. The V8 Monza with A/C used a 2 row radiator with a very ‘loose’ fin count to promote airflow. The main reason for the thinner 2 row core was it allowed room to install a very large 7 blade (17″) fixed-pitch cooling fan. Most V8 Monza’s did not have a fan shroud and only those with ‘Heavy-Duty Cooling’ were so equipped. In short, many enthusiasts overlook these simple, proven techniques successfully employed by GM Engineers in the construction of the V8 Monza. I hope this information is helpful…Robert |
Suspension I – Factory
Now, since the main swap had already been done, I had the joy of discovering the weakness of Vega bodies.
This is where geometry becomes helpful.
The factory early Vega rear end is a four-link. Two lower control arms, and two upper control arms. The geometry was such that when power was applied, the suspension would react by lifting the axle off the ground. The reaction of the body to this was to “squat.” When an abnormally large amount of power is applied, when the axle lifts, the wheel spins. When the wheel spins, the axle is unloaded, and drops down. The cycle repeats, and “wheel hop” is the result. Very violent wheel hop. Wheel hop isn’t the same is losing traction, and “If you don’t break traction, you’ll break something else.”
I broke something else.
Suspension II – Modifications
The left-side lower control arm ripped itself free from the frame after a hot-rodding session out to the Burger King in New Westminster. The back end became quite soft, and started pointing in different directions. I babied it back to the shop, and tried to figure out what to do next.
I modeled the suspension1 out of cardboard, and I was able to clearly see how the suspension was reacting. I didn’t want to repair the damage only to have it happen again, so I modeled a new rear suspension that changed its geometry.
I removed the upper control arms, and I bolted 1/4″ steel plates in the floors, onto which I welded brackets for ladder bars. I fabricated ladder bars, welding them to the rear axle. I triangulated the bars to I wouldn’t need a Panhard rod, and I left the lower arms attached.
Now when the car was under power, the axle would react in such a way that it would push the wheels against the ground. This in effect raised the back end under power. Immediately I could no longer get four gears of rubber. Traction was greatly increased, and the car really hooked up and went! But as the saying goes, “if you don’t break traction, you’ll break something else.”
I broke something else.
Body
Actually it didn’t get that bad. The rear suspension was so much better, that the force of acceleration was transmitted to the rest of the body. After a while, the doors wouldn’t open, because the body had been “tweaked” by engine torque.
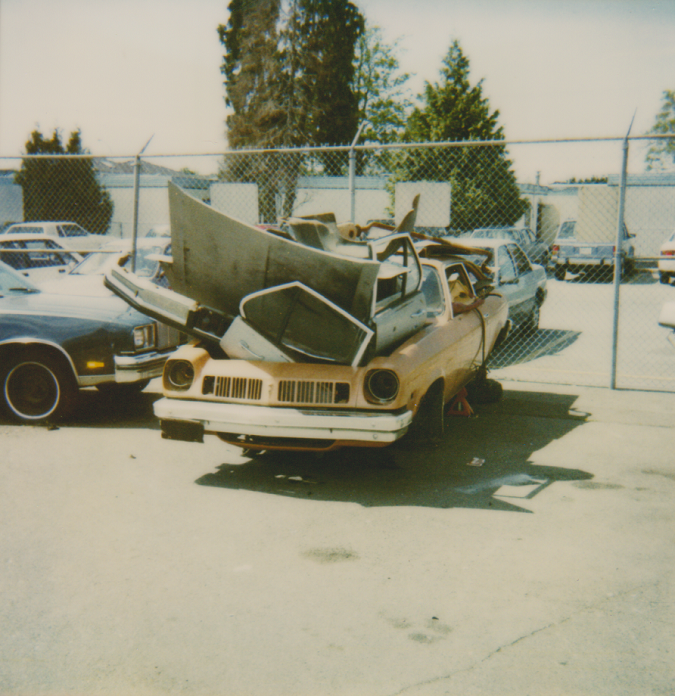
I stripped the car and sold all the parts. I didn’t like it as much as I liked the Pintos. It was a beast to drive. Incredibly fast, but it didn’t steer or stop well at all.
The moral of the story: Don’t buy a rusty car.
Recommendations
What would I do differently? Headers. The factory Monza manifolds are really restrictive. Automatic transmission. The standard takes too much work to drive, puts too much shock on the body, and requires more concentration for that extra pedal as you slide sideways into the ditch. And Vegas seem to be really rusty. I haven’t found one yet that wasn’t half eaten with cancer.
Really though, I wouldn’t do another Vega. Just doesn’t float my boat. However, check out Dave’s Vega Village in Anmore, BC.